Dell PowerEdge 4600 Rack-to-Tower Conversion Guide - Page 17
Removing the Slide Assemblies
 |
View all Dell PowerEdge 4600 manuals
Add to My Manuals
Save this manual to your list of manuals |
Page 17 highlights
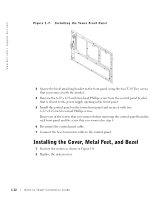
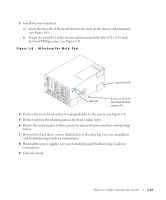
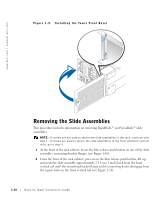
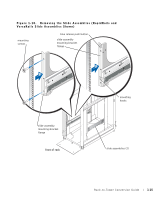
www.dell.com | support.dell.com Figure 1-9. Installing the Tower Front Bezel Removing the Slide Assemblies This procedure includes information on removing RapidRails™ and VersaRails™ slide assemblies. NOTE: If screws are not used to secure the slide assemblies in the rack, continue with step 1. If screws are used to secure the slide assemblies to the front and back vertical rails, go to step 4. 1 At the front of the rack cabinet, locate the blue release push button on one of the slide assembly's mounting-bracket flanges (see Figure 1-10). 2 From the front of the rack cabinet, press in on the blue release push button, lift up, and push the slide assembly approximately 2.54 cm (1 inch) back from the front vertical rail until the mounting-bracket flange and its mounting hooks disengage from the square holes in the front vertical rail (see Figure 1-10). 1-14 Rack-to-Tower Conversion Guide
-
 1
1 -
2
-
3
-
4
-
5
-
6
-
7
-
8
-
9
-
10
-
11
-
 12
12 -
 13
13 -
 14
14 -
 15
15 -
 16
16 -
 17
17 -
 18
18 -
 19
19
 |
 |
