Dell PowerVault 110T DLT VS160 Dell PowerVault 110T DLT VS160 Tape Drive - Use - Page 20
Indicator Activity During Normal Operation - Fault/Clean/Media LEDs, Unload/Eject Button Features - firmware
 |
View all Dell PowerVault 110T DLT VS160 manuals
Add to My Manuals
Save this manual to your list of manuals |
Page 20 highlights
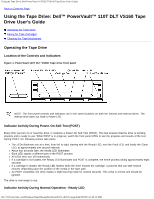
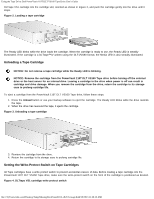
Using the Tape Drive: Dell PowerVault 110T DLT VS160 Tape Drive User's Guide When the PowerVault 110T DLT VS160 Tape drive is in use, the Ready LED indicates the three states detailed in Table 1. The Ready LED operates independently of the other three LEDs. Table 1. Ready LED activity and drive status Ready LED Activity Drive Status Off No power to the drive On Power is on; no cartridge loaded or a loaded cartridge is idle with no tape motion Blinking The drive is loading a cartridge or a loaded cartridge has tape motion indicating read, write, seek, rewind, calibration, or other cartridge activity Indicator Activity During Normal Operation - Fault/Clean/Media LEDs The Fault, Clean, and Media LEDs indicate the status of the drive. Note that the LEDs can indicate more than one of the indicated operating conditions simultaneously. For example: If cleaning is required while a DLT1 format cartridge is loaded, both the Clean and Media LEDs are on If an internal write/read diagnostic fails as a result of a permanent write error, both the Fault and Clean LEDs blink slowly. Table 2 describes what each front panel indicator means. Table 2. Fault/Clean/Media LED activity and drive status Indicator Activity Operating Condition Fault Slow Blink (1x per second) User initiated write/read diagnostic failed Fast Blink (3x per second) Servo or mechanism error On Internal firmware error Clean Slow Blink (1x per second) Calibration error or permanent write/read error Medium Blink (2x per second) Cleaning in progress On Cleaning required Media Slow Blink (1x per second) Unsupported format, or damaged or unsupported cartridge type inserted into drive On DLT1 format DLTtape™ IV cartridge loaded See Troubleshooting the Drive in Troubleshooting for more details on error conditions. Unload/Eject Button Features The Unload/Eject button provides features in addition to unloading and ejecting a cartridge. To activate one of these features, press and hold the Unload/Eject button for the amount of time specified in Table 3. Release the Unload/Eject button when the desired LED sequence is displayed. If you do nothing for 15 seconds after accessing any of the additional features that require an action, such as loading a cartridge, the drive returns to normal operating mode. NOTICE: The Unload/Eject button features indicated by an asterisk (*) in Table 3 overwrite all data on the cartridge loaded in the drive. Use extreme caution when accessing these features to avoid loss of important file:///C|/Users/rishi_sood/Desktop/Temp/MissingDocsPosted/110t_dlt/UG/usage.htm[3/8/2013 11:46:13 AM]
-
 1
1 -
2
-
3
-
4
-
5
-
6
-
7
-
8
-
9
-
10
-
11
-
12
-
13
-
14
-
 15
15 -
 16
16 -
 17
17 -
 18
18 -
 19
19 -
 20
20 -
 21
21 -
 22
22 -
 23
23 -
 24
24 -
 25
25 -
26
-
27
-
28
-
29
-
30
-
31
-
32
-
33
-
34
-
35
-
36
-
37
-
38
 |
 |
