Dell XPS 630 XP Service Manual - Page 37
card's cable connections., Replace the screw to secure the card to the chassis.
 |
View all Dell XPS 630 XP manuals
Add to My Manuals
Save this manual to your list of manuals |
Page 37 highlights
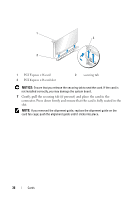
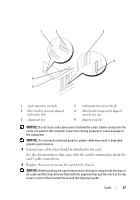
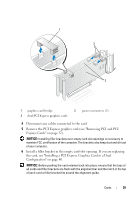
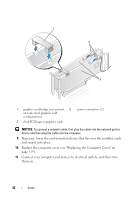
1 2 3 4 6 5 1 card connector (seated) 3 filler bracket properly aligned within the slot 5 alignment bar 2 card connector (not seated) 4 filler bracket improperly aligned outside the slot 6 alignment guide NOTICE: Do not route card cables over or behind the cards. Cables routed over the cards can prevent the computer cover from closing properly or cause damage to the equipment. NOTICE: An incorrectly attached graphics power cable may result in degraded graphics performance. 8 Connect any cables that should be attached to the card. See the documentation that came with the card for information about the card's cable connections. 9 Replace the screw to secure the card to the chassis. NOTICE: Before pushing the card retainer back into place, ensure that the tops of all cards and filler brackets are flush with the alignment bar and the notch in the top of each card or filler bracket fits around the alignment guide. Cards 37
-
 1
1 -
2
-
3
-
4
-
5
-
6
-
7
-
8
-
9
-
10
-
11
-
12
-
13
-
14
-
15
-
16
-
17
-
18
-
19
-
20
-
21
-
22
-
23
-
24
-
25
-
26
-
27
-
28
-
29
-
30
-
31
-
 32
32 -
 33
33 -
 34
34 -
 35
35 -
 36
36 -
 37
37 -
 38
38 -
 39
39 -
 40
40 -
 41
41 -
 42
42 -
43
-
44
-
45
-
46
-
47
-
48
-
49
-
50
-
51
-
52
-
53
-
54
-
55
-
56
-
57
-
58
-
59
-
60
-
61
-
62
-
63
-
64
-
65
-
66
-
67
-
68
-
69
-
70
-
71
-
72
-
73
-
74
-
75
-
76
-
77
-
78
-
79
-
80
-
81
-
82
-
83
-
84
-
85
-
86
-
87
-
88
-
89
-
90
-
91
-
92
-
93
-
94
-
95
-
96
-
97
-
98
-
99
-
100
-
101
-
102
-
103
-
104
-
105
-
106
-
107
-
108
-
109
-
110
-
111
-
112
-
113
-
114
-
115
-
116
-
117
-
118
-
119
-
120
 |
 |
