Dell XPS 720 Owner's Manual - Page 117
Installing a Floppy Drive
 |
View all Dell XPS 720 manuals
Add to My Manuals
Save this manual to your list of manuals |
Page 117 highlights
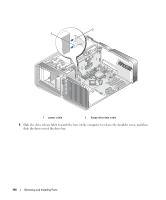
1 2 1 drive release latch 2 floppy drive 6 Replace the drive panel (see "Replacing the Drive Panel" on page 114). 7 Replace the computer cover (see "Replacing the Computer Cover" on page 159). NOTICE: To connect a network cable, first plug the cable into the network port or device and then plug it into the computer. 8 Connect the computer and devices to electrical outlets, and turn them on. Installing a Floppy Drive 1 Follow the procedures in "Before You Begin" on page 85. 2 Remove the computer cover (see "Removing the Computer Cover" on page 86). 3 Remove the drive panel (see "Removing the Drive Panel" on page 113). 4 Remove the existing floppy drive, if applicable (see "Removing a Floppy Drive" on page 115). 5 If no screws are attached to the new floppy drive, check the inside of the drive panel for shoulder screws. If screws are present, attach the screws to the new drive. Removing and Installing Parts 117
-
 1
1 -
2
-
3
-
4
-
5
-
6
-
7
-
8
-
9
-
10
-
11
-
12
-
13
-
14
-
15
-
16
-
17
-
18
-
19
-
20
-
21
-
22
-
23
-
24
-
25
-
26
-
27
-
28
-
29
-
30
-
31
-
32
-
33
-
34
-
35
-
36
-
37
-
38
-
39
-
40
-
41
-
42
-
43
-
44
-
45
-
46
-
47
-
48
-
49
-
50
-
51
-
52
-
53
-
54
-
55
-
56
-
57
-
58
-
59
-
60
-
61
-
62
-
63
-
64
-
65
-
66
-
67
-
68
-
69
-
70
-
71
-
72
-
73
-
74
-
75
-
76
-
77
-
78
-
79
-
80
-
81
-
82
-
83
-
84
-
85
-
86
-
87
-
88
-
89
-
90
-
91
-
92
-
93
-
94
-
95
-
96
-
97
-
98
-
99
-
100
-
101
-
102
-
103
-
104
-
105
-
106
-
107
-
108
-
109
-
110
-
111
-
 112
112 -
 113
113 -
 114
114 -
 115
115 -
 116
116 -
 117
117 -
 118
118 -
 119
119 -
 120
120 -
 121
121 -
 122
122 -
123
-
124
-
125
-
126
-
127
-
128
-
129
-
130
-
131
-
132
-
133
-
134
-
135
-
136
-
137
-
138
-
139
-
140
-
141
-
142
-
143
-
144
-
145
-
146
-
147
-
148
-
149
-
150
-
151
-
152
-
153
-
154
-
155
-
156
-
157
-
158
-
159
-
160
-
161
-
162
-
163
-
164
-
165
-
166
-
167
-
168
-
169
-
170
-
171
-
172
-
173
-
174
-
175
-
176
-
177
-
178
-
179
-
180
-
181
-
182
-
183
-
184
-
185
-
186
-
187
-
188
-
189
-
190
-
191
-
192
-
193
-
194
-
195
-
196
-
197
-
198
-
199
-
200
-
201
-
202
-
203
-
204
-
205
-
206
-
207
-
208
-
209
-
210
-
211
-
212
-
213
-
214
-
215
-
216
-
217
-
218
 |
 |
