Dewalt DCS310S1 Instruction Manual - Page 12
OPERATION, Proper Hand Position Fig. 2, 4, Installing and Removing the Battery Pack, Fig. 5, Pivot
 |
View all Dewalt DCS310S1 manuals
Add to My Manuals
Save this manual to your list of manuals |
Page 12 highlights
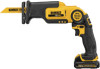
English OPERATION WARNING: To reduce the risk of serious personal injury, lock the trigger switch and disconnect battery pack before making any adjustments or removing/installing attachments or accessories. An accidental start-up can cause injury. Proper Hand Position (Fig. 2, 4) WARNING: To reduce the risk of serious personal injury, ALWAYS use proper hand position as shown. WARNING: To reduce the risk of serious personal injury, ALWAYS hold securely in anticipation of a sudden reaction. Proper hand position requires one hand on the hand grip (I), with the other hand on the main handle (H). FIG. 4 Installing and Removing the Battery Pack (Fig. 5) WARNING: To reduce the risk of injury, never depress the battery release button without removing the battery pack. Depressing the battery release button without removing the battery pack can result in the battery pack falling out unexpectedly. NOTE: For best results, make sure your battery pack is fully charged. To install the battery pack (J) into the tool handle, align the battery pack with the rails inside the tool's handle and slide it into the handle until the battery pack is firmly seated in the tool and ensure that it does not disengage. To remove the battery pack from the tool, press the release button (K) and firmly pull the battery pack out of the tool handle. Insert it into the charger as described in the charger section of this manual. FIG. 5 K J Pivot Release Slider (Fig. 2, 6, 7) WARNING: To avoid tool being turned on accidentally, make sure the lock-off button (B) is engaged. WARNING: To avoid being pinched, keep hands away from the hinge when changing positions. The tool can be converted into three different positions. To change positions, slide the pivot release slider (C) to the right as shown in Figure 6 and rotate the handle portion of the tool until it snaps securely into any of the three positions shown in Figure 7. 10
-
 1
1 -
2
-
3
-
4
-
5
-
6
-
 7
7 -
 8
8 -
 9
9 -
 10
10 -
 11
11 -
 12
12 -
 13
13 -
 14
14 -
 15
15 -
 16
16 -
 17
17 -
18
-
19
-
20
-
21
-
22
-
23
-
24
-
25
-
26
-
27
-
28
-
29
-
30
-
31
-
32
-
33
-
34
-
35
-
36
-
37
-
38
-
39
-
40
-
41
-
42
-
43
-
44
-
45
-
46
-
47
-
48
-
49
-
50
-
51
-
52
-
53
-
54
-
55
-
56
 |
 |
