Dewalt DCS390L Instruction Manual - Page 14
To Replace The Blade Fig. 5
 |
View all Dewalt DCS390L manuals
Add to My Manuals
Save this manual to your list of manuals |
Page 14 highlights
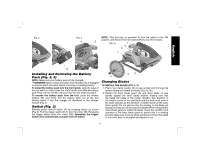
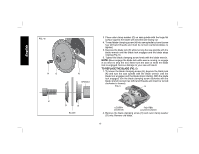
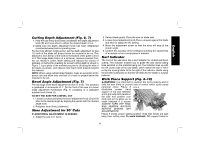
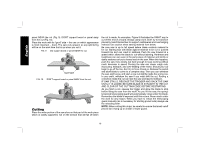
English FIG. 4b H O N SPINDLE 3. Place outer clamp washer (O) on saw spindle with the large flat surface against the blade with beveled side facing out. 4. Thread blade clamping screw (H) into saw spindle by hand (screw has left-hand threads and must be turned counterclockwise to tighten). 5. Depress the blade lock (K) while turning the saw spindle with the blade wrench until the blade lock engages and the blade stops rotating (Fig. 5). 6. Tighten the blade clamping screw firmly with the blade wrench. NOTE: Never engage the blade lock while saw is running, or engage in an effort to stop the tool. Never turn the saw on while the blade lock is engaged. Serious damage to your saw will result. TO REPLACE THE BLADE (FIG. 5) 1. To loosen the blade clamping screw (H), depress the blade lock (K) and turn the saw spindle with the blade wrench until the blade lock engages and the blade stops rotating. With the blade lock engaged, turn the blade clamping screw clockwise with the blade wrench (screw has left-hand threads and must be turned clockwise to loosen). FIG. 5 K H O N BLADE LOOSEN (clockwise) TIGHTEN (counterclockwise) 2. Remove the blade clamping screw (H) and outer clamp washer (O) only. Remove old blade. 12
-
 1
1 -
2
-
3
-
4
-
5
-
6
-
7
-
8
-
 9
9 -
 10
10 -
 11
11 -
 12
12 -
 13
13 -
 14
14 -
 15
15 -
 16
16 -
 17
17 -
 18
18 -
 19
19 -
20
-
21
-
22
-
23
-
24
-
25
-
26
-
27
-
28
-
29
-
30
-
31
-
32
-
33
-
34
-
35
-
36
-
37
-
38
-
39
-
40
-
41
-
42
-
43
-
44
-
45
-
46
-
47
-
48
-
49
-
50
-
51
-
52
-
53
-
54
-
55
-
56
-
57
-
58
-
59
-
60
-
61
-
62
-
63
-
64
-
65
-
66
-
67
-
68
 |
 |
