Dewalt DW368 Instruction Manual
Dewalt DW368 Manual
 |
View all Dewalt DW368 manuals
Add to My Manuals
Save this manual to your list of manuals |
Dewalt DW368 manual content summary:
- Dewalt DW368 | Instruction Manual - Page 1
Industrial Tool Co., 701 East Joppa Road, Baltimore, MD 21286 Printed in USA (MAR02-CD-1) Form No. 605266 DW368, DW369 Copyright © 2002 The following are trademarks for one or more DeWALT power tools: the yellow and black color scheme; the "D" shaped air intake grill; the array of pyramids on - Dewalt DW368 | Instruction Manual - Page 2
Web at www.dewalt.com INSTRUCTION MANUAL GUIDE D'UTILISATION MANUAL DE INSTRUCCIONES INSTRUCTIVO DE OPERACIÓN, CENTROS DE SERVICIO Y PÓLIZA DE GARANTÍA. ADVERTENCIA: LÉASE ESTE INSTRUCTIVO ANTES DE USAR EL PRODUCTO. DW368, DW369 7-1/4"(184 mm) Circular Saws Scies circulaires de 184 mm (7 1/2 po - Dewalt DW368 | Instruction Manual - Page 3
DW368/605266 7/2/02 11:50 AM Page 4 English IF YOU HAVE ANY QUESTIONS OR COMMENTS ABOUT THIS OR ANY DEWALT TOOL, CALL US TOLL FREE AT: 1-800-4-DEWALT (1-800-433-9258) General Safety Instructions WARNING! Read and understand all instructions. Failure to follow all instructions low moving parts. - Dewalt DW368 | Instruction Manual - Page 4
support the servicing a tool, use only identical replacement parts. Follow instructions in the Maintenance section of this manual. Use of unauthorized parts or failure to follow Maintenance Instructions may create a risk of electric shock or injury. Additional Safety Instructions for Circular Saws - Dewalt DW368 | Instruction Manual - Page 5
the operator. • When ripping, always use a rip fence or straight edge guide. This improves the accuracy of cut and reduces the chance for blade binding. • Always use blades with correct size and shape (diamond vs. round) arbor holes. Blades that do not match the mounting hardware of the saw will run - Dewalt DW368 | Instruction Manual - Page 6
the operator. Release switch immediately if blade binds or saw stalls. Keep blades sharp. Support large panels as shown in Figure 10. Use fence or straight edge guide when ripping. Don't force tool. Stay alert-exercise control. Don't remove saw from work during a cut while the blade is moving - Dewalt DW368 | Instruction Manual - Page 7
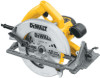
DW368/605266 7/2/02 11:50 AM Page 4 English Features: A. End cap B. Trigger switch C. Bevel angle adjustment D. Shoe E. Blade bolt Motor B A D E C Your DEWALT tool is powered by a DEWALT motor. Be sure your power supply agrees with nameplate marking. 120 Volts AC/DC means your saw will - Dewalt DW368 | Instruction Manual - Page 8
cut along the side of the blade, as shown in the figure, and observe how much tooth projects beyond the material. BEVEL ANGLE ADJUSTMENT (DW368) FIG. 7 DISCONNECT THE SAW FROM THE POWER SUPPLY. The full range of the bevel adjustment is from 0 TO 56 DEGREES. The quadrant is graduated in increments of - Dewalt DW368 | Instruction Manual - Page 9
shoe until the pointer aligns with the desired mark. KERF INDICATOR (FIG.9) The front of the saw shoe has a kerf indicator for vertical and bevel cutting. This indicator enables you to guide the saw along cutting lines penciled on the material being cut. The indicator lines up with the left (inner - Dewalt DW368 | Instruction Manual - Page 10
DW368/605266 7/2/02 11:50 AM Page 7 FIG. 10 FIG. 11 FIG. 12 FIG. 13 WORKPIECE SUPPORT Figure 10 and 12 show proper sawing position. Figure 11 on your right. Place the wider portion of the saw shoe on that part of the work piece which is solidly supported, not on the section that will fall off when - Dewalt DW368 | Instruction Manual - Page 11
DW368/605266 7/2/02 11:50 AM Page 8 English Kickback When the saw blade becomes pinched or twisted in the cut, kickback can occur. The saw 11) B. Cutting through material supported at the outer ends only. As D. Cutting off long narrow strips (as in ripping). The cut off strip can sag or twist - Dewalt DW368 | Instruction Manual - Page 12
shoe until the blade and the shoe are both in flush contact with the square. Retighten the Bevel Adjust Lever. problem may be worn brushes. Replace the brushes as described below and try the saw again. If the problem still persists, have the tool serviced at a DEWALT certified service center. 9 - Dewalt DW368 | Instruction Manual - Page 13
DW368 Dull blades can be sharpened in most areas; see SAWS-SHARPENING in the yellow pages. Hardened gum on extra cost from your local service center. CAUTION: The use of any blade for rips and cross cuts If you need any assistance regarding blades or accessories, please contact DEWALT Industrial - Dewalt DW368 | Instruction Manual - Page 14
English DW368/605266 7/2/02 11:50 AM Page 11 In addition to the warranty, DEWALT tools are covered by our: 30 DAY NO RISK SATISFACTION GUARANTEE If you are not completely satisfied with the performance of your DEWALT heavy duty industrial tool, simply return it to the participating seller within 30 - Dewalt DW368 | Instruction Manual - Page 15
DW368/605266 7/2/02 11:50 AM Page 12 Français SI VOUS AVEZ DES QUESTIONS OU VOUS VOULEZ NOUS FAIRE PART DE VOS COMMENTAIRES CONCERNANT CET OUTIL OU TOUT AUTRE OUTIL DEWALT, COMPOSEZ SANS FRAIS LE : 1 800 433-9258. Règles de sécurité - Généralités AVERTISSEMENT! Lire et comprendre toutes les - Dewalt DW368 | Instruction Manual - Page 16
DW368/605266 7/2/02 11:50 AM Page 13 Français Calibre minimal des cordons de rallonge UTILISATION ET ENTRETIEN DE L'OUTIL Tension Longueur totale du cordon en meters 120 V De 0 à7 De 7à15 De 15à30 De 30à 45 240 V De 0 à7 De7à15 De 15à39 De 30à 45 Intensité (A) • Fixer et soutenir la piè - Dewalt DW368 | Instruction Manual - Page 17
fin lorsqu'il risque d'entrer en contact avec des fils cachés ou son propre cordon, car de tels contacts peuvent mettre les pièces métalliques de l'outil sous tension, engendrant des risques de choc électrique. • Toujours utiliser un guide de refend ou de bord droit lorsqu'on effectue une coupe en - Dewalt DW368 | Instruction Manual - Page 18
DW368/605266 7/2/02 11:50 AM Page 15 Français recul brusque de l'outil vers l'opérateur. • Si la lame se tord ou est mal alignée, les dents arrière peuvent s'engager sur le dessus de la pièce, faisant grimper la lame hors de l'entaille et rebondir l'outil en direction de l'opérateur. • Le rebond - Dewalt DW368 | Instruction Manual - Page 19
DW368/605266 7/2/02 11:50 AM Page 16 Français immédiatement l'interrupteur à gâchette. Maintenir les lames propres et bien aiguisées. Soutenir les grands panneaux, tel qu'illustré à la figure 10. Toujours utiliser un guide de refend ou de bord droit lorsqu'on effectue une coupe en long. Ne jamais - Dewalt DW368 | Instruction Manual - Page 20
DW368/605266 7/2/02 11:50 AM Page 17 Français FIG. 1 FIG. 3 FIG. 2 A Opérations de réglage et d'installation INSTALLATION ET RETRAIT DE LA LAME (FIG. 1 À 3) DÉBRANCHER L'OUTIL DE LA SOURCE D'ALIMENTATION ÉLECTRIQUE. Pour fixer la lame, escamoter le protège-lame inférieur et placer la rondelle de - Dewalt DW368 | Instruction Manual - Page 21
coupe appropriée. Il s'agit de déposer le matériau le long de la lame, tel qu'illustré, et de vérifier les dents qui dépassent. RÉGLAGE DE LA PROFONDEUR DE BISEAU- MODELE DW368 (FIG. 7) DÉBRANCHER L'OUTIL DE LA SOURCE D'ALIMENTATION. La plage complète des angles de biseau se situe entre 0 et 56 degr - Dewalt DW368 | Instruction Manual - Page 22
DW368/605266 7/2/02 11:50 AM Page 19 Français FIG. 7 FIG. 8 FIG. 9 1/4 PO 6.35 mm A C B B DESSERRER A 1/2 PO 13 mm SERRER 45˚ 0˚ Resserrer fermement le bouton (vers la droite). RÉGLAGE DE L'ANGLE DE BISEAU- MODELE DW369 (FIG. 8) DÉBRANCHER L'OUTIL. La plage complète des angles de biseau se - Dewalt DW368 | Instruction Manual - Page 23
dans cette position par quelque moyen que ce soit. SUPPORT DE LA PIÈCE Les figures 10 et 12 illustrent la position de sciage appropriée, tandis que les figures 11 et 13 indiquent les positions à éviter. Les mains doivent être tenues éloignées de la zone de coupe et on doit s'assurer que le cordon - Dewalt DW368 | Instruction Manual - Page 24
les dents arrière peuvent s'engager sur le dessus de la pièce, faisant grimper la lame hors de l'entaille et rebondir l'outil en direction de l'opérateur. L'effet de rebond est plus susceptible de se produire dans les conditions suivantes : 1. SUPPORTS INADÉQUATS A. Si le matériau s'affaisse ou les - Dewalt DW368 | Instruction Manual - Page 25
de service DEWALT afin de guides. Lorsqu'on place un balai, on doit prendre soin de le mettre dans le même sens qu'avant. Divers symboles figurent sur les côtés de chaque balai; on doit remplacer ces derniers lorsque l'usure atteint la ligne la plus près du ressort. N'utiliser que des balais DEWALT - Dewalt DW368 | Instruction Manual - Page 26
DW368/605266 7/2/02 11:50 AM Page 23 Français aux centres de service de sa région. Laisser l'outil marcher à vide, sans lame, pendant 5 minutes avant de l'utiliser afin de s'assurer que les nouveaux balais soient bien en place. Durant le rodage des balais, NE PAS RETENIR L'INTERRUPTEUR À GÂ - Dewalt DW368 | Instruction Manual - Page 27
le remplacement du balai); on ne doit utiliser que des pièces de rechange identiques. Garantie complète DEWALT garantit les outils industriels de service intensif contre tout défaut de matériel ou de fabrication pour une période d'un an à compter de la date d'achat; le produit défectueux sera répar - Dewalt DW368 | Instruction Manual - Page 28
DW368/605266 7/2/02 11:50 AM Page 25 SI TIENE PREGUNTAS O COMENTARIOS SOBRE ESTA U OTRA HERRAMIENTA DEWALT, LLÁMENOS GRATIS AL: 1-800-4-DEWALT (1-800-433-9258) Reglas generales de el enchufe de un tomacorriente. Mantenga el cable alejado del calor, aceite, bordes afilados o partes en movimiento. - Dewalt DW368 | Instruction Manual - Page 29
Mantenimiento de este manual. El uso de repuestos no autorizados o el no cumplir con las instrucciones de Mantenimiento puede crear el riesgo de electrochoque o lesión. Medidas adicionales de seguridad para sierras circulares ¡PELIGRO! Mantenga las manos alejadas del área de corte y del disco de la - Dewalt DW368 | Instruction Manual - Page 30
DW368/605266 7/2/02 11:50 AM Page 27 sierra, pero NO alineado con ésta. Un REBOTE podría hacer que la sierra salte hacia atrás (Lea la sección "Causas del rebote y su prevención por parte del operario" página 2 y "REBOTE", página 33). • No meta sus manos por debajo de la pieza de trabajo. Allí el - Dewalt DW368 | Instruction Manual - Page 31
DW368/605266 7/2/02 11:50 AM Page 28 fuerza del REBOTE. La fuerza del rebote "vivos", ¡NO TOQUE NINGUNA PARTE METÁLICA DE SU HERRAMIENTA! Sostenga la sierra solamente por medio de sus mangos plásticos, con el fin de prevenir el choque eléctrico en caso de cortar accidentalmente un cable vivo. - Dewalt DW368 | Instruction Manual - Page 32
de estos químicos son: · el plomo de las pinturas a base de plomo, · la sílice cristalina de los ladrillos y cemento y otros productos de albañilería, y · el arsénico y el cromo de de seguridad aprobados, tales como las máscaras de polvo que están especialmente diseñadas para filtrar las partí - Dewalt DW368 | Instruction Manual - Page 33
30 FIG. 1 FIG. 3 FIG. 2 A Información Tecnica DW368, DW369 Tensión de alimentación y 120 V - 15A Frecuencia de Alimentación: 50/60 Hz Rotación sin carga: 5800/min Su sierra DEWALT acepta cuchillas con perforaciones circulares del árbol de 5/8". 1. Presione el PASADOR del SEGURO, Figura - Dewalt DW368 | Instruction Manual - Page 34
, y observe qué tanto se proyectan los dientes del disco más allá del material. AJUSTE DEL ÁNGULO DE CORTE (DW368) FIG. 7 DESCONECTE LA SIERRA DEL SUMINISTRO DE ENERGÍA ELÉCTRICA. El rango total de ajuste del ángulo de corte va de 0 a 56 GRADOS. El cuadrante está graduado cada 5 grados. Al frente - Dewalt DW368 | Instruction Manual - Page 35
DW368/605266 7/2/02 11:50 AM Page 32 FIG. 7 FIG. 8 FIG. 9 1/4" 6.35 mm A C B B AFLOJE A APRIETE 1/2" 13 mm 45˚ 0˚ DISPOSITIVO DE PARADA DEL CORTE A ÁNGULO (SOLO PARA EL MODELO DW369) DESCONECTE LA SIERRA DEL SUMINISTRO DE ENERGÍA ELÉCTRICA. La sierra está equipada con un dispositivo de - Dewalt DW368 | Instruction Manual - Page 36
en la superficie que se encuentra hacia arriba. CORTE Apoye la pieza de trabajo de manera que el pedazo restante quede a su derecha. Coloque la porción más ancha de la zapata de su sierra en aquella parte de la pieza de trabajo que se encuentra sólidamente apoyada, y no en la sección que caer - Dewalt DW368 | Instruction Manual - Page 37
ón del motor hace rebotar la unidad hacia atrás. Cuando el disco se tuerce o se desalinea en el corte, los dientes de la parte posterior del disco pueden cavar en la superficie superior de la madera, haciendo que el disco salga fuera del corte y salte hacia atrás contra el operario. El rebote es - Dewalt DW368 | Instruction Manual - Page 38
ún líquido entre al interior de la herramienta. Nunca sumerja ninguna parte de la herramienta dentro de un líquido. La herramienta de servicio DE WALT para su mantenimiento. Escobillas DESCONECTE EL ENCHUFE DEL SUMINSTRO DE ENERGÍA ANTES DE REALIZAR EL MANTENIMENTO Verifique las escobillas de - Dewalt DW368 | Instruction Manual - Page 39
que estén disponibles para su utilización inmediata. Los discos desafilados pueden afilarse en la mayor parte de los centros de servicio. Vea la sección Sierras-afilado (SAWS-SHARPENING) en las páginas amarillas. La goma endurecida acumulada en el disco puede ser retirada con queroseno, trementina - Dewalt DW368 | Instruction Manual - Page 40
ública Mexicana, donde podrá hacer efectiva su garantía y adquirir partes, refacciones y accesorios originales. Garantía Completa Las herramientas industriales DEWALT están garantizadas durante un año a partir de la fecha de compra. Repararemos, sin cargos, cualquier falla debida a material o mano - Dewalt DW368 | Instruction Manual - Page 41
DW368/605266 7/2/02 11:50 AM Page 38 legales específicos, y usted puede tener otros derechos que pueden variar de estado a estado. En adición a la garantía, las herramientas DEWALT están amparadas por nuestra: GARANTÍA DE SATISFACCIÓN SIN RIESGO POR 30 DÍAS Si usted no se encuentra completamente
-
 1
1 -
 2
2 -
 3
3 -
 4
4 -
 5
5 -
 6
6 -
 7
7 -
8
-
9
-
10
-
11
-
12
-
13
-
14
-
15
-
16
-
17
-
18
-
19
-
20
-
21
-
22
-
23
-
24
-
25
-
26
-
27
-
28
-
29
-
30
-
31
-
32
-
33
-
34
-
35
-
36
-
37
-
38
-
39
-
40
-
41
 |
 |

D
E
WALT Industrial Tool Co., 701 East Joppa Road, Baltimore, MD 21286
Printed in USA (MAR02-CD-1)
Form No. 605266
DW368, DW369
Copyright © 2002
The following are trademarks for one or more DeWALT power tools: the yellow and black color scheme; the “D” shaped air intake grill; the array of
pyramids on the handgrip; the kit box configuration; and the array of lozenge-shaped humps on the surface of the tool.
DW368/605266
7/2/02
11:50 AM
Page 2