Dewalt DWMIIIFS Instruction Manual - Floor Kit - Page 3
Correct Fastener Placement/ Depth, General Usage Instructions
 |
View all Dewalt DWMIIIFS manuals
Add to My Manuals
Save this manual to your list of manuals |
Page 3 highlights
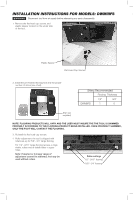
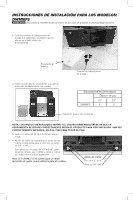
GENERAL USAGE INSTRUCTIONS 1. Be sure foot is flush to flooring. Use the window to verify that the foot is flush against flooring. DO NOT STRIKE PRE-FINISHED FLOORING!! 2. Strike both sides of foot to set flooring 3. Actuate tool after flooring is set. 4. Roll tool to next fastener position. CORRECT FASTENER PLACEMENT/ DEPTH When tool is properly shimmed and with correct air pressure, fasteners should be set into flooring tongue. (see example below) Important: always test on a scrap piece of flooring. • Air pressure too low. • Fastener above tongue. • Increase air pressure. • Air pressure too high. • Fastener buried. • Lower air pressure. • Correct air pressure. • Fastener just below surface. Floor Fastener Sub-floor
-
 1
1 -
 2
2 -
 3
3 -
 4
4 -
 5
5 -
 6
6 -
 7
7 -
 8
8 -
 9
9 -
10
 |
 |

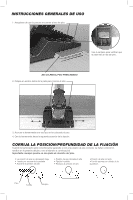
CORRECT FASTENER PLACEMENT/ DEPTH
When tool is properly shimmed and with correct air pressure, fasteners should be set into flooring tongue.
(see example below)
Important: always test on a scrap piece of flooring.
GENERAL USAGE INSTRUCTIONS
DO NOT STRIKE PRE-FINISHED FLOORING!!
1. Be sure foot is flush to flooring.
2. Strike both sides of foot to set flooring
3. Actuate tool after flooring is set.
4. Roll tool to next fastener position.
• Air pressure too low.
• Fastener above tongue.
• Increase air pressure.
• Air pressure too high.
• Fastener buried.
• Lower air pressure.
• Correct air pressure.
• Fastener just below surface.
Floor
Fastener
Sub-floor
Use the window to verify that the
foot is flush against flooring.