Dymo LabelManager® 450 User Guide 1 - Page 10
Adding Date and Time
 |
View all Dymo LabelManager® 450 manuals
Add to My Manuals
Save this manual to your list of manuals |
Page 10 highlights
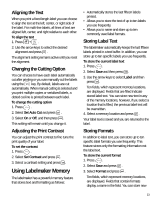
To add a symbol 1. Press Symbols . The first row of symbols shown in the table appears in the display. 2. Use the arrow keys to move to the desired symbol. The left and right arrows move horizontally along a row of symbols. The up and down arrow keys scroll vertically through the rows of symbols. To quickly see a row of symbols, you can press the letter corresponding to the row you want. 3. When you locate the desired symbol, press to add the symbol to your label text. Adding International Characters The labelmaker supports the extended Latin character set using RACE technology. Similar to using a mobile phone keypad, if you type a letter multiple times within a very short time, you will scroll through variations on that letter. For example, if French is selected as the language and you repeatedly press the letter a, you will see a à â æ and so on through all the variations available. The character variations and the order in which the variations appear depend on the language you have selected to use. Currency Symbols The currency key $ also uses RACE technology to scroll through a number of currency symbols The order these symbols appear depends on the language you have selected. Adding Date and Time You can add the date and time to your labels. Changing the Date Format You can choose from twelve different date formats: 24/12/2004 12/24/2004 24/12/04 12/24/04 24 Dec 2004 Dec 24, 2004 (US default) 24 Dec 04 (EU default) Dec 24, 04 24 December 2004 December 24, 2004 24 December 04 December 24, 04 To change the date format 1. Press Settings , select Set Date, and press . 2. Use the arrow keys to select the date format and press . The display shows the currently set date. 3. Use the arrow keys to change each part of the date (month, day, year) and press after each part. Adding the Date to Your Label The date can be added as fixed text (the date remains the same) or as variable text that is automatically updated with the current date when the label is actually printed. To add the date 1. Press . Preview Inser t 2. Select Insert Date and press . 3. Select Fixed Date or Autom. Updated and press . When Autom. Updated is selected, a date icon is inserted on your label. When Fixed Date is selected, the actual date is inserted on your label in the format specified. 10
-
 1
1 -
2
-
3
-
4
-
 5
5 -
 6
6 -
 7
7 -
 8
8 -
 9
9 -
 10
10 -
 11
11 -
 12
12 -
 13
13 -
 14
14 -
 15
15 -
16
-
17
-
18
 |
 |
