Dymo LabelWriter® 450 Professional Label Printer for PC and Mac® Use - Page 20
Address Book Tab, Edit Area, Select All, Select None
 |
View all Dymo LabelWriter® 450 Professional Label Printer for PC and Mac® manuals
Add to My Manuals
Save this manual to your list of manuals |
Page 20 highlights
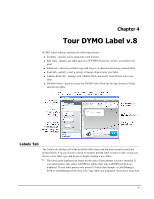
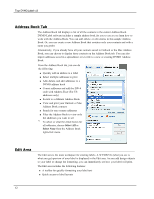
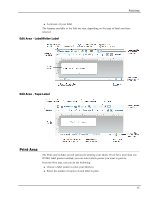
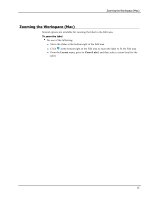
Tour DYMO Label v.8 Address Book Tab The Address Book tab displays a list of all the contacts in the current Address Book. DYMO Label software includes a sample address book for you to use as you learn how to work with the Address Book. You can add, delete, or edit entries in this sample Address Book. Or, you can create a new Address Book that contains only your contacts and with a name you prefer. Alternatively, if you already have all your contacts saved in Outlook or the Mac Address Book, you can choose to display those contacts on the Address Book tab. You can also import addresses saved in a spreadsheet or text file to a new or existing DYMO Address Book. From the Address Book tab, you can do the following: n Quickly add an address to a label n Select multiple addresses to print n Add, delete, and edit addresses in a DYMO address book n Correct addresses and add the ZIP+4 code with Address Fixer (For US addresses only) n Switch to a different Address Book n View and print your Outlook or Mac Address Book contacts n Search for one or more addresses n Filter the Address Book to view only the addresses you want to see To select or clear the check boxes for all addresses, choose Select All or Select None from the Address Book right-click menu. Edit Area The Edit area is the main workspace for creating labels. A WYSIWYG (what you see is what you get) preview of your label is displayed in the Edit area. As you add design objects to your label or change the formatting, you can immediately see how your label will print. The Edit area includes the following features: n A toolbar for quickly formatting your label text n Quick access to label layouts 12
-
 1
1 -
2
-
3
-
4
-
5
-
6
-
7
-
8
-
9
-
10
-
11
-
12
-
13
-
14
-
 15
15 -
 16
16 -
 17
17 -
 18
18 -
 19
19 -
 20
20 -
 21
21 -
 22
22 -
 23
23 -
 24
24 -
 25
25 -
26
-
27
-
28
-
29
-
30
-
31
-
32
-
33
-
34
-
35
-
36
-
37
-
38
-
39
-
40
-
41
-
42
-
43
-
44
-
45
-
46
-
47
-
48
-
49
-
50
-
51
-
52
-
53
-
54
-
55
-
56
-
57
-
58
-
59
-
60
-
61
-
62
-
63
-
64
-
65
-
66
-
67
-
68
-
69
-
70
-
71
-
72
-
73
-
74
-
75
-
76
-
77
-
78
-
79
-
80
-
81
-
82
-
83
-
84
-
85
-
86
-
87
-
88
-
89
-
90
-
91
-
92
-
93
-
94
-
95
-
96
-
97
-
98
-
99
-
100
-
101
-
102
-
103
-
104
-
105
-
106
-
107
-
108
-
109
-
110
-
111
-
112
-
113
-
114
-
115
-
116
-
117
-
118
-
119
-
120
-
121
-
122
 |
 |
