Dynex DX-PD510 User Manual (English)
Dynex DX-PD510 - 5" Portable DVD Player Manual
 |
UPC - 600603101496
View all Dynex DX-PD510 manuals
Add to My Manuals
Save this manual to your list of manuals |
Dynex DX-PD510 manual content summary:
- Dynex DX-PD510 | User Manual (English) - Page 1
DX-PD510 PORTABLE 5" LCD MONITOR AND DVD PLAYER Owner's Manual 1 PDF created with FinePrint pdfFactory Pro trial version http://www.fineprint.com - Dynex DX-PD510 | User Manual (English) - Page 2
Basic Operation 14 I. Menu 15 J. Display 15 K. Playing Audio CDs 21 L. Playing MP3 Discs 23 M. Playing JPEG file 25 N. Connecting to a TV or another monitor 26 O. Specifications 27 P. Rechargeable Battery Installation and Use 27 2 PDF created with FinePrint pdfFactory Pro trial version http - Dynex DX-PD510 | User Manual (English) - Page 3
Notice: 1. This Product incorporates copyright protection technology that is protected by method claims of certain U.S. Patents and other intellectual property rights owned by Macrovision Corporation and other rights owners. Use of this copyright protection technology must be authorized by - Dynex DX-PD510 | User Manual (English) - Page 4
hour before operating the unit, or remove the disc and leave the unit turned on until the moisture evaporates. 2. Installation Ensure that the 5" portable DVD player is installed in accordance with the instructions and illustrations provided in this manual. 3. Caution Do not push objects of any kind - Dynex DX-PD510 | User Manual (English) - Page 5
intentionally fixed by software producers. Since this unit plays discs according to the disc contents the software producers designed, some playback features may not be available. Also refer to the instructions supplied with the discs. 5 PDF created with FinePrint pdfFactory Pro trial version http - Dynex DX-PD510 | User Manual (English) - Page 6
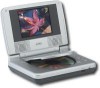
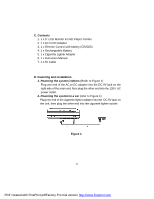
Contents 1. 1 x 5'' LCD Monitor & DVD Player Combo 2. 1 x AC to DC Adapter 3. 1 x Remote Control with battery (CR2025) 4. 1 x Rechargeable Battery 5. 1 x Cigarette Lighter Adapter 6. 1 x Instruction Manual 7. 1 x AV Cable D. Powering and installation 1. Powering the system indoors (Refer to Figure - Dynex DX-PD510 | User Manual (English) - Page 7
Button 9) Brightness Up/Down Control 10) Volume Up/Down Control 11) Headphone Jack 1 12) Headphone Jack 2 13) DC 9V Input 14) Power On/Off Switch 15) Power LED 16) Remote Control Sensor 17) AV In Jack 18) AV Out Jack 7 PDF created with FinePrint pdfFactory Pro trial version http://www.fineprint - Dynex DX-PD510 | User Manual (English) - Page 8
2. Remote Control View (Refer to Figure 3) 1) Setup Button 2) Up Button 3) Skip- Button 4) and Playing a Disc a. After connecting power to the unit, power on "DVD player" with the power switch. The power indicator will light. b. Open the disc tray by pressing OPEN, and place a disc into the tray - Dynex DX-PD510 | User Manual (English) - Page 9
'SETUP' again to exit the Setup Menu and the unit will resume it's last playback mode. Main Setup Menu Screen 1) Press "SETUP", the 'Language Setup Page' will display on screen. a).Select 'Disc Menu' using the UP/DOWN button, and then press RIGHT to enter the submenu. Select the Menu Language on - Dynex DX-PD510 | User Manual (English) - Page 10
. Choose Audio Language using the UP/DOWN button and then press ENTER to confirm the setting. Press the LEFT button to return. Audio Language Screen Display c).Select 'Subtitle' using the UP/DOWN button, and then press the RIGHT button to enter the submenu. Choose Subtitle Language using the UP - Dynex DX-PD510 | User Manual (English) - Page 11
connected to a normal TV, and a wide picture is shown on the screen with a black strip at both the top and bottom of the screen. * 16:9 (Wide): When the player is connected to a wide screen TV, a wide picture is shown on the full screen. b. Select 'TV Type' the using UP/DOWN button, then press RIGHT - Dynex DX-PD510 | User Manual (English) - Page 12
. a. Select 'Parental Ctrl' using the UP/DOWN button, then press RIGHT to enter the submenu. Parental Control Screen Display Select the parental level you desire using the UP/DOWN button for discs with lock-out function or multiple rating levels. These are listed from the lowest level (1 G) to the - Dynex DX-PD510 | User Manual (English) - Page 13
password in another area and delete it from this manual. Some discs can be limited depending on the age of users while some discs cannot. 4) Select "Exit" using UP/DOWN button, then press ENTER button to exit Setup screen display Exit Screen Display 13 PDF created with FinePrint pdfFactory Pro trial - Dynex DX-PD510 | User Manual (English) - Page 14
H. Basic Operation POWER Turn the unit on/off OPEN Remove/load the disc PLAY Start Play/Execute item or setting PAUSE Still menu of the disc 1/ALL REPEAT Repeat playing title, chapter, or track A-B REPEAT Repeat a specific portion from point A to point B of the disc DISPLAY Display - Dynex DX-PD510 | User Manual (English) - Page 15
and chapters. When you play a DVD, a root menu of the disc will appear on the screen of your TV or Monitor. The contents of the menu vary from disc to disc. Press MENU during playback to display the menu. Some DVDs only allow you to select disc playback options using the DVD root menu. J. Display - Dynex DX-PD510 | User Manual (English) - Page 16
The heading will disappear automatically in 3 seconds. Chapter Elapsed Time Screen Display d. Press 'DISPLAY' a fourth time to display the Remaining displayed and will disappear automatically in 3 seconds. 2. SUBTITLE During disc playback press 'SUBTITLE' to select the subtitle language you desire*, - Dynex DX-PD510 | User Manual (English) - Page 17
language. The audio display will disappear automatically if the 'AUDIO' button is not pressed within for 3 seconds. Audio Language Screen Display * Some DVDs only allow access to this function through the DVD menu. 17 PDF created with FinePrint pdfFactory Pro trial version http://www.fineprint.com - Dynex DX-PD510 | User Manual (English) - Page 18
be enlarged 2X. (2) Press "zoom" a second time, the picture will be enlarged 4X. (3) Press "zoom" a 3th time, the picture will return to normal size. Zoom Screen Display 5. A-B REPEAT a. During playback press 'A-B' the first time to set the Starting Point A. A-B Repeat Starting Point - Dynex DX-PD510 | User Manual (English) - Page 19
time to set the Ending Point B and the player will repeatedly play the part between Point A and Point B. A-B Repeat Ending Point Screen Display c. Press 'A-B' a third time to cancel A-B repeat and resume playback. A-B Repeat Cancelled Screen Display 6. 1/ALL REPEAT a. During playback press '1/ALL - Dynex DX-PD510 | User Manual (English) - Page 20
b. During playback press '1/ALL REPEAT' again to repeatedly play the current title. Title Repeat Screen Display c. During playback press '1/ALL REPEAT' a third time to repeat whole disc. Disc Repeat Screen Display d. Press '1/ALL REPEAT' a fourth time to resume normal playback. 20 PDF created with - Dynex DX-PD510 | User Manual (English) - Page 21
CD press the DISPLAY button on the remote to view time information. The options below show you what information is available using this function. a. The current track and playing time of that track will be displayed on the screen. Single Elapsed Screen Display b.Press 'DISPLAY' one time and Single - Dynex DX-PD510 | User Manual (English) - Page 22
Off appears along with no display. Display Off Screen Display USING THE REPEAT FEATURE The default mode for the Repeat feature is OFF. Pressing REPEAT consecutively changes the repeat options: • Track- repeats the track that is playing. • Disc- repeats the disc that is playing. • Off As you toggle - Dynex DX-PD510 | User Manual (English) - Page 23
format are compatible with this system. Insert a MP3 CD, the DVD player will initialize the disc and the directory (folder) will be shown on the TV screen. MP3 MENU Screen Display When a MP3 disc is inserted into the unit, the menu screen appears and plays the MP3 automatically. You can use the menu - Dynex DX-PD510 | User Manual (English) - Page 24
, not an MP3 file. " " icon in front of a file name indicates that this is a MP3 file. M. Playing JPEG file 1) Load the JPEG Disc into the tray and the disc is played automatically. 2) Select a JPEG file by pressing "UP/DOWN" button. 3) You can preview the JPEG file by pressing "PLAY" or "ENTER - Dynex DX-PD510 | User Manual (English) - Page 25
7) Press "MENU" to browse the JPEG files. A menu will appear on the screen and press "PLAY" to return. 8) Press "Play" or "OK", to play the JPEG file. 25 PDF created with FinePrint pdfFactory Pro trial version http://www.fineprint.com - Dynex DX-PD510 | User Manual (English) - Page 26
or another monitor ( Refer to Figure 4) You can also connect the DVD player to a TV to enjoy high quality stereo sound and picture on another monitor. 1. Connect one end of the audio/video cable's black (1/8" plug) plug into the unit's DVD AV Out jack, and connect the other end to the AUDIO INPUT - Dynex DX-PD510 | User Manual (English) - Page 27
0.67 kg Dimensions (W x D x H): 8.07 X 5.98 X1.57inches 205 x 152 x 40mm Battery Type: NiMh P. Rechargeable Battery Installation and Use The player utilizes a set of long-life NiMh batteries for a portable power supply. NiMh batteries feature high storage capacity and low level of degradation. This - Dynex DX-PD510 | User Manual (English) - Page 28
battery life. 2. To charge the battery, please connect the power jack directly into the unit and leave the Power switch in the OFF position. Using and Maintaining your Rechargeable Batteries 1. Please make sure you always use only the AC adapter included with the player to recharge your batteries - Dynex DX-PD510 | User Manual (English) - Page 29
lock position is indicated by a click. The unit will fit snugly to the player. Installing the DVD Player Battery Removing the Battery Pack: 1. First, make sure the player is in 'Stop' mode and that the AC power supply has been disconnected. 2. Press the release button in the down direction. 3. Slide
-
 1
1 -
 2
2 -
 3
3 -
 4
4 -
 5
5 -
 6
6 -
 7
7 -
8
-
9
-
10
-
11
-
12
-
13
-
14
-
15
-
16
-
17
-
18
-
19
-
20
-
21
-
22
-
23
-
24
-
25
-
26
-
27
-
28
-
29
 |
 |
1
DX-PD510
PORTABLE 5" LCD MONITOR AND DVD PLAYER
Owner
’
s Manual
PDF created with FinePrint pdfFactory Pro trial version