Electrolux EI33AR80WS Complete Owners Guide English
Electrolux EI33AR80WS Manual
 |
View all Electrolux EI33AR80WS manuals
Add to My Manuals
Save this manual to your list of manuals |
Electrolux EI33AR80WS manual content summary:
- Electrolux EI33AR80WS | Complete Owners Guide English - Page 1
Use & Care Guide EN Refrigerator electroluxappliances.com\register electroluxappliances.ca - Electrolux EI33AR80WS | Complete Owners Guide English - Page 2
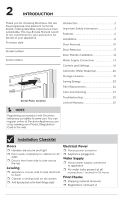
Care and Cleaning 27 Troubleshooting 29 Limited Warranty 32 NOTE Registering your product with Electrolux enhances our ability to serve you. You can register online at ElectroluxAppliances.com or by sending your Product Registration Card in the mail. Installation Checklist Doors ˆˆ Handles - Electrolux EI33AR80WS | Complete Owners Guide English - Page 3
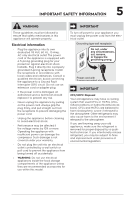
or moderate injury. IMPORTANT IMPORTANT indicates installation, operation or maintenance information which is service personnel. Use only manufacturer-authorized service parts. Any repair equipment used must be designed for flammable refrigerants. Follow all manufacturer repair instructions - Electrolux EI33AR80WS | Complete Owners Guide English - Page 4
entrapment Child entrapment and suffocation are not problems of the past. Junked or abandoned appliances your old appliance, please follow the instructions below to help prevent accidents. We inside. • Have refrigerant removed by a qualified service technician. • DO NOT operate the refrigerator - Electrolux EI33AR80WS | Complete Owners Guide English - Page 5
Plug it directly into a properly grounded 3-prong receptacle. Install the receptacle in accordance with local codes and ordinances. extension cord or adapter plug. • If the power cord is damaged, an authorized service technician should replace it to prevent any risk. • Never unplug the appliance by - Electrolux EI33AR80WS | Complete Owners Guide English - Page 6
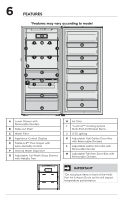
6 FEATURES *Features may vary according to model H IGI K J J IGI K F E L J J C D J J M B M A A Lower Drawer with Removable Dividers B Slide-out Shelf C Water Filter D Appliance Control Display E TasteLock™ Plus Crisper with Auto-Humidity Control F Internal Water Dispenser G - Electrolux EI33AR80WS | Complete Owners Guide English - Page 7
important information about cleaning glass shelves and covers in the STORAGE FEATURES section of this manual. IMPORTANT Moving your Appliance Your appliance is heavy. When moving the appliance for cleaning or service, raise the anti-tip bracket (see "Setting the anti-tip bracket"). Be sure to cover - Electrolux EI33AR80WS | Complete Owners Guide English - Page 8
8 INSTALLATION This Use & Care Manual provides general operating instructions for your model. Use the appliance only as instructed in this Use & Care Manual. Before starting the appliance, follow these important first steps. Location NOTE If your appliance is placed with the door hinge side - Electrolux EI33AR80WS | Complete Owners Guide English - Page 9
installed according to the instructions in your Use & Care Manual. Failure to do so may result in injury. Pairing Installation Pairing kit (TWINSPAIRKIT) is REQUIRED if you are installing you purchased your appliances, or contact Electrolux customer service at 1-877-4ELECTROLUX (1-877-435-3287). - Electrolux EI33AR80WS | Complete Owners Guide English - Page 10
10 DOOR REVERSAL Single Unit Door Swing Reversal: • Refrigerator: Right-hand to Left-hand Swing order TTDRRVERKIT • Freezer: Left-hand to Right-hand Swing order TTDRRVEFKIT Order the kit on ElectroluxAppliances.com or by calling 1-877-4ELECTROLUX (1-877-435-3287). Right-hand Swing Left-hand Swing - Electrolux EI33AR80WS | Complete Owners Guide English - Page 11
the door, reverse the above procedures and securely tighten all screws to prevent hinge slippage. The door should be closed prior to removing or installing • Unplug the unit or switch the breaker that supplies power to the unit to the off position. • Remove the plastic top hinge cover. • Hold - Electrolux EI33AR80WS | Complete Owners Guide English - Page 12
these handles. The rounded end of the handles may be sharp. Door Handle Mounting Instructions 1. Remove handle from carton and any other protective packaging. 2. Position handle end caps over upper and lower pre-installed shoulder bolts (A) that are fastened into door, ensuring the holes for the set - Electrolux EI33AR80WS | Complete Owners Guide English - Page 13
Copper or Stainless Steel braided tubing for the water supply line. Electrolux does not recommend water supply tubing made of ¼" plastic. Plastic the supply line. • DO NOT install water supply tubing in areas where temperatures fall below freezing. Before Installing The Water Supply Line, You Will - Electrolux EI33AR80WS | Complete Owners Guide English - Page 14
14 WATER SUPPLY CONNECTION To Connect Water Supply Line To Water Inlet Valve 1. Disconnect the refrigerator from electrical power source. 2. Place the end of the water supply line into a sink or bucket. Turn ON the water supply and flush the supply line until the water is clear. Turn OFF the water - Electrolux EI33AR80WS | Complete Owners Guide English - Page 15
NOTE Check with your local building authority for recommendations on water lines and associated materials prior to installing your new refrigerator. Depending on your local/ state building codes, Electrolux recommends for homes with existing valves its Smart Choice® water line kit 5305513409 (with - Electrolux EI33AR80WS | Complete Owners Guide English - Page 16
16 CONTROLS AND SETTINGS Cool Down Period To ensure safe food storage, allow the appliance to operate with the door closed for at least 8 hours before loading it with food. Power On Upon opening the door, the settings icon will illuminate on the control panel. By pressing the settings icon, you will - Electrolux EI33AR80WS | Complete Owners Guide English - Page 17
remain active for up to 24 hours before automatically deactivating or being manually exited. To turn the function on/off, press CHILL BOOST. When replacing the water filter, see the AUTOMATIC WATER DISPENSER section for instructions on how to prime the water system. 11 WATER DISP The illuminated - Electrolux EI33AR80WS | Complete Owners Guide English - Page 18
18 CONTROLS AND SETTINGS Sabbath Mode The Sabbath Mode is a feature that disables portions of the appliance and its controls in accordance with observance of the weekly Sabbath and religious holidays within the Orthodox Jewish community. To enter Sabbath Mode Simultaneously press and hold - and TEMP - Electrolux EI33AR80WS | Complete Owners Guide English - Page 19
19 CONTROLS AND SETTINGS To exit Sabbath Mode Simultaneously press and hold - and TEMP F/C for 5 seconds. The appliance control display will show all of the icons. In the Sabbath mode, the HIGH TEMP alarm is active for health reasons. For example, if you leave the door ajar, the HIGH TEMP alarm is - Electrolux EI33AR80WS | Complete Owners Guide English - Page 20
the recommended water supply pressure should fall between 30 psi and 100 psi. Excessive pressure may cause the system to malfunction. Using the dispenser after installation: If the system is not flushed, the first glass of water may have discolored water or have an odd flavor. 1. Begin filling the - Electrolux EI33AR80WS | Complete Owners Guide English - Page 21
. For more information about your PureAdvantage Produce Keeper™, see FILTER REPLACEMENT. • Replace the shelf by inserting the mounting bracket hooks into the desired support slots at the rear. • Carefully lower the shelf and lock into position. Slide-Out Shelf The slide-out shelf can hold many - Electrolux EI33AR80WS | Complete Owners Guide English - Page 22
pull it upward until it disengages with the door bin. To install, slide the divider downward into the corresponding door bin alignment features it clears the locking lugs. • Pull the door bin straight out toward you. To install a door bin: • Make sure the locking feature on the bin aligns with the - Electrolux EI33AR80WS | Complete Owners Guide English - Page 23
23 SAVING ENERGY • Locate the appliance in the coolest part of the room, out of direct sunlight, and away from heating ducts or registers. Do not place the unit next to heat-producing appliances such as a range, oven, or dishwasher. If this is not possible, a section of cabinetry or an added layer - Electrolux EI33AR80WS | Complete Owners Guide English - Page 24
your refrigerator and health at risk. Electrolux Genuine Filters are the smarter, safer choice L for PureAdvantage™ and ice and water filter • Rated service flow - .50 gal/min. • Operating Temp.: Min. new filter cartridge. Using the alignment guide, slide it gently into the filter housing until it - Electrolux EI33AR80WS | Complete Owners Guide English - Page 25
filter cover. The open face (carbon media) of the filter should be installed facing outward in the cover. 7. Press and hold WATER FILTER on the Ultra II™ Air Filter WIth more power to clear the air, Electrolux air filters banish pungent smells and work better than baking soda. PureAdvantage - Electrolux EI33AR80WS | Complete Owners Guide English - Page 26
produce with a longer storage life. Here are the product numbers to request when ordering: PureAdvantage Produce Keeper™ PK-1™ ELPAPKRF™ . Installing the PureAdvantage Produce Keeper™: 1. Remove the plastic wrapper. Insert unopened packet into the holder in the TasteLock™ Crisper Drawer. 2. For - Electrolux EI33AR80WS | Complete Owners Guide English - Page 27
27 CARE AND CLEANING Protecting Your investment Keeping your appliance clean maintains appearance and prevents odor build-up. Wipe up any spills immediately and clean the appliance at least twice a year. When cleaning, take the following precautions: • Never use CHLORIDE or cleaners with bleach to - Electrolux EI33AR80WS | Complete Owners Guide English - Page 28
. Use a non-abrasive stainless steel cleaner. These cleaners can be purchased at most home improvement or major department stores. Always follow manufacturer's instruction. NOTE: Always, clean, wipe and dry with grain to prevent cross-grain scratching. Wash the rest of the cabinet with warm water - Electrolux EI33AR80WS | Complete Owners Guide English - Page 29
troubleshoot your concern! This section will help you with common issues. If you need us, visit our website, chat with an agent, or call us. We may be able to help you avoid a service visit. If you do need service . in the INSTALLATION section. Appliance DOOR PROBLEMS in TROUBLESHOOTING section. - Electrolux EI33AR80WS | Complete Owners Guide English - Page 30
30 TROUBLESHOOTING CONCERN CAUSE SOLUTION APPLIANCE TEMPERATURES (cont'd) Temperature inside Leveling" rocks on the floor when in the INSTALLATION section. it is moved slightly. • Floor is uneven or weak. • Ensure floor can adequately support the appliance. Level the appliance by putting wood - Electrolux EI33AR80WS | Complete Owners Guide English - Page 31
support appliance. Level the appliance by putting wood or metal shims under part of the appliance. • Look for food items on the shelves or in the door bins keeping the door from closing completely. LIGHTING PROBLEMS Cabinet light is • LED has burned out. not working. • Call an Electrolux service - Electrolux EI33AR80WS | Complete Owners Guide English - Page 32
accordance with the provided instructions. 8. Service calls to correct the installation of your appliance or to instruct you how to use Electrolux Major Appliances North America, a division of Electrolux Home Products, Inc. In Canada, your appliance is warranted by Electrolux Canada Corp. Electrolux - Electrolux EI33AR80WS | Complete Owners Guide English - Page 33
A16366203 (April 2021) electroluxappliances.com
-
 1
1 -
 2
2 -
 3
3 -
 4
4 -
 5
5 -
 6
6 -
 7
7 -
8
-
9
-
10
-
11
-
12
-
13
-
14
-
15
-
16
-
17
-
18
-
19
-
20
-
21
-
22
-
23
-
24
-
25
-
26
-
27
-
28
-
29
-
30
-
31
-
32
-
33
 |
 |
electroluxappliances.com\register
electroluxappliances.ca
Use & Care Guide
EN
Refrigerator