Electrolux EI33AR80WS Complete Owners Guide English - Page 2
Introduction - installation manual
 |
View all Electrolux EI33AR80WS manuals
Add to My Manuals
Save this manual to your list of manuals |
Page 2 highlights
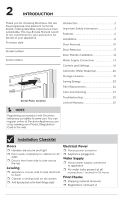
2 INTRODUCTION Thank you for choosing Electrolux. We are the progressive and premium home life brand, making desirable experiences more sustainable. This Use & Care Manual is part of our commitment to your experience for the life of your appliance. Purchase date Model number Serial number jjjjffffkkkk;;;;ffffkkkkddddaaaa;;;;jjjjffffddddaaaa jjjjffffkkkk;;;;ffffkkkkddddaaaa;;;;jjjjffffddddaaaa jjjjffffkkkk;;;;ffffkkkkddddaaaa;;;;jjjjffffddddaaaa jjjjffffkkkk;;;;ffffkkkkddddaaaa;;;;jjjjffffddddaaaa jjjjffffkkkk;;;;ffffkkkkddddaaaa;;;;jjjjffffddddaaaa jjjjffffkkkk;;;;ffffkkkkddddaaaa;;;;jjjjffffddddaaaa jjjjffffkkkk;;;;ffffkkkkddddaaaa;;;;jjjjffffddddaaaa jjjjffffkkkk;;;;ffffkkkkddddaaaa;;;;jjjjffffddddaaaa Serial Plate location Introduction 2 Important Safety information 3 Features 6 Installation 8 Door Reversal 10 Door Removal 11 Door Handle Installation 12 Water Supply Connection 13 Controls and Settings 16 Automatic Water Dispenser 20 Storage Features 21 Saving Energy 23 Filter Replacement 24 Care and Cleaning 27 Troubleshooting 29 Limited Warranty 32 NOTE Registering your product with Electrolux enhances our ability to serve you. You can register online at ElectroluxAppliances.com or by sending your Product Registration Card in the mail. Installation Checklist Doors ˆˆ Handles are secure and tight ˆˆ Door seals completely to cabinet on all sides ˆˆ Door is level from side to side across the top Leveling ˆˆ Appliance is level, side to side and front to back ˆˆ Cabinet is setting solid on all corners ˆˆ Anti-tip bracket set in front (hinge side) Electrical Power ˆˆ House power turned on ˆˆ Appliance plugged in Water Supply ˆˆ House water supply connected to appliance ˆˆ No water leaks present at all connections - recheck in 24 hours Final Checks ˆˆ Shipping material removed ˆˆ Registration card sent in
-
 1
1 -
 2
2 -
 3
3 -
 4
4 -
 5
5 -
 6
6 -
 7
7 -
 8
8 -
9
-
10
-
11
-
12
-
13
-
14
-
15
-
16
-
17
-
18
-
19
-
20
-
21
-
22
-
23
-
24
-
25
-
26
-
27
-
28
-
29
-
30
-
31
-
32
-
33
 |
 |
