Electrolux EIDW1805KS Installation Instructions (English) - Page 10
Drain Line Installation, Step 12, Connect Drain Line
 |
View all Electrolux EIDW1805KS manuals
Add to My Manuals
Save this manual to your list of manuals |
Page 10 highlights
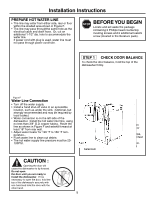
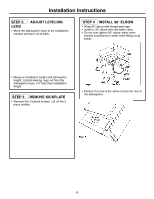
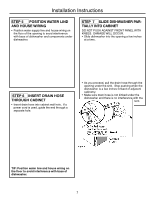
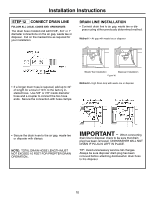
Installation Instructions STEP 12 CONNECT DRAIN LINE FOLLOW ALL LOCAL CODES AND ORDINANCES The drain hose molded end will fit 5/8", 3/4" or 1" diameter connections on the air gap, waste tee or disposer. Cut on the marked line as required for your installation. DRAIN LINE INSTALLATION • Connect drain line to air gap, waste tee or disposer using either previously determined method. Method 1 - Air gap with waste tee or disposer • If a longer drain hose is required, add up to 42" of length for a total of 10 ft. to the factory installed hose. Use 5/8" or 7/8" inside diameter hose and a coupler to connect the two hose ends. Secure the connection with hose clamps. Waste Tee Installation Disposer Installation Figure W Method 2 - High Drain loop with waste tee or disposer • Secure the drain hose to the air gap, waste tee or disposer with clamps. NOTE: TOTAL DRAIN HOSE LENGTH MUST NOT EXCEED 10 FEET FOR PROPTER DRAIN OPERATION.. Waste Tee Installation Disposer Installation Figure X IMPORTANT - When connecting drain line to disposer check to be sure that drain plug has been removed. DISHWASHER WILL NOT DRAIN IF PLUG IS LEFT IN PLACE. TIP: Avoid unnecessary service call charges. Always be sure disposer drain plug has been removed before attaching deishwasher drain hose to the disposer. 10
-
 1
1 -
2
-
3
-
4
-
 5
5 -
 6
6 -
 7
7 -
 8
8 -
 9
9 -
 10
10 -
 11
11 -
 12
12
 |
 |
