Electrolux EWFLS70JIW Installation Instructions (All Languages) - Page 15
H Removing Latch Indicator, G Removing Striker Plate, I Removing Hole Plug
 |
UPC - 012505382796
View all Electrolux EWFLS70JIW manuals
Add to My Manuals
Save this manual to your list of manuals |
Page 15 highlights
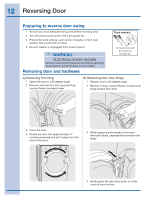
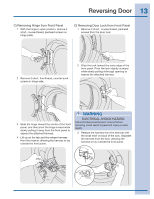
Reversing Door 15 G) Removing Striker Plate I) Removing Hole Plug 1 Remove 2 long, course-thread, counter-sunk screws and striker plate. 2 Set the striker plate to the side for later. H) Removing Latch Indicator 1 Insert flat blade screwdriver into open slot of hole plug. 2 Gently pry upward to release tab. 1 Insert flat blade screwdriver into open slot of latch indicator. 2 Gently pry upward to release tab. 3 Pull the hole plug out and set it aside. 3 Pull the indicator out and set it aside.
-
 1
1 -
2
-
3
-
4
-
5
-
6
-
7
-
8
-
9
-
 10
10 -
 11
11 -
 12
12 -
 13
13 -
 14
14 -
 15
15 -
 16
16 -
 17
17 -
 18
18 -
 19
19 -
 20
20 -
21
-
22
-
23
-
24
-
25
-
26
-
27
-
28
-
29
-
30
-
31
-
32
-
33
-
34
-
35
-
36
-
37
-
38
-
39
-
40
-
41
-
42
-
43
-
44
-
45
-
46
-
47
-
48
-
49
-
50
-
51
-
52
-
53
-
54
-
55
-
56
 |
 |

15
Reversing Door
H) Removing Latch Indicator
1
Insert flat blade screwdriver into open slot of
latch indicator.
2
Gently pry upward to release tab.
3
Pull the indicator out and set it aside.
3
Pull the hole plug out and set it aside.
G) Removing Striker Plate
1
Remove 2 long, course-thread, counter-sunk
screws and striker plate.
2
Set the striker plate to the side for later.
I) Removing Hole Plug
1
Insert flat blade screwdriver into open slot of
hole plug.
2
Gently pry upward to release tab.