Electrolux EWMGD65HIW Installation Instructions
Electrolux EWMGD65HIW - 8.0 cu. Ft. Gas Dryer Manual
 |
UPC - 012505379017
View all Electrolux EWMGD65HIW manuals
Add to My Manuals
Save this manual to your list of manuals |
Electrolux EWMGD65HIW manual content summary:
- Electrolux EWMGD65HIW | Installation Instructions - Page 1
Installation Instructions Electrolux Front-Load Gas a Electric Dryer E Electrolux 1)701820) A 10e0i I - Electrolux EWMGD65HIW | Installation Instructions - Page 2
wIre call... 12 Electrical connection - Bectric dryer (4-wirecacq...13 Gee oarnectian 14 Water connection (Steam Model only) 15-16 General installation 17 Performing installs:bar cycle is Resenting &cc 1943 Options 24 • Access:ties 44 • Replacement parts 24 Espahol 25-sx Francais - Electrolux EWMGD65HIW | Installation Instructions - Page 3
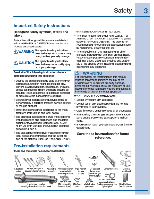
garbage container dr maXe materials inaccessible to children. • Clothes dryer installation aid service must be performed by a qualified Installer, service agency or the gas supplier • Install the cbthes dryer according to the rrenutacturers instructions and boat codes. • The electrical seiviceto the - Electrolux EWMGD65HIW | Installation Instructions - Page 4
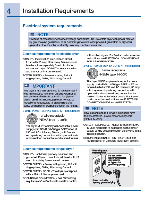
wit clothes dryers. Fora-wire cord connection instructions see ELECTRICAL CONNECTIONS FOR A 4-WIRE SYSTEM. IM NOTE Dryers manufactured ror dryer is In tre installed posltbn. nouNoiNc CONNCCTION - Cee "Grounding requirements' in Electrical installation section. Electrical requirements for gas dryer - Electrolux EWMGD65HIW | Installation Instructions - Page 5
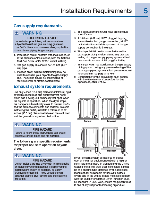
drying times an0 ire hazards. L reeembet The following are specific requirements for proper and safe operation of your dryer. WARNING FIRE HAZARD Do not Install a oomes dryer with flexible plastic or metal fon val1Ing MaterlaS. Flexible venting matenais are known to collapse. be easily crusneo - Electrolux EWMGD65HIW | Installation Instructions - Page 6
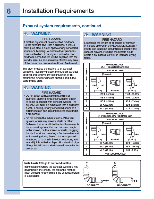
6 Installation Requirements Exhaust system requirements, continued WARNING FIRE HAZARD A clothes dryer mug be exhausted outdoors. Do not oxnauct Myer into a chimney. a wail a ceiling, an attic, a crawl space or any concealec space or a building. A Clothes dryer produces combustible lint. If Tie - Electrolux EWMGD65HIW | Installation Instructions - Page 7
Part 280) orStandar° CAWCSAZ240 MH. 2 Dryer MUST be exhausted OUt°40$ (outdoors. not beneath tile!while home)maig mutts] Uuelllig that win not support to previous sections n this guide for other important exhaust venting system requirements. 5. when Installing a gas dryer into a mobile home, a - Electrolux EWMGD65HIW | Installation Instructions - Page 8
installed to ac iete 0' (0 cry installation. Pal " pa)$ 7 7$17^4 11 closet door • NOTE TO achieve an instailzdon with 0" (0 cm) clearance tor the back Of the direr (for other than straight back venting). a quick-tum SO° dryer vent elbow must be installed as desalbed previcusly in this manual - Electrolux EWMGD65HIW | Installation Instructions - Page 9
Requirements 9 AIM Installed dryer dimensions ferroideiny to dampen door ea Mel as dear (Oder, O ter assn gest IleceNns J Oar (110.Sal sr, IsId.la tv-wft re".7 dive navitid * - Electrolux EWMGD65HIW | Installation Instructions - Page 10
. Electrical shock can result if the dryer is not propeny grounaea. Follow tne instructions in this manual tor proper grounding. e Do not use De plugged into an appropriate. copper wired receptacle tnat is properly installs° and grounaeci in accordance with all local cozies and ordinances. if - Electrolux EWMGD65HIW | Installation Instructions - Page 11
Installation Instructions 11 Grounding requirements - Electrb dryer (Canada) A\ WARNING ELECTRICAL SHCCK HAZARD improper in doubt as to whether the apcuance Is properly grounded. Foi a grounaeci. cora-connected dryer. 1. The aryer MUST be grounded. In tne event of a malfunction or breakdown. - Electrolux EWMGD65HIW | Installation Instructions - Page 12
Installation Instructions Electrical connection (non-Canada) - 3 wire cord 3-wire receptacle %00 (NEMA type 10-30R) /?\ WARNING ELECTRICAL SHOCK HAZARD Failure to - Electrolux EWMGD65HIW | Installation Instructions - Page 13
or tne dyer. 3 install a UL-approved strain rale/ according to tne power corcVstrain 'elle/ manufacturers instructions in the power cord entry with tne ground (GREEN) screw. Tighten the screw securcly. 7 Move the internal dryer Maness ground (BLACK) wire to the terminal dock and attach It along With - Electrolux EWMGD65HIW | Installation Instructions - Page 14
Installation Instructions Gas connection 1. Remove the snipping cap from gas pipe at the near ot the dryer. MI IMPORTANT DO NOT connect tna - Electrolux EWMGD65HIW | Installation Instructions - Page 15
Installation Instructions 15 Water connection (Steam Model only) 1 'Rim off COLDwater supply to washer. 2 Remove COLD Inlet hose from COLD water supply and Inspect for ti ter - Electrolux EWMGD65HIW | Installation Instructions - Page 16
16 Installation Instructions Water connection, con't (Steam Model only) 1. if your installation has nom tor the COLD water coupling to tho Crass wator Inlot on tho bad. of the dryer and snug it by hand. lighten each correction ot the dryer Inlet hose another 2'3 turn with pliers. O. TUm on the - Electrolux EWMGD65HIW | Installation Instructions - Page 17
am money. 6 See the next page about peilaming a Met, helpful •installation Cycle" to your new dryer. 7 It you have any questbns duilng Initial opetatbn, please neview the "Avoid Service Cheddis In ycurUse & Care Guide before calling for seivice. 8 Place these Inshucticrts n a location near the - Electrolux EWMGD65HIW | Installation Instructions - Page 18
for use. It It prompts an action such as SOiVCECO.NO GAS or CPU SERVICE 87 435 3297, review the installation steps and make the necessary corrections before you attempt to uSe the dryer. 5.YOUr dryer will oaths installation Cycle and return to normal operation the next time you wake ft up. g NOTE - Electrolux EWMGD65HIW | Installation Instructions - Page 19
flat woik surface, such as top of dryer or11)or near dryer, with a soft cloth or towel. 4 Be sure dryer Is unplucged from power source) th 000r 01M appoidtreddy W countecCIOCkWlse and pull Wig away from dear. 3 Mlle supporting dear with the other hand, remove 3 short, line-thread, ccunter-sunk - Electrolux EWMGD65HIW | Installation Instructions - Page 20
aside. 2 Rotate striker and movetooppsite opening. Mt:at-Iwith 2 short. couise-trireai, pannead scams. 2 Remove 4 Iamb course-thread. recessed screws and hinge. Set hinge aside. 3 Install nal plastic hole plugs or use new plugs suppliedwith - Electrolux EWMGD65HIW | Installation Instructions - Page 21
E) Removing Latch Indicator Reversing Door 21 F) Removing Hole Plug 1 Grasp indicator on latch side between linger and thumb and rock upward, pivoting away from center of glass. 2 Gently push Indicator tward center of glass to release tab. antab Inlet 1 Grasp hole plug tehveen linger and thumb - Electrolux EWMGD65HIW | Installation Instructions - Page 22
22 Reversing Door G) Reinserting Latch Indicator 1 Rotate latch inlicator and moveto opposba ride in door. 2 Grasp inalcator between angers and $licle through cpenirg. I) Reattaching Latch Plate 1 Rotate latch plea and move to opposite slce 01door above Irdlcatcr. 2 Reattach with 2 long course- - Electrolux EWMGD65HIW | Installation Instructions - Page 23
panhead screws through lace of hinge plate. N) Reinstall ng Trim Plug 1 Open door to ao degreemg*. 2 Install trim plug with 1 icng, course-thread, panhead screw. 4 Close door and test opera bn 01 latch. down. lb a remove plate titim rigrr. pivot point s up. 0; Plug in dryer and cant nue operation. - Electrolux EWMGD65HIW | Installation Instructions - Page 24
where you purchased your dryer, call 1-877-4ELECTROLUX (1-877-435-32E7). a visit our webstte, www.electoimappliances. oom, for the Electrolta Authorized Parts Distilbu:or nearest ycu. /f\ WARNING LEU I FUGAL HAZAHL) Label an wires prior to aisccnnection when servicing controls. 'fling enors can
-
 1
1 -
 2
2 -
 3
3 -
 4
4 -
 5
5 -
 6
6 -
 7
7 -
8
-
9
-
10
-
11
-
12
-
13
-
14
-
15
-
16
-
17
-
18
-
19
-
20
-
21
-
22
-
23
-
24
 |
 |
Installation
Instructions
Electrolux
Front
-Load
Gas
a
Electric
Dryer
E
Electrolux
1)701820)
A
10e0i
I