Electrolux EWMGD65HIW Installation Instructions - Page 17
breaker/fuse
 |
UPC - 012505379017
View all Electrolux EWMGD65HIW manuals
Add to My Manuals
Save this manual to your list of manuals |
Page 17 highlights
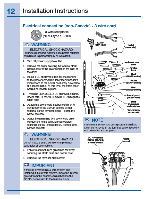
Installation Instructions 17 General installation 1 Connect the exhaust duct to the outside exhaust system (see pages 5 through 7). Use of a r (10.2 a damp Is recommended to connect the dryer to the exhaust vent system. use motet fog tape to seal all otner joints. 2 Canefully slide the dryer to Its anal posaion. Adjust one a may crt the legs until the dryer Is resting solidly on all tourlegs. Place a level on top of the dryer. The diyer MUST be level and resting solidly on all tourlegs. Rock alternating corners to check for statillty. Remove and discern door tape. M IMPORTANT Be sure the power Is off at a =nit bnaaltar/tuse box before pugging the power cord Into an allot. 3 Plug the power cord Into a grounded outlet. 4 Awn on the power at thecituft breaker/fuse box. 5 Read the Use & Care Guide provided with the dryer. It contains valLable and helpful tot information that will save you lime am money. 6 See the next page about peilaming a Met, helpful •installation Cycle" to your new dryer. 7 It you have any questbns duilng Initial opetatbn, please neview the "Avoid Service Cheddis In ycurUse & Care Guide before calling for seivice. 8 Place these Inshucticrts n a location near the dryer for future reference. NOTE I A wiring diagram and technixil data sheet are located inside the dryercc:rude. r Domtunder ;Awls** 14/ . 9muleV/Perill L %CO
-
 1
1 -
2
-
3
-
4
-
5
-
6
-
7
-
8
-
9
-
10
-
11
-
 12
12 -
 13
13 -
 14
14 -
 15
15 -
 16
16 -
 17
17 -
 18
18 -
 19
19 -
 20
20 -
 21
21 -
 22
22 -
23
-
24
 |
 |
