Electrolux GLMV169HS Installation Instructions
Electrolux GLMV169HS Manual
 |
View all Electrolux GLMV169HS manuals
Add to My Manuals
Save this manual to your list of manuals |
Electrolux GLMV169HS manual content summary:
- Electrolux GLMV169HS | Installation Instructions - Page 1
appliance requires basic mechanical and electrical skills. • Proper installation is the responsibility of the installer. • Product failure due to improper installation is not covered under the Warranty. • Please read all instructions thoroughly before installing the Over the Range Microwave Oven - Electrolux GLMV169HS | Installation Instructions - Page 2
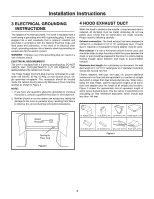
be located inside the cabinet directly above the Microwave Oven mounting location as shown in Figure 2. NOTE: 1. If you have any questions about the grounding or electrical instructions, consult a qualified electrician or serviceperson. 2. Neither Electrolux nor the dealer can accept any liability - Electrolux GLMV169HS | Installation Instructions - Page 3
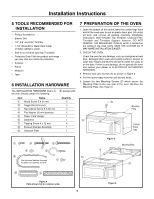
the oven over to rest on plastic foam pad. Lift carton off oven and remove all packing materials, Installation Instructions, Wall Template, Top Template, Charcoal Filter, Turntable and Turntable Support; however, DO NOT REMOVE THE WAVEGUIDE COVER, which is located on the ceiling in the oven cavity - Electrolux GLMV169HS | Installation Instructions - Page 4
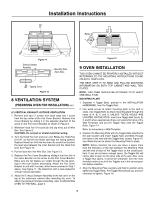
requires the use of the Charcoal Filter, which has been installed in the oven. Horizontal Exhaust - outside ventilation. Follow installation procedure (B). Vertical Exhaust - outside ventilation. Follow installation procedure (C). 5. Replace the Fan Cover Bracket by sliding it into the slits - Electrolux GLMV169HS | Installation Instructions - Page 5
INSTALLATION) cont. (C) VERTICAL EXHAUST: OUTSIDE VENTILATION 1. Remove and save 2 screws from back edge and 1 screw from the top center of the Fan Cover Bracket. Remove Fan Cover Bracket onto the Toggle Bolts. Figure 14. Refer to instructions in Wall Template. 3. Position the Mounting Plate with - Electrolux GLMV169HS | Installation Instructions - Page 6
Installation Instructions 9 OVEN INSTALLATION cont. Toggle Nut Toggle Bolt Mounting Plate Figure 14 Space more than wall thickness (D) (D) Wall Figure 15 Figure 16 MOUNTING OVEN TO THE WALL Two people are recommended to attach the Microwave Oven/Hood to the Mounting Plate. 1. Thread the - Electrolux GLMV169HS | Installation Instructions - Page 7
Installation Instructions OPTIONAL TIP: After removing oven from carton, flip carton (B) Top Side (A) Cutting Line Figure 21 CHECKLIST FOR INSTALLATION 1. Make sure the unit has been installed according to all of the Installation Instructions and the Wall and Top Cabinet Templates. 2. Plug - Electrolux GLMV169HS | Installation Instructions - Page 8
Installation Instruction Notes 8
-
 1
1 -
 2
2 -
 3
3 -
 4
4 -
 5
5 -
 6
6 -
 7
7 -
8
 |
 |
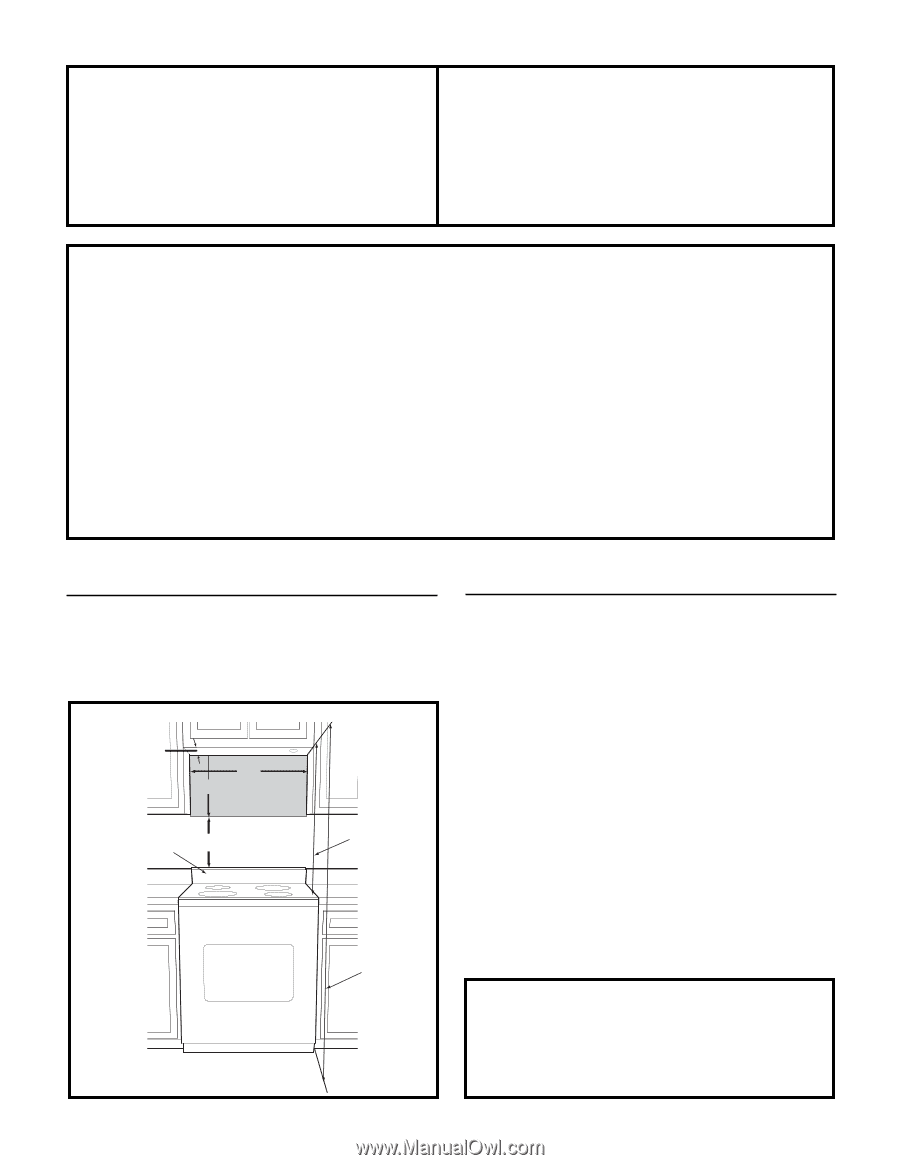
1
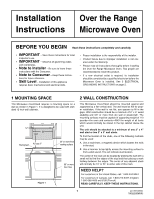
1 MOUNTING SPACE
This Microwave Oven/Hood requires a mounting space on a
wall as shown in Figure 1. It is designed to be used with stan-
dard 12-inch wall cabinets.
p/n
316137
2
34
TINSEB385MRR0
2 WALL CONSTRUCTION
This Microwave Oven/Hood should be mounted against and
supported by a flat vertical wall. The wall must be flat for prop-
er installation. If the wall is not flat, use spacers to fill in the
gaps. Wall construction should be a minimum of 2” x 4” wood
studding and 3/8” or more thick dry wall or plaster/lath. The
mounting surfaces must be capable of supporting weight of 110
pounds—the oven and contents—AND the weight of all items
which would normally be stored in the top cabinet above the
unit.
The unit should be attached to a minimum of one 2” x 4”
wall stud or two 2" x 3" wall studs.
To find the location of the studs, one of the following methods
may be used:
A.
Use a stud finder, a magnetic device which locates the nails
in the stud.
B. Use a hammer to tap lightly across the mounting surface to
find a solid sound. This will indicate stud location.
The center of the stud can be located by probing the wall with a
small nail to find the edges of the stud and then placing a mark
halfway between the edges. The center of any adjacent studs
will normally be 16” or 24” to either side of this mark.
Installation
Instructions
Over the Range
Microwave Oven
BEFORE YOU BEGIN
•
IMPORTANT
– Save these instructions for local
inspector's use.
•
IMPORTANT
– Observe all governing codes
and coordinates.
•
Note to Installer
– Be sure to leave these
instructions with the Consumer.
•
Note to Consumer
– Keep these instruc-
tions for future reference.
•
Skill Level
– Installation of this appliance
requires basic mechanical and electrical skills.
•
Proper installation is the responsibility of the installer.
•
Product failure due to improper installation is not cov-
ered under the Warranty.
•
Please read all instructions thoroughly before installing
the Over the Range Microwave Oven. Two people are
recommended to install this product.
•
If a new electrical outlet is required, its installation
should be completed by a qualified electrician before the
Microwave Oven is installed. See 3 ELECTRICAL
GROUNDING INSTRUCTIONS on page 2.
Read
these instructions completely and carefully.
NEED HELP?
For customers in the United States, call: 1-800-944-9044
For customers in Canada, call: 1-800-213-9397 (English)
1-800-668-4606 ext.8199 (French)
READ CAREFULLY. KEEP THESE INSTRUCTIONS.
Figure 1
66" or more
from floor
Backsplash
At least 2"
15.5"
30"
12"
30" or more from
cooking surface