Electrolux GLMV169HS Installation Instructions - Page 6
Oven Installation
 |
View all Electrolux GLMV169HS manuals
Add to My Manuals
Save this manual to your list of manuals |
Page 6 highlights
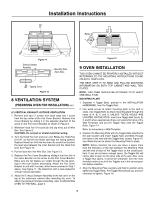
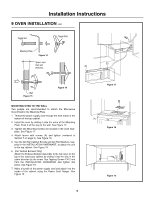
Installation Instructions 9 OVEN INSTALLATION cont. Toggle Nut Toggle Bolt Mounting Plate Figure 14 Space more than wall thickness (D) (D) Wall Figure 15 Figure 16 MOUNTING OVEN TO THE WALL Two people are recommended to attach the Microwave Oven/Hood to the Mounting Plate. 1. Thread the power supply cord through the hole made in the bottom of the top cabinet. 2. Install the oven by sliding it onto the arms of the Mounting Plate. Push it all the way to the wall. See Figure 17. 3. Tighten two Mounting Screws (D) located in the oven faceplate. See Figure 17. 4. Attach louver with screws (A) and tighten (removed in Section 7 on page 3). See Figure 18. 5. Use the two Top Cabinet Screws and two Flat Washers, supplied in the INSTALLATION HARDWARE, to attach the unit to the top cabinet. See Figure 19. 6. (For Vertical Exhaust Only) Attach the Exhaust Damper Assembly to the fan cover on the top of the outercase cabinet by sliding it into the slits in the same direction as the arrow. Use Tapping Screw 4 X12 mm from the INSTALLATION HARDWARE and tighten into place. See Figure 19. 7. Make a bundle of the power supply cord and attach it to the inside of the cabinet using the Power Cord Hanger. See Figure 19. 6 Figure 17 (A) (A) (A) Figure 18 Figure 19
-
 1
1 -
 2
2 -
 3
3 -
 4
4 -
 5
5 -
 6
6 -
 7
7 -
 8
8
 |
 |
