Epson 50 Quick Guide - Page 15
sides of the CD/DVD tray slide into the brackets on the front tray.
 |
UPC - 010343168718
View all Epson 50 manuals
Add to My Manuals
Save this manual to your list of manuals |
Page 15 highlights
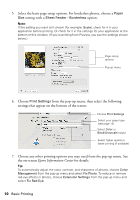
3. Place the front tray in the CD/DVD position (upper notches). 4. Place the disc on the CD/DVD tray with the white or printable side face-up. Make sure the disc lies flat in the tray. CD/DVD adapter 12-cm CD/DVD 8-cm CD/DVD 5. Gently insert the CD/DVD tray along the base of the front tray until the arrows on the CD/DVD tray and the front tray are aligned. Make sure both sides of the CD/DVD tray slide into the brackets on the front tray. Align the arrows 6. To design and print with Epson Print CD, follow the detailed instructions in in the on-screen Epson Information Center. Caution: Be sure to place the front tray in the paper (lower) position when you're done printing on CDs and DVDs. Printing on CDs and DVDs 15
-
 1
1 -
2
-
3
-
4
-
5
-
6
-
7
-
8
-
9
-
 10
10 -
 11
11 -
 12
12 -
 13
13 -
 14
14 -
 15
15 -
 16
16 -
 17
17 -
 18
18 -
 19
19 -
 20
20 -
21
-
22
-
23
-
24
-
25
-
26
-
27
-
28
-
29
-
30
-
31
-
32
-
33
-
34
-
35
-
36
 |
 |
Printing on CDs and DVDs
15
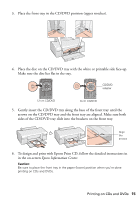
3.
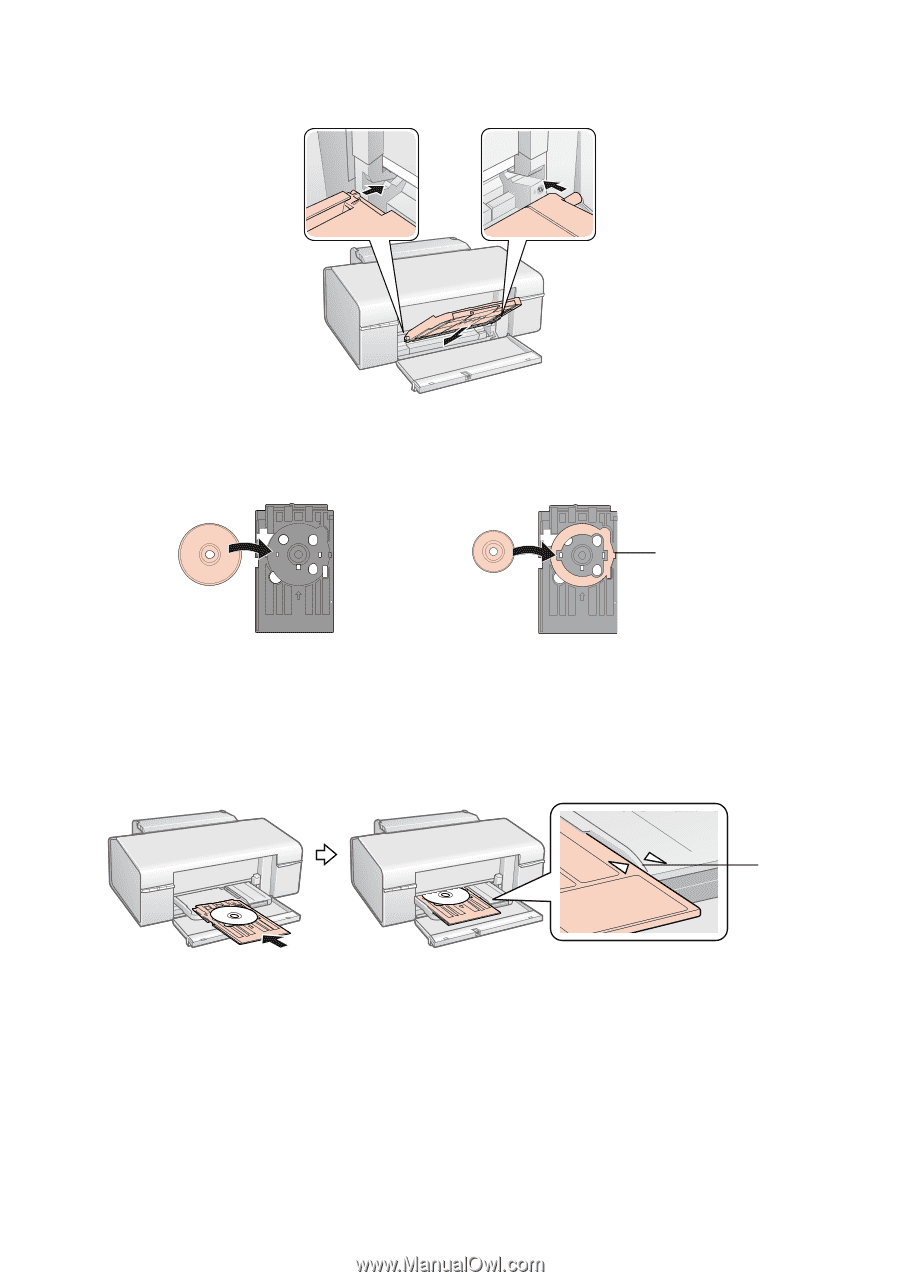
Place the front tray in the CD/DVD position (upper notches).
4.
Place the disc on the CD/DVD tray with the white or printable side face-up.
Make sure the disc lies flat in the tray.
5.
Gently insert the CD/DVD tray along the base of the front tray until the
arrows on the CD/DVD tray and the front tray are aligned. Make sure both
sides of the CD/DVD tray slide into the brackets on the front tray.
6.
To design and print with Epson Print CD, follow the detailed instructions in
in the on-screen
Epson Information Center
.
Caution:
Be sure to place the front tray in the paper (lower) position when you’re done
printing on CDs and DVDs.
8-cm CD/DVD
12-cm CD/DVD
CD/DVD
adapter
Align
the
arrows