Epson 7700p Product Information Guide - Page 3
Computer Video Port Pin Assignments, Positioning the Projector, EPSON PowerLite 7700p Projector - 3
 |
View all Epson 7700p manuals
Add to My Manuals
Save this manual to your list of manuals |
Page 3 highlights
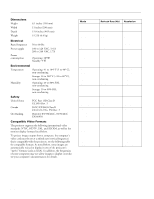
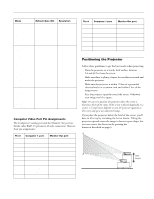
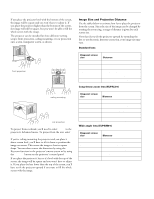
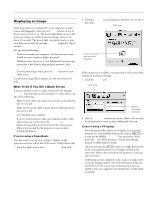
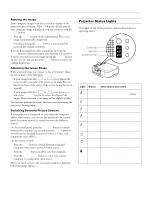
EPSON PowerLite 7700p Projector Mode Refresh Rate (Hz) Resolution MACL13 MAC II 13 MAC16 MAC19-60 MAC19 MAC21 HDTV480P (ANSI/ SMPTE) HDTV480P (ATSC) HDTV480I (ANSI/ SMPTE) HDTV480I (ATSC) HDTV720P (SMPTE) HDTV1080P (ANSI/ SMPTE) HDTV480I (ANSI/ SMPTE) NTSC (SVGA) NTSC (XGA) PAL (SVGA) PAL (XGA) SECAM (SVGA) SECAM (XGA) 66.62 66.67 74.55 59.28 74.93 75.062 59.94 59.94 59.94 59.94 59.94 59.94 59.94 60 60 50 50 50 50 640 × 480 640 × 480 832 × 624 1024 × 768 1024 × 768 1152 × 870* 720 × 483 704 × 480 720 × 487 704 × 480 1280 × 720 1920 × 1080 1920 × 1080 800 × 438 1024 × 438 800 × 512 1024 × 512 800 × 512 1024 × 512 * The image is resized so that it displays using one of the projector's native formats. Computer Video Port Pin Assignments The Computer 1 analog port and the Monitor Out port are female video RGB, 15-pin micro-D-style connectors. Here are their pin assignments: Pin # 1 2 3 4 5 6 7 8 9 Computer 1 port Red video Green video Blue video Monitor (ID bit 2) GND Red video GND Green video GND Blue video GND +5V Monitor Out port Red out / red video Green out / green video Blue out / blue video Reserved GND GND GND GND Reserved Pin # 10 11 12 13 14 15 Computer 1 port Synchronous GND Monitor (ID bit 0) SDA Horizontal sync Vertical sync Reserved Monitor Out port GND Reserved Reserved Horizontal sync Vertical sync Vertical sync Positioning the Projector Follow these guidelines to get the best results when projecting: t Place the projector on a sturdy, level surface, between 3.6 and 48 feet from the screen. t Make sure there is plenty of space for ventilation around and under the projector. t Make sure the projector is within 10 feet of a grounded electrical outlet or extension cord and within 5 feet of the image source. t Face the projector squarely toward the screen. Otherwise, your image won't be square. Note: It's easier to position the projector when the screen is directly in front of the room. If the screen is placed diagonally in a corner, it's much more difficult to aim the projector squarely at the screen and get a non-distorted image. If you place the projector below the level of the screen, you'll have to tilt it up by extending the feet as shown. Tilting the projector upward causes the image to lose its square shape, but you can correct the distortion by pressing the Keystone button as described on page 6. ideal height 11/00 EPSON PowerLite 7700p Projector - 3
-
 1
1 -
 2
2 -
 3
3 -
 4
4 -
 5
5 -
 6
6 -
 7
7 -
 8
8 -
 9
9 -
10
-
11
 |
 |
