Epson C11C294131BZ Product Information Guide - Page 11
Qvwdoolqj Wkh &roru 8sjudgh .lw
 |
View all Epson C11C294131BZ manuals
Add to My Manuals
Save this manual to your list of manuals |
Page 11 highlights
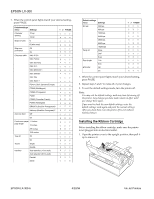
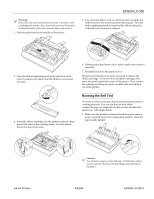
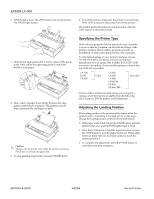
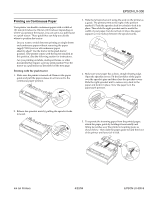
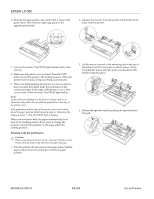
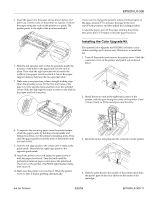
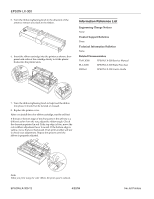
(3621ý/;ðêíí 5. Insert the paper into the paper slot as shown below and pull it up. Use the scale on the printer as a guide. Position the paper using the scale on the printer as a guide. The printer prints to the right of the position marked 0. If you want to change the position where printing begins on the page, press LF/FF to advance the page to the next top-of-form position, and then adjust the loading position. To eject the paper, tear off the paper entering the printer; then press the LF/FF button to feed the paper forward. 6. Slide the left sprocket unit so that its sprockets match the position of the holes in the paper and lock the unit in place. Then slide the right sprocket unit to match the width of your paper, but do not lock it. Move the paper support midway between the two sprocket units. 7. Make sure your paper has a clean, straight leading edge. Open the sprocket covers. Fit the first four holes of the paper over the sprocket pins and then close the sprocket covers. Slide the right sprocket unit to remove any slack in the paper and lock it in place. 10 5 0 ,QVWDOOLQJýWKHý&RORUý8SJUDGHý.LWý The optional color upgrade kit (C832081) includes a color ribbon cartridge and a motor unit. Here's how to install the kit: 1. Turn off the printer and remove the printer cover. Slide the connector cover on the printer and pull it out as shown below. 2. Install the motor unit in the right hand corner of the printer, with the gear facing the center of the printer. Push it down firmly to fit the metal pins into the slots. 8. To separate the incoming paper from the printed paper, attach the paper guide by holding it horizontally and fitting its notches over the printer's mounting posts. Then slide the paper guide toward the back of the printer until you feel it click. 9. Slide the left edge guide to the center until it stops at the guide mark. Then slide the right edge guide to the opposite guide mark. 10.Attach the printer cover and adjust the paper position with the paper-feed knob. Turn the knob until the perforation between pages is just above the print head. Then turn on the printer. The PAUSE light flashes briefly, then stays off. 11.Make sure the printer cover is closed. When the printer receives data, it begins printing automatically. 3. Insert the motor unit plug into the connector on the printer. 4. Slide the print head to the middle of the printer; then slide the plastic part on the color ribbon to the center of the cartridge. ,QNý-HWý3ULQWHUV (3621
-
 1
1 -
2
-
3
-
4
-
5
-
 6
6 -
 7
7 -
 8
8 -
 9
9 -
 10
10 -
 11
11 -
 12
12
 |
 |
