Epson C11C294131BZ Product Information Guide - Page 4
Default settings descriptions
 |
View all Epson C11C294131BZ manuals
Add to My Manuals
Save this manual to your list of manuals |
Page 4 highlights
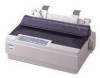
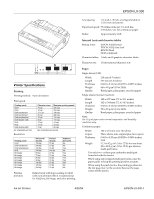
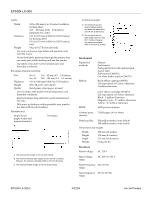
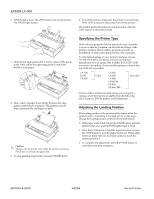
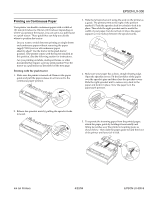
(3621ý/;ðêíí LF/FF button Press this button briefly to feed the paper forward one line. Hold this button down to eject a single sheet or to advance continuous paper to the next top-of-form position. You can also use this button to eject a page. You can also use this button to run a self-test to make sure the printer is working correctly. To start the self-test, hold down the LF/FF button while you turn on your printer. PAUSE button Press this button to stop printing temporarily. Press it again to resume printing. PAPER PARK Press the FONT and LF/FF buttons together to feed continuous paper backward to the paper park position. See "Printing with the push tractor." MICRO ADJUST button Feeds paper backward to adjust the loading position. See "Adjusting the loading position." &KDUDFWHUý)RQWV To choose one of the four internal fonts listed on the control panel, press the FONT button. The two FONT lights come on (1 ) or go off (2 ) to indicate the active font. Press the button repeatedly to cycle through all selections. Your selection stays in effect until you change it or turn off the printer. Any font you select with your software overrides any you selected at the control panel. Roman Sans Serif Draft Draft Condensed Font 12 Pap Micro Adjust The table below lists the available fonts and shows how the FONT lights appear for each selection. )RQW (SVRQý5RPDQýõ1/4ô (SVRQý6DQVý6HULIýõ1/4ô (SVRQý'UDIW (SVRQý'UDIWý&RQGHQVHG 1 ý ýRQ 2 ý ýRII )217ý/LJKWV 1##2 2##1 1##1 2##2 3ULQWHUý6HWWLQJV Your printer comes with a series of internal settings that control a variety of printer functions, such as print direction and auto line feed. Because these settings take effect each time you turn on the printer, they are called default settings. The factory default settings are designed to meet the needs of most users, so you may not need to change them. The table below lists all the features you can select in the default-settings mode. )XQFWLRQ &KDUDFWHUýVSDFLQJ 6KDSHýRIý]HUR ìýLQFKýVNLSðRYHUðSHUIRUDWLRQ &KDUDFWHUýWDEOH $XWRýOLQHýIHHG 3DJHýOHQJWK $XWRýWHDUýRII 7UDFWRU ,QWHUIDFH 6HULDOý,î)ýELWýUDWHý 6HULDOý,î)ýSDULW\ýELWý 6HULDOý,î)ýGDWDýOHQJWKý 6HULDOý,î)ý(7;î$&.ý 2SWLRQV ìíýFSLñýìëýFSL ZLWKýVODVKô 2Qñý2II 86$ý,WDOLFñý)UDQFHý,WDOLFñý*HUPDQ\ý,WDOLFñý8. ,WDOLFñý'HQPDUNý,WDOLFñý6ZHGHQý,WDOLFñý,WDO\ ,WDOLFñý6SDLQýìý,WDOLFñý3 5$6&,,ñý$ELFRPS 2Qñý2II LQFKHV 2Qñý2II 6LQJOHñý'RXEOH $XWRýõìíýVHFïýZDLWôñý$XWRýõêíýVHFïýZDLWôñ 3DUDOOHOñý6HULDO ESV 1RQHñý2GGñý(YHQ æýELWñýåýELW 'LVDEOHñý(QDEOH Note: Most software programs control the character table and auto line feed. If your software program controls these features, you may never need to set them with the control panel. Default settings descriptions Character spacing When you select 10 cpi, the printer prints 10 characters per inch (cpi). When you select 12 cpi, it prints 12 characters per inch. Shape of zero The printer prints the zero character with a slash (/0 ) when the setting is on, or no slash when the setting is off. The slashed zero makes it easy to distinguish between an uppercase O and a zero. Skip-over-perforation When this feature is on and you are using continuous paper, the printer leaves a 1-inch (25.4-mm) margin between the last printable line on one page and the first printable line on the next page. This causes the printer to skip over the perforation between continuous sheets. Most software takes care of the top and bottom margins. Do not turn on skip-over-perforation unless your software does not provide these margins. Character table Character tables contain the characters and symbols used by different languages. The printer prints text with the selected character table. (3621 ,QNý-HWý3ULQWHUV
-
 1
1 -
 2
2 -
 3
3 -
 4
4 -
 5
5 -
 6
6 -
 7
7 -
 8
8 -
 9
9 -
 10
10 -
11
-
12
 |
 |