Epson Expression 10000XL - Photo Edition Product Information Guide - Page 5
Scanner Lights, Scanning with EPSON Scan, Placing the Original Document, Home Mode, Office Mode - expression photo scanner
 |
View all Epson Expression 10000XL - Photo Edition manuals
Add to My Manuals
Save this manual to your list of manuals |
Page 5 highlights
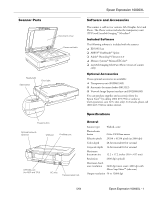
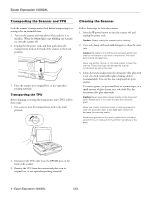
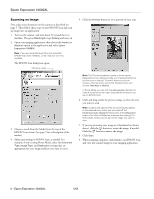
Epson Expression 10000XL Scanner Lights You can diagnose some problems by checking the scanner's lights. Error light Ready light a Start button . Power button Light Ready light is on or flashing. Error and Ready lights are both off. Error and Ready lights are both on. Error and Ready lights are both flashing. Scanner Status The green Ready light is on when the scanner is ready to scan. It flashes when scanning is in progress. Make sure your scanner is connected to a working outlet, then press the . power button. The scanner has received an incorrect command from your scanner software. Try scanning again. If the problem persists, try reinstalling your scanner software. If you're using the automatic document feeder, there may be a paper jam. Clear any jammed paper, then close any open covers. If this doesn't solve the issue, there may be a problem with the fluorescent lamp, or another problem. Contact Epson as described in the User's Guide. Scanning with EPSON Scan The EPSON Scan software offers three scanning modes: ❏ Home Mode makes scanning quick and easy, and provides excellent results for all types of documents. Use when advanced control over image quality settings is not required. ❏ Office Mode is ideal for scanning business documents containing text or graphics, with or without color. Choose this mode to scan multi-page documents on the optional automatic document feeder, or when scanning for OCR (optical character recognition) to create editable text. ❏ Professional Mode gives you the greatest control over image color and quality. Lets you manually adjust any setting, including the histogram setting, tone, color depth, balance, saturation, brightness, and contrast. You can open EPSON Scan from any TWAIN-compliant imaging application, such as Photoshop Elements (included with the scanner); this lets you scan images into the application. Or you can use EPSON Scan in "standalone" mode to scan directly to a file on your computer's hard drive. Placing the Original Document Follow these steps to position a photo or single-page document for scanning. (If you want to scan several photos at a time, a multi-page document, or film or slides, see the User's Guide.) 1. Raise the scanner cover and place the document face down on the document table. Place it in the upper-left corner, aligning it with the edges of the glass. 2. Close the cover, being careful not to move the document. Tip: If the edges of the document don't scan, move it in about 1/16 of an inch (1.5 mm) from the edges of the glass. You can raise or remove the document cover if you need to scan a thick item-such as a photo in an album-that doesn't fit under the cover. Simply lift the back of the cover straight up. When you reattach the cover, line up the hinge pins with the positioning holes and lower the cover into place. 5/04 Epson Expression 10000XL - 5
-
 1
1 -
 2
2 -
 3
3 -
 4
4 -
 5
5 -
 6
6 -
 7
7 -
 8
8
 |
 |
