Epson FX-980 User Manual - Page 170
Aligning Vertical Lines in Your Printout, Pause, Operate
 |
View all Epson FX-980 manuals
Add to My Manuals
Save this manual to your list of manuals |
Page 170 highlights
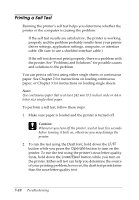
Aligning Vertical Lines in Your Printout If you notice that the vertical lines in your printout are not properly aligned, you can use the printer's bidirectional adjustment mode to correct this problem. Note: t To complete the steps below, you need four sheets of A4 or letter size single-sheet paper or four pages of continuous paper that are at least 279 mm (11 inches) long and 241 mm (9.5 inches) wide. See Chapter 2 for instructions on loading continuous paper, or Chapter 3 for instructions on loading single sheets. t If you use single sheets, you need to load a new sheet of paper each time the printer ejects a printed sheet onto the paper guide base . Follow these steps to perform the bidirectional adjustment: 1. Make sure paper is loaded and the printer is turned off. c 7 Caution: Whenever you turn off the printer, wait at least five seconds before turning it back on; otherwise you may damage the printer. 2. While holding down the Pause button, press the Operate button to turn on the printer. The printer enters the bidirectional adjustment mode and then prints instructions and the first set of alignment patterns. 3. As described in the instructions, compare the alignment patterns and select the pattern with the best alignment. 4. Follow the instructions to print the remaining sets of alignment patterns and select the pattern with the best alignment in each set. 5. After you select the best pattern in the final set of alignment patterns, press the Operate button to turn off the printer and exit the bidirectional adjustment mode. Your selections are saved automatically. Troubleshooting 7-17 Troubleshooting
-
 1
1 -
2
-
3
-
4
-
5
-
6
-
7
-
8
-
9
-
10
-
11
-
12
-
13
-
14
-
15
-
16
-
17
-
18
-
19
-
20
-
21
-
22
-
23
-
24
-
25
-
26
-
27
-
28
-
29
-
30
-
31
-
32
-
33
-
34
-
35
-
36
-
37
-
38
-
39
-
40
-
41
-
42
-
43
-
44
-
45
-
46
-
47
-
48
-
49
-
50
-
51
-
52
-
53
-
54
-
55
-
56
-
57
-
58
-
59
-
60
-
61
-
62
-
63
-
64
-
65
-
66
-
67
-
68
-
69
-
70
-
71
-
72
-
73
-
74
-
75
-
76
-
77
-
78
-
79
-
80
-
81
-
82
-
83
-
84
-
85
-
86
-
87
-
88
-
89
-
90
-
91
-
92
-
93
-
94
-
95
-
96
-
97
-
98
-
99
-
100
-
101
-
102
-
103
-
104
-
105
-
106
-
107
-
108
-
109
-
110
-
111
-
112
-
113
-
114
-
115
-
116
-
117
-
118
-
119
-
120
-
121
-
122
-
123
-
124
-
125
-
126
-
127
-
128
-
129
-
130
-
131
-
132
-
133
-
134
-
135
-
136
-
137
-
138
-
139
-
140
-
141
-
142
-
143
-
144
-
145
-
146
-
147
-
148
-
149
-
150
-
151
-
152
-
153
-
154
-
155
-
156
-
157
-
158
-
159
-
160
-
161
-
162
-
163
-
164
-
 165
165 -
 166
166 -
 167
167 -
 168
168 -
 169
169 -
 170
170 -
 171
171 -
 172
172 -
 173
173 -
 174
174 -
 175
175 -
176
-
177
-
178
-
179
-
180
-
181
-
182
-
183
-
184
-
185
-
186
-
187
-
188
-
189
-
190
-
191
-
192
-
193
-
194
-
195
-
196
-
197
-
198
-
199
-
200
-
201
-
202
-
203
-
204
-
205
-
206
-
207
-
208
-
209
-
210
-
211
-
212
-
213
-
214
-
215
-
216
-
217
-
218
-
219
-
220
-
221
-
222
-
223
-
224
-
225
-
226
-
227
-
228
-
229
-
230
-
231
-
232
-
233
-
234
-
235
-
236
-
237
-
238
-
239
-
240
-
241
-
242
-
243
-
244
-
245
 |
 |