Epson L-1000 User Manual - Page 105
Using a cross-head screwdriver, remove the screw labelled CG
 |
View all Epson L-1000 manuals
Add to My Manuals
Save this manual to your list of manuals |
Page 105 highlights
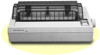
The Interface Boards 6. Carefully disconnect the control panel cable from the connector labelled CN4 on the main board, as shown below. Then lift off the cover and set it aside. 7. Remove the shield plate on the back of the printer by pressing in on the plastic clips located at the back of the plate. 8. Using a cross-head screwdriver, remove the screw labelled CG (shown on the next page) from the main board. Then set it aside in a safe place. A-6 Appendix
-
 1
1 -
2
-
3
-
4
-
5
-
6
-
7
-
8
-
9
-
10
-
11
-
12
-
13
-
14
-
15
-
16
-
17
-
18
-
19
-
20
-
21
-
22
-
23
-
24
-
25
-
26
-
27
-
28
-
29
-
30
-
31
-
32
-
33
-
34
-
35
-
36
-
37
-
38
-
39
-
40
-
41
-
42
-
43
-
44
-
45
-
46
-
47
-
48
-
49
-
50
-
51
-
52
-
53
-
54
-
55
-
56
-
57
-
58
-
59
-
60
-
61
-
62
-
63
-
64
-
65
-
66
-
67
-
68
-
69
-
70
-
71
-
72
-
73
-
74
-
75
-
76
-
77
-
78
-
79
-
80
-
81
-
82
-
83
-
84
-
85
-
86
-
87
-
88
-
89
-
90
-
91
-
92
-
93
-
94
-
95
-
96
-
97
-
98
-
99
-
 100
100 -
 101
101 -
 102
102 -
 103
103 -
 104
104 -
 105
105 -
 106
106 -
 107
107 -
 108
108 -
 109
109 -
 110
110 -
111
-
112
-
113
-
114
-
115
-
116
-
117
-
118
-
119
-
120
-
121
-
122
-
123
-
124
-
125
-
126
-
127
-
128
-
129
-
130
-
131
-
132
-
133
-
134
-
135
-
136
 |
 |

The Interface Boards
6.
Carefully disconnect the control panel cable from the connector
labelled CN4 on the main board, as shown below. Then lift off
the cover and set it aside.
7.
Remove the shield plate on the back of the printer by pressing
in on the plastic clips located at the back of the plate.
8. Using a cross-head screwdriver, remove the screw labelled CG
(shown on the next page) from the main board. Then set it aside
in a safe place.
A-6
Appendix