Epson LQ-300 User Manual - Page 48
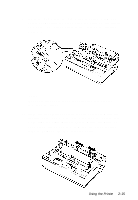
Release the sprocket units by pulling the sprocket locks
 |
View all Epson LQ-300 manuals
Add to My Manuals
Save this manual to your list of manuals |
Page 48 highlights
3. Lift the tractor forward to the mounting slot at the top of the printer and tilt it into place as shown below. Then push the tractor onto the posts until the notches snap into place. 4. Release the sprocket units by pulling the sprocket locks forward. 2-14 Using the Printer
-
 1
1 -
2
-
3
-
4
-
5
-
6
-
7
-
8
-
9
-
10
-
11
-
12
-
13
-
14
-
15
-
16
-
17
-
18
-
19
-
20
-
21
-
22
-
23
-
24
-
25
-
26
-
27
-
28
-
29
-
30
-
31
-
32
-
33
-
34
-
35
-
36
-
37
-
38
-
39
-
40
-
41
-
42
-
 43
43 -
 44
44 -
 45
45 -
 46
46 -
 47
47 -
 48
48 -
 49
49 -
 50
50 -
 51
51 -
 52
52 -
 53
53 -
54
-
55
-
56
-
57
-
58
-
59
-
60
-
61
-
62
-
63
-
64
-
65
-
66
-
67
-
68
-
69
-
70
-
71
-
72
-
73
-
74
-
75
-
76
-
77
-
78
-
79
-
80
-
81
-
82
-
83
-
84
-
85
-
86
-
87
-
88
-
89
-
90
-
91
-
92
-
93
-
94
-
95
-
96
-
97
-
98
-
99
-
100
-
101
-
102
-
103
-
104
-
105
-
106
-
107
-
108
-
109
-
110
-
111
-
112
-
113
-
114
-
115
-
116
-
117
 |
 |

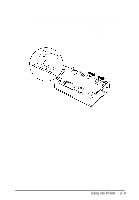
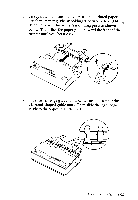
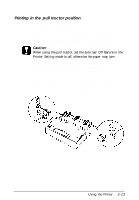
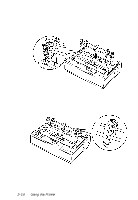
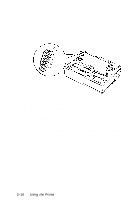
3.
Lift the tractor forward to the mounting slot at the top of the
printer and tilt it into place as shown below. Then push the
tractor onto the posts until the notches snap into place.
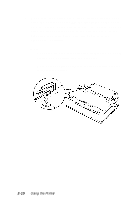
4.
Release the sprocket units by pulling the sprocket locks
forward.
2-14
Using the Printer