Epson LX-90 User Manual - Parallel 8620 PIC for LX-90 - Page 9
Connecting the Printer to Your Computer, Self-test printouts
 |
View all Epson LX-90 manuals
Add to My Manuals
Save this manual to your list of manuals |
Page 9 highlights
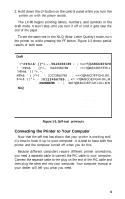
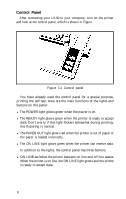
2. Hold down the LF button on the control panel while you turn the printer on with the power switch. The LX-90 begins printing letters, numbers, and symbols in the draft mode. It won't stop until you turn it off or until it gets near the end of the paper. To see the same test in the NLQ (Near Letter Quality) mode, turn the printer on while pressing the FF button. Figure 1-3 shows partial results of both tests. I Draft 0123456789 : ; ?@ABCDEFGHI 0123456789 : ; ?@ABCDEFEHIJ 0123456789 : ; ?@ABCDEFGHIJK f , -. /O123456789 : ; ?@ABCDEFGHIJKL 0 1 2 3 4 5 6 7 8 9 : ; < = >?@ABCDEFGHIJKLM 0123456789 ABCDEFGHIJKLMN NLQ 0123456789:;?@ABCDEFGHI 0123456789:;?@ABCDEFGHIJ 0123456789:;?@ABCDEFGHIJK #$%&'()a+,-./0123456789:;?@ABCDEFGHIJKL 0123456789:;?@ABCDEFGHIJKLM 0123456789:;?@ABCDEFGHIJKLM Figure 1-3. Self-test printouts Connecting the Printer to Your Computer Now that the self test has shown that your printer is working well, it's time to hook it up to your computer. It is best to have both the printer and the computer turned off when you do this. Because different computers require different printer connections, you need a separate cable to connect the PIC cable to your computer. Connect the separate cable to the plug on the end of the PIC cable and then plug the other end into your computer. Your computer manual or your dealer will tell you what you need. 5
-
 1
1 -
2
-
3
-
 4
4 -
 5
5 -
 6
6 -
 7
7 -
 8
8 -
 9
9 -
 10
10 -
 11
11 -
 12
12 -
 13
13 -
 14
14 -
15
-
16
-
17
-
18
-
19
-
20
-
21
-
22
-
23
-
24
-
25
-
26
-
27
-
28
-
29
-
30
-
31
-
32
-
33
-
34
-
35
-
36
-
37
-
38
-
39
-
40
-
41
-
42
-
43
-
44
-
45
-
46
-
47
-
48
-
49
-
50
-
51
-
52
-
53
-
54
-
55
-
56
-
57
-
58
-
59
-
60
-
61
-
62
-
63
-
64
-
65
-
66
-
67
-
68
-
69
-
70
-
71
-
72
-
73
-
74
-
75
-
76
-
77
-
78
-
79
-
80
-
81
-
82
-
83
-
84
-
85
-
86
-
87
-
88
-
89
-
90
-
91
-
92
-
93
-
94
-
95
-
96
-
97
-
98
-
99
-
100
-
101
-
102
-
103
-
104
-
105
-
106
-
107
-
108
-
109
-
110
-
111
-
112
-
113
-
114
-
115
-
116
-
117
-
118
-
119
-
120
-
121
-
122
 |
 |