Epson PP-50 Users Guide - Page 82
Aligning the Print Head, Using the Print Head Alignment Utility
 |
View all Epson PP-50 manuals
Add to My Manuals
Save this manual to your list of manuals |
Page 82 highlights
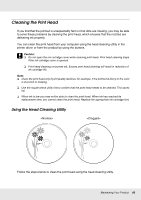
Note: ❏ If print quality has not improved after repeating this procedure about four times, turn the product off and wait for at least six hours. Then run the nozzle check again and repeat the head cleaning if necessary. ❏ If the print quality still has not improved, at least one of your ink cartridges may be old or damaged and may need to be replaced. & See "Replacing an Ink Cartridge" on page 75. Aligning the Print Head If you notice a misalignment of vertical lines or horizontal banding, you may be able to solve this problem by using the print head alignment utility in your printer driver. Note: Disc thickness may vary, depending on their manufacturer. Using discs with various thicknesses may result in misalignment of the print head. Use the print head alignment utility to check and adjust the print head alignment. It is recommended to use the same product and type of discs when publishing several discs. Using the Print Head Alignment Utility Follow the steps below to align the print head using the print head alignment utility. 1. Make sure an unprinted disc is inserted in stacker 1. 2. Make sure no lights indicate errors and the disc cover is closed. 3. Access the printer driver. See "Accessing the Printer Driver" on page 23. 4. Click the Utility tab, then click the Print Head Alignment button. 5. Follow the on-screen instructions to align the print head. c Caution: ❏ When you enter a value in the confirmation screen after the initial adjustment, adjustment will be done using the initial value and the entered value added together. To clear the adjustment value, select Reset and click Exit. ❏ If the label printing surface is not aligned with center of the disc after aligning the print head as described above, print will appear out of alignment compared to printing surface. Maintaining Your Product 82
-
 1
1 -
2
-
3
-
4
-
5
-
6
-
7
-
8
-
9
-
10
-
11
-
12
-
13
-
14
-
15
-
16
-
17
-
18
-
19
-
20
-
21
-
22
-
23
-
24
-
25
-
26
-
27
-
28
-
29
-
30
-
31
-
32
-
33
-
34
-
35
-
36
-
37
-
38
-
39
-
40
-
41
-
42
-
43
-
44
-
45
-
46
-
47
-
48
-
49
-
50
-
51
-
52
-
53
-
54
-
55
-
56
-
57
-
58
-
59
-
60
-
61
-
62
-
63
-
64
-
65
-
66
-
67
-
68
-
69
-
70
-
71
-
72
-
73
-
74
-
75
-
76
-
 77
77 -
 78
78 -
 79
79 -
 80
80 -
 81
81 -
 82
82 -
 83
83 -
 84
84 -
 85
85 -
 86
86 -
 87
87 -
88
-
89
-
90
-
91
-
92
-
93
-
94
-
95
-
96
-
97
-
98
-
99
-
100
-
101
-
102
-
103
-
104
-
105
-
106
-
107
-
108
-
109
-
110
-
111
-
112
-
113
-
114
-
115
-
116
-
117
-
118
-
119
-
120
-
121
-
122
-
123
-
124
 |
 |
