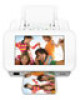
Epson PictureMate Show - PM 300 Basics
Epson PictureMate Show - PM 300 - PictureMate Show Digital Frame Manual
 |
View all Epson PictureMate Show - PM 300 manuals
Add to My Manuals
Save this manual to your list of manuals |
Epson PictureMate Show - PM 300 manual content summary:
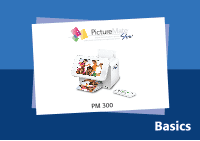
- Epson PictureMate Show - PM 300 | Basics - Page 1
PM 300 Basics - Epson PictureMate Show - PM 300 | Basics - Page 2
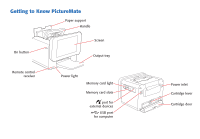
Getting to Know PictureMate Paper support Handle On button Screen Output tray Remote control receiver Power light Memory card light Memory card slots port for external devices USB port for computer Power inlet Cartridge lever Cartridge door - Epson PictureMate Show - PM 300 | Basics - Page 3
to View and Print 6 View Photos and Print 10 Do More With Your Photos 16 Print From an External Device 24 Save Photos 28 Print From a Computer 31 Replace Print Pack 37 Take PictureMate With You 41 Set PictureMate Preferences 42 Printer Care and Troubleshooting 45 Notices 55 Index 65 1 - Epson PictureMate Show - PM 300 | Basics - Page 4
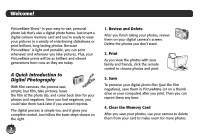
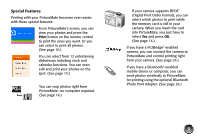
ShowTM is your easy-to-use, personal photo lab that's also a digital photo frame. Just insert a digital camera memory card and you're ready to view your pictures in a variety of entertaining slideshows or print brilliant, long-lasting photos. Because PictureMate® is light and portable, you can print - Epson PictureMate Show - PM 300 | Basics - Page 5
calendar functions. You can even edit and print your photos on the spot. (See page 13.) You can crop photos right from PictureMate-no computer required. (See page 16.) If your camera supports DPOF (Digital Print Order Format), you can select which photos to print while the memory card is still in - Epson PictureMate Show - PM 300 | Basics - Page 6
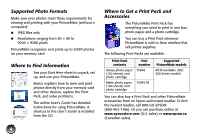
paper (150 sheets) and photo cartridge Matte photo paper (100 sheets) and photo cartridge Part number T5846 T5845-M Supported PictureMate models All PictureMate 200/ 300 Series models You can also buy a Print Pack and other PictureMate accessories from an Epson authorized reseller. To find the - Epson PictureMate Show - PM 300 | Basics - Page 7
PictureMate to standby mode or turn it on from standby mode Decrease number of copies Cancel current operation and go back View help information Stop printing or cancel settings Return to home menu Set/increase number of copies Confirm settings Start printing Change the number of photos displayed - Epson PictureMate Show - PM 300 | Basics - Page 8
Prepare to View and Print Before you view and print with PictureMate, you need to: ● Insert your memory card (below) ● top of the screen to slide it up. 2 Press the P On button to turn on PictureMate. 3 Insert the memory card into the correct slot, as shown on the following page. Insert just one - Epson PictureMate Show - PM 300 | Basics - Page 9
Note: PictureMate can't read multiple cards at once. 4 Push the card in carefully until remove a card while the memory card light is flashing; you may lose photos on your card. Top slot: Memory card light SDTM (Secure Digital) and SDHCTM (High Capacity) miniSDTM * and miniSDHC* microSD* and - Epson PictureMate Show - PM 300 | Basics - Page 10
a card while the memory card light is flashing; you may lose photos on your card. Pull the card out of the slot. 2 Slide out the edge guides. Loading Paper Caution: Don't load plain paper; this may damage PictureMate. 1 Open the paper support. 3 Create a stack of up to 20 sheets of paper and - Epson PictureMate Show - PM 300 | Basics - Page 11
photos begins automatically after 3 minutes. Press any button to return to the function you were using. 2 When you're finished using PictureMate, press the P On button on the remote control. The power light turns orange. 3 Press the P On button on the remote control or on the side of the printer - Epson PictureMate Show - PM 300 | Basics - Page 12
to return to the function you were using. To store and display your printed photos, see page 15. If you need help at any time, press the button on the remote control. You see instructions on whatever PictureMate function you were using. Press d for more 10 information, or select Contents for a list - Epson PictureMate Show - PM 300 | Basics - Page 13
you want to crop or edit your photo, press OK. See page 16 for instructions. 5 To print more than one copy, press to increase the number of copies or to decrease it. 6 After you have selected all the photos you want, press Print. 7 You see a preview screen showing the number of sheets required and - Epson PictureMate Show - PM 300 | Basics - Page 14
22 for instructions. 12 Printing All Photos You can print photos at full size or on a proof sheet of small thumbnail images. 1 From the home menu, select PRINT PHOTOS and press OK on the remote control. 2 Select Print All Photos and press OK. You see a screen like the following, showing the number - Epson PictureMate Show - PM 300 | Basics - Page 15
or r to review your photos. 5 If photos, press Menu. See page 16 for instructions animation, and choose photos for printing right from the show. 1 From the Home menu, select SLIDE SHOW and press OK on the remote control. 2 Select the slideshow you want, then press OK. PictureMate displays your photos - Epson PictureMate Show - PM 300 | Basics - Page 16
to review your reserved photos. Photos If your camera supports DPOF (Digital Print Order Format), you can use it to pre-select which photos and how many copies you want to print. See your camera's manual to choose photos for printing with DPOF, then insert your memory card in PictureMate. PictureMate - Epson PictureMate Show - PM 300 | Basics - Page 17
they are completely dry. ● Let photos sit for 24 hours before framing. ● After you print, the colors on your photos will take some time to set as the ink dries. During this time, the colors may look different than you expect. Displaying Your Photos ● To ensure photos will last as long as possible - Epson PictureMate Show - PM 300 | Basics - Page 18
your photos for printing individually or in multi-photo formats. You can also do the following: ● Remove red eyes from your photos (see page 19) ● Fix color and photo quality in this section do not change or replace the original digital photo file; they customize only the print(s) you make at - Epson PictureMate Show - PM 300 | Basics - Page 19
may take longer to display after cropping. Choosing a Layout By default, your photos are printed at the full 4 × 6 size. If you want to place several small photos on one page, you can use the Layout menu. 1 From the Home menu, select LAYOUT and press OK on the remote control. 2 Select Layout - Epson PictureMate Show - PM 300 | Basics - Page 20
. Custom Sizing and Cropping You can set custom sizes and crop your photos. Depending on the size of the photo(s), multiple copies may fit on one page. Cropping affects only your printed photo, not your original image. 1 From the Home menu, select LAYOUT and press OK on the remote control. 2 Select - Epson PictureMate Show - PM 300 | Basics - Page 21
following, showing your cropped photo and the layout: Fixing Red-Eye PictureMate can fix red eyes in your photos when you print. Note: PictureMate may not be able to correct red eyes in all photos, and printing will be slower when you use this feature. 1 Select a photo with the red-eye problem and - Epson PictureMate Show - PM 300 | Basics - Page 22
Adjusting Photo Settings PictureMate lets you adjust the color and improve the quality of your photos without using a computer. You can do the following: ● Enhance your photos based on the following types of scene detection: standard, people, landscape, or night scene ● Print at the highest - Epson PictureMate Show - PM 300 | Basics - Page 23
Standard. Quality-Select Standard or Best. Printing is slower at Best quality. Sharpness-Increase or decrease the sharpness until you are happy with the effect (as shown on the sample photo). Fix Red Eye-See page 19 for details. Color Effect-Select Black & White or Sepia (like an old-fashioned - Epson PictureMate Show - PM 300 | Basics - Page 24
folder or All folders. Adding Camera Text If your camera allows you to add text to your photos, you can print the pictures along with the text. This setting is available for borderless photos only. 1 Select the photos that have text added by your camera. 2 Press the Menu button on the remote control - Epson PictureMate Show - PM 300 | Basics - Page 25
You can rotate a photo on PictureMate's screen. This does not affect how the photo prints, only how it displays. 1 Select the photo you want to rotate and press OK. 2 Select Rotate and press OK. 3 Select 90 degrees, 180 degrees, or 270 degrees (or select Do Not Rotate). Your photo is rotated on the - Epson PictureMate Show - PM 300 | Basics - Page 26
can back up photos from your camera's memory card to the drive for safekeeping. See page 28 for instructions. Printing From a Digital Camera You can connect a digital camera that supports PictBridge printing to PictureMate and use the camera to control printing. Check your camera manual to see if - Epson PictureMate Show - PM 300 | Basics - Page 27
photos on PictureMate. (See your camera manual for instructions.) When you print directly from your camera, you can't select settings the way you can when you print from a memory card. Instead, you can use the PictBridge Settings on the Setup Menu. For more information, see your online User's Guide - Epson PictureMate Show - PM 300 | Basics - Page 28
Bluetooth-enabled mobile device or computer when you use the optional Bluetooth Photo Print Adapter. The adapter (part# C12C824383) is available from your local reseller or Epson (see page 54). Note: Although PictureMate complies with the Bluetooth specification, it is not guaranteed to work with - Epson PictureMate Show - PM 300 | Basics - Page 29
a Bluetooth error message on the PictureMate screen, try printing the photo from a memory card or your computer instead. Note: For instructions on selecting PictureMate's Bluetooth settings, see the online User's Guide. Disconnecting the Adapter Make sure PictureMate is not printing, then pull the - Epson PictureMate Show - PM 300 | Basics - Page 30
up Photos Before you start, make sure PictureMate is not connected to your computer. 1 Insert your memory card into PictureMate. 2 Insert a USB storage device or thumb drive into the port on the side of PictureMate. If you need instructions, see page 25. 3 From the Home menu, select Photo Storage - Epson PictureMate Show - PM 300 | Basics - Page 31
History You can select photos to delete from PictureMate's print history, or delete all the photos. Note: You can delete photos from the print history only, not from a memory card. 1 From the Home menu, select Photo Storage. 2 Select Delete Selected Photos or Delete All Photos. ● If you choose to - Epson PictureMate Show - PM 300 | Basics - Page 32
at a time press the Display button. Continue pressing the button to switch between 20 photos, one photo, and display by month. 4 When you see a photo you want to delete, press to select it. You see a red check mark on the photo, indicating that it will be deleted. 5 After you have selected all the - Epson PictureMate Show - PM 300 | Basics - Page 33
to the memory card. See your online User's Guide for instructions. Note: Periodically, it's a good idea to check Epson's support website at epson.com/support for free updates to your PictureMate printer software. Download instructions are posted for your convenience. Installing Software and - Epson PictureMate Show - PM 300 | Basics - Page 34
Note: If you see a Found New Hardware screen, click Cancel and disconnect PictureMate from your computer. 3 When you see this screen, click Install. 2 Insert the PictureMate CD. With Windows Vista, if you see the AutoPlay window, click Run Setup.exe. When you see the User Account Control screen, - Epson PictureMate Show - PM 300 | Basics - Page 35
the other end to the USB port on the back of PictureMate. Note: PictureMate is automatically set as your default printer. If you have another printer, you can change this setting in the Windows Control Panel. 6 Follow the on-screen instructions to install the rest of the software. 7 When you see - Epson PictureMate Show - PM 300 | Basics - Page 36
8 Follow the on-screen instructions to register your PictureMate. 9 When you're done, remove the CD. Now you can print photos from your computer on PictureMate (see your online User's Guide). Installing Software for Macintosh Before you start, make sure PictureMate is NOT connected to your Macintosh - Epson PictureMate Show - PM 300 | Basics - Page 37
and click Accept. 6 Follow the on-screen instructions to install the software. After a few minutes, you see this screen: 7 Connect the USB cable to any open USB port on your Macintosh. Then connect the other end to the USB port on the back of PictureMate. If you're using Mac OS X 10 - Epson PictureMate Show - PM 300 | Basics - Page 38
, click Add Printer. 9 Follow the steps on the right side of the screen to add PictureMate. 10 Follow the on-screen instructions to install the rest of the software and register your PictureMate. 11 When you're done, eject the CD. Now you can print photos from your Macintosh on PictureMate (see your - Epson PictureMate Show - PM 300 | Basics - Page 39
paper (150 sheets) and photo cartridge Matte photo paper (100 sheets) and photo cartridge Part number T5846 T5845-M Supported PictureMate models All PictureMate 200/ 300 series models You can also buy a Print Pack and other PictureMate accessories from an Epson authorized reseller. To find the - Epson PictureMate Show - PM 300 | Basics - Page 40
new one right away. Caution: Before you replace the cartridge, read the "Photo Cartridge Safety Instructions" on page 57. 1 Make sure PictureMate is on but not printing. 2 Open the cartridge door on the back of PictureMate. 3 Slide the cartridge lever left, to the Release position. Caution: Do not - Epson PictureMate Show - PM 300 | Basics - Page 41
into the slot, label side up, until it clicks into place. Warning: Keep photo cartridges out of the reach of children and do not drink the ink. If ink gets on your hands, wash them thoroughly with soap and water. If ink gets in your eyes, flush them thoroughly with water. If discomfort or vision - Epson PictureMate Show - PM 300 | Basics - Page 42
. 2 Select Maintenance and press OK. 3 Select Check Cartridge Status and press OK. You see the status displayed on the screen: The gray square represents the ink level 4 Press OK to exit. Note: If you see the photo cartridge low warning, you should buy a new Print Pack. See page 37 for details - Epson PictureMate Show - PM 300 | Basics - Page 43
to balance the printer's weight. Packing Your PictureMate If PictureMate is going to photo cartridge is installed. Do not remove the photo cartridge before transporting. Don't place PictureMate on its side or upside down, or ink may leak. Note: If your prints don't look as good after PictureMate - Epson PictureMate Show - PM 300 | Basics - Page 44
● Change the way photos are saved after printing (see page 42) ● Make settings for printing directly from your camera (see your online User's Guide) ● Make settings for Bluetooth printing (see your online User's Guide) ● Set the date and time (see page 43) ● Set a time for PictureMate to turn on or - Epson PictureMate Show - PM 300 | Basics - Page 45
press OK. 6 Repeat the process to set the time format and time, then press OK. Setting Automatic Power On/Off You can set times for PictureMate to turn on and off automatically. 1 Press the Menu button on the remote control. 2 Select Setup and press OK. 3 Select Auto Power Settings and press - Epson PictureMate Show - PM 300 | Basics - Page 46
You can see your setting reflected in the sample image. 5 When you're done, press OK. Returning to Default Settings You can return all PictureMate settings to the original default settings. 1 Press the Menu button on the remote control. 2 Select Setup and press OK. 3 Select Restore Default Settings - Epson PictureMate Show - PM 300 | Basics - Page 47
the following:. Troubleshooting Print Quality Problems Paper Problems Ink Problems Memory Card Problems Other Problems Help contents Preparing to Print Printing Photos Printing from External Equipment Changing Settings Maintaining the Printer Replacing the Photo Cartridge Using Other Functions - Epson PictureMate Show - PM 300 | Basics - Page 48
photos are too light, are missing colors, or have lines running through them-PictureMate 's print head nozzles may need cleaning. You can check the nozzles and clean the print head if necessary. 1 Load paper in PictureMate PictureMate makes - Epson PictureMate Show - PM 300 | Basics - Page 49
head by selecting Auto Cleaning from the Maintenance menu. If you see the photo cartridge low warning, you may not be able to clean the print head until you replace the photo cartridge. Aligning the Print Head If you have moved PictureMate and print quality is not as good as it used to be-if - Epson PictureMate Show - PM 300 | Basics - Page 50
next time you align the print head. Cleaning PictureMate To keep PictureMate working at its best, you should clean it several times a year. 1 Turn off PictureMate, unplug the power cable, and disconnect the power slide out the battery holder. You may need to use a small screw driver or other tool. - Epson PictureMate Show - PM 300 | Basics - Page 51
in the battery holder until it clicks into place. Printing and Operation Problems If you have problems with PictureMate, check the suggestions on the following pages. You can also press the button on the remote control for troubleshooting help. The power light and screen don't turn on. ● Press the - Epson PictureMate Show - PM 300 | Basics - Page 52
an unexpected noise after you install a photo cartridge. The first time you install the photo cartridge, PictureMate charges its print head for about three and a half minutes. Wait until charging finishes before you turn it off, or it may charge improperly and use more ink the next time you turn it - Epson PictureMate Show - PM 300 | Basics - Page 53
Device or Print History. You can only back up photos that are on a memory card. See page 28. You can't raise PictureMate's handle straight up. The handle is not designed to go all the way up. Software Installation Problems ● Follow the instructions beginning on page 31 to install your software. Don - Epson PictureMate Show - PM 300 | Basics - Page 54
side of the paper face up. ● The photo cartridge may need replacing. See page 38. Your print is grainy. ● The print head may need aligning. See page 47. Your print is blurry or smeared. ● Use PictureMate photo paper to ensure proper saturation, absorption of ink, and quality. ● Be sure to print with - Epson PictureMate Show - PM 300 | Basics - Page 55
. ● Use only PictureMate photo paper or Epson Premium Photo Paper Glossy or Semigloss. (See page 4.) ● Store paper flat to help prevent curling. Miscellaneous Printout Problems PictureMate prints blank pages. ● The print head may need cleaning. See page 46. ● The photo cartridge may be old or - Epson PictureMate Show - PM 300 | Basics - Page 56
to common problems. You can download drivers and documentation, get FAQs and troubleshooting advice, or e-mail Epson with your questions. Speak to a Support Representative Before you call Epson for support, please have the following information ready: ● Product name (PictureMate Show or PM 300 - Epson PictureMate Show - PM 300 | Basics - Page 57
as in airplanes or hospitals, follow all instructions in those places. ● Do not insert objects through the slots in the printer. ● Take care not to spill liquid on the printer and the AC adapter. ● Do not put your hand inside the printer or touch the photo cartridge during printing. ● Do not use - Epson PictureMate Show - PM 300 | Basics - Page 58
by yourself except as specifically explained in the printer's guides. Doing so may result in injury, electric shock, or fire. ● Unplug the printer and the AC adapter, remove the optional battery from the printer, and refer servicing to qualified service personnel under the following conditions: The - Epson PictureMate Show - PM 300 | Basics - Page 59
with Proposition 65 in Cal. Health & Safety Code §25249.5 and following.) Photo Cartridge Safety Instructions ● Keep photo cartridges out of the reach of children and do not drink the ink. ● Do not shake the photo cartridge after removing it from the bag; this can cause leakage. ● Be careful - Epson PictureMate Show - PM 300 | Basics - Page 60
them immediately with water. If discomfort or vision problems remain after a thorough flushing, see a in the trash. Remote Control Battery Safety Instructions ● If battery acid gets into your eyes and do not use it. ● When not using the printer for a long period of time, remove the battery from - Epson PictureMate Show - PM 300 | Basics - Page 61
Will Do To Correct Problems: Should your Epson printer prove defective during the warranty period, please call the Epson ConnectionSM at (562) 276-7282 (U.S.) or (905) 709-2567 (Canada) for warranty repair instructions and return authorization. An Epson service technician will provide telephone - Epson PictureMate Show - PM 300 | Basics - Page 62
Center nearest you, visit epson.com/support. You can also write to: Epson America, Inc., P.O. Box 93012, Long Beach, CA 90809-3012 How Many Photos Will I Get From a PictureMate Print Pack? Epson has packaged the PictureMate Photo Cartridge with a quantity of 4 × 6 PictureMate Photo Paper, so that - Epson PictureMate Show - PM 300 | Basics - Page 63
the PictureMate Photo Cartridge. Using other papers may result in poor color reproduction, print quality problems or more fading. Both a PictureMate Photo Cartridge and some PictureMate Photo Paper were included in the box with your PictureMate printer. The included cartridge contains enough ink to - Epson PictureMate Show - PM 300 | Basics - Page 64
may cause undesired operation. Trade Name: Epson Type of Product: Ink Jet Printer Model: B384A FCC Compliance Statement For United States Users This equipment has been tested and found to comply with the limits for a Class B digital device, pursuant to Part 15 of the FCC Rules. These limits - Epson PictureMate Show - PM 300 | Basics - Page 65
This Class B digital apparatus complies with Epson product. Epson is not responsible for any use of this information as applied to other printers. Neither Seiko Epson Epson Corporation's operating and maintenance instructions. Seiko Epson Corporation shall not be liable for any damages or problems - Epson PictureMate Show - PM 300 | Basics - Page 66
Matching, and the PRINT Image Matching logo are registered trademarks, Epson Exceed Your Vision is a registered logomark, and PictureMate Show is a trademark of Seiko Epson Corporation. Epson Connection is a service mark of Epson America, Inc. . General Notice: Other product names used herein are - Epson PictureMate Show - PM 300 | Basics - Page 67
B Backing up photos, 28 to 29 Banding, fixing, 46, 52 Battery replacing, 48 to 49 safety instructions, 58 Black and white prints, 21 Blank pages, 53 Blank screen, 49 Bluetooth printing, 26 to 27 Blurry prints, 52 Borderless expansion, 21 Borders printing with, 12 problems - Epson PictureMate Show - PM 300 | Basics - Page 68
, 13 Care of PictureMate, 45 to 49 Cartridge, photo see Photo cartridge CD, installing software from, 31 to 36 Change units setting, 44 Checking nozzles, 46, 47 Choosing photos, 10 to 14 Cleaning PictureMate, 48 print head, 46, 52 Color effects, 21 fixing, 20 to 21 problems, 52 Computer Bluetooth - Epson PictureMate Show - PM 300 | Basics - Page 69
26 G Gaps in image, 46, 52 Grainy prints, 52 H Handle, PictureMate, 41 Help Epson, 54 on screen, 45 I Image formats, 4 quality, 20 to 21 quality problems, 52 Incorrect colors, 52 margins, 21, 53 Ink, see Photo cartridge Internet support, 54 J Jammed paper, 53 JPEG, 4 L Language, changing, 44 Layout - Epson PictureMate Show - PM 300 | Basics - Page 70
, 50 removing, 8, 31 Missing colors, 52 68 N Noise, PictureMate, 50 Nozzles, checking and cleaning, 46 O On button, 6, 9 Output tray, 8, 41 P Packing PictureMate, 41 Paper buying, 4, 54 feeding problems, 53 jam, 53 loading, 8 to 9, 53 output tray, 9, 41 storing, 15 support, 8 to 9, 41 PDA, printing - Epson PictureMate Show - PM 300 | Basics - Page 71
, 22 sizing, 18 to 19 storing, 15 Photo cartridge buying, 4, 54 information, 60 to 62 replacing, 37 to 40 safety instructions, 57 status, 40 Photo Storage menu, 28 to 30 PictBridge camera, 24 to 25 PIM (PRINT Image Matching), 20 Power light, 49 problems, 49 saving, 9 turning on, 6, 9, 49 Power - Epson PictureMate Show - PM 300 | Basics - Page 72
camera, 24 to 25 from external device, 24 to 26 from slideshow, 13 to 14 individual photos, 10 to 12 preview, 11 to 14 problems, 49 to 51 wireless, 26 to 27 70 Problems border or layout, 53 color, 52 memory card, 50 paper feeding, 53 paper jam, 53 power, 49 print quality, 52 - Epson PictureMate Show - PM 300 | Basics - Page 73
Replacing photo cartridge, 37 to 40 Reserved photos, 14 Resetting preferences, 42 to 44 Resolution, 4 Rotating photos, 23 S Safety instructions, 55 to 58 Saving photos, 42 Scene Detection, 21 Screen adjusting angle, 10 adjusting brightness, 44 problems, 49 safety instructions, 58 Sepia, 21 Service - Epson PictureMate Show - PM 300 | Basics - Page 74
Troubleshooting, 45 to 53 Turning printer on or off, 6, 9, 49 U USB cable, 25, 31, 33 to 35, 41 User's Guide, 4 W Wallet-size photos, 17 to 18 Warranty, 59 to 60 Where to get help, 54 Windows Bluetooth printing, 26 installing software for, 31 to 34, 51 Wireless printing, - Epson PictureMate Show - PM 300 | Basics - Page 75
paper (150 sheets) and photo cartridge Matte photo paper (100 sheets) and photo cartridge PictureMate carrying case Bluetooth® Photo Print Adapter Part Number T5846 T5845-M PMBAG06 C12C824383 You can also buy a Print Pack and other PictureMate accessories from an Epson authorized reseller. To find - Epson PictureMate Show - PM 300 | Basics - Page 76
Print Show *411718900* *411718900* CPD-27492 Printed in XXXXXX
-
 1
1 -
 2
2 -
 3
3 -
 4
4 -
 5
5 -
 6
6 -
 7
7 -
8
-
9
-
10
-
11
-
12
-
13
-
14
-
15
-
16
-
17
-
18
-
19
-
20
-
21
-
22
-
23
-
24
-
25
-
26
-
27
-
28
-
29
-
30
-
31
-
32
-
33
-
34
-
35
-
36
-
37
-
38
-
39
-
40
-
41
-
42
-
43
-
44
-
45
-
46
-
47
-
48
-
49
-
50
-
51
-
52
-
53
-
54
-
55
-
56
-
57
-
58
-
59
-
60
-
61
-
62
-
63
-
64
-
65
-
66
-
67
-
68
-
69
-
70
-
71
-
72
-
73
-
74
-
75
-
76
 |
 |

Basics
PM 300