Epson RX580 Product Information Guide
Epson RX580 - Stylus Photo Color Inkjet Manual
 |
UPC - 010343859906
View all Epson RX580 manuals
Add to My Manuals
Save this manual to your list of manuals |
Epson RX580 manual content summary:
- Epson RX580 | Product Information Guide - Page 1
; cancel settings Check ink status; replace ink cartridges; maintain the RX580; adjust CD/DVD print position; backup photos; restore default settings; make PictBridge or Bluetooth® settings Print on CD/DVDs; reprint or restore photos; print photo greeting cards 11/06 Epson Stylus Photo RX580 - 1 - Epson RX580 | Product Information Guide - Page 2
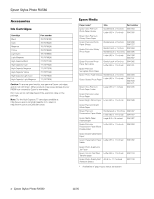
Epson Stylus Photo RX580 Accessories Ink Cartridges Cartridge Black Cyan Magenta Yellow Light Cyan Light Magenta High-Capacity Black High-Capacity Cyan High-Capacity Magenta High-Capacity Yellow High-Capacity Light Cyan High- - Epson RX580 | Product Information Guide - Page 3
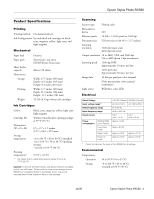
Epson Stylus Photo RX580 Product Specifications Printing Printing method On-demand ink jet Ink Configuration Six individual ink cartridges in black, cyan, magenta, yellow, light cyan, and light magenta Mechanical Paper feed Paper path Sheet feeder capacity Dimensions Storage Printing Weight - Epson RX580 | Product Information Guide - Page 4
* When you print with the borderless feature, print quality may decline in the expanded area. Before printing large jobs using the borderless setting, print a single sheet to microSDHC card* CompactFlash® Microdrive™ Envelopes * User-supplied adapter required 4 - Epson Stylus Photo RX580 11/06 - Epson RX580 | Product Information Guide - Page 5
Epson Stylus Photo RX580 Memory card slots: CF Type II card slot Memory printing in landscape mode. ❏ Load letterhead or preprinted paper into the RX580 top edge first. ❏ If you experience paper feeding problems, try loading fewer sheets. ❏ If you're using special paper, follow the instructions - Epson RX580 | Product Information Guide - Page 6
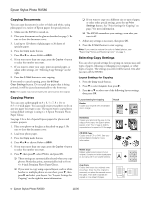
; 9 copies on letter-sized paper or as many will fit on smaller sheets. 2-up Copy Copies two letter-size originals onto one sheet. After the first original is scanned, you place the second one on the glass. Then both originals are copied on one sheet of paper. 6 - Epson Stylus Photo RX580 11/06 - Epson RX580 | Product Information Guide - Page 7
Epson Stylus Photo RX580 Layout Setting for Copying Repeat Copy Prints a photo at actual size as many times as it will fit on one sheet. Repeat-4 Prints a photo four times on one sheet. Result Print Settings for Copying You can choose from various sizes and types of Epson paper and other settings - Epson RX580 | Product Information Guide - Page 8
on any ink jet-printable CD or DVD. When you use your computer, the Epson Print CD software makes it easy to import your own photos, add text, and modify your designs with a variety of special effects. You can print on both regular 12-cm and 8-cm CDs and DVDs. See your on-screen User's Guide for - Epson RX580 | Product Information Guide - Page 9
on. 2. Open the front cover, then set the front tray to the CD/DVD position by pushing the tray lever down. Epson Stylus Photo RX580 Caution: Make sure you always use the small CD/DVD adapter when you print on 8-cm CDs or DVDs and that the CD or DVD and adapter lie flat on the tray; otherwise the - Epson RX580 | Product Information Guide - Page 10
Basics Guide for more information. 13. Press OK to confirm your print settings and selections. 14. Make sure you have paper loaded, then press the x Start button to print your photos. Note: If you need to cancel printing, press the y Stop/ Clear Settings button. 10 - Epson Stylus Photo RX580 11 - Epson RX580 | Product Information Guide - Page 11
. Using the optional Epson Bluetooth Photo Print Adapter, you can also print wirelessly from a Bluetooth-enabled PDA, mobile phone, or computer. For more information, see the on-screen User's Guide. To see the part numbers for the ink cartridges currently installed in your RX580, click Information - Epson RX580 | Product Information Guide - Page 12
Epson Stylus Photo RX580 When you're done, press l or r to select OK, then press OK. Ink Cartridge Precautions Warning: Keep ink cartridges out of the reach of children. Do not allow children to drink from or handle the cartridges. The ink cartridges are designed to contain any excess ink and - Epson RX580 | Product Information Guide - Page 13
the cartridge before you install it; otherwise, print quality may decline or you may not be able to print. If you have installed an ink cartridge without removing the yellow tape, take the cartridge out of the RX580, remove the yellow tape, and then reinstall it. 11/06 Epson Stylus Photo RX580 - Epson RX580 | Product Information Guide - Page 14
Epson Stylus Photo RX580 12. Press OK. The RX580 begins charging the ink delivery system and the message "Charging Ink. Please Wait" appears on the LCD screen. After about one minute, the message "Ink cartridge replacement is complete" appears on the LCD screen. Caution: Do not turn off the RX580 - Epson RX580 | Product Information Guide - Page 15
. Leave the ink cartridges installed. Removing the cartridges can dehydrate the print head and may prevent the RX580 from printing. 1. Remove all paper from the sheet feeder. 2. Turn the RX580 off. 3. Remove any memory cards installed in the memory card slots. 11/06 Epson Stylus Photo RX580 - 15 - Epson RX580 | Product Information Guide - Page 16
CPD-22268R1 Epson Stylus Photo RX580 Start Here Epson Stylus Photo RX580 Basics Guide Epson Stylus Photo RX580 CD-ROM with on-screen User's Guide 5. Close the scanner unit. 6. Unplug the power cord from the outlet, then disconnect the USB cable from your computer. 7. Close the paper support, the
-
 1
1 -
 2
2 -
 3
3 -
 4
4 -
 5
5 -
 6
6 -
 7
7 -
8
-
9
-
10
-
11
-
12
-
13
-
14
-
15
-
16
 |
 |
Epson Stylus Photo RX580
11/06
Epson Stylus Photo RX580
- 1
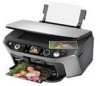
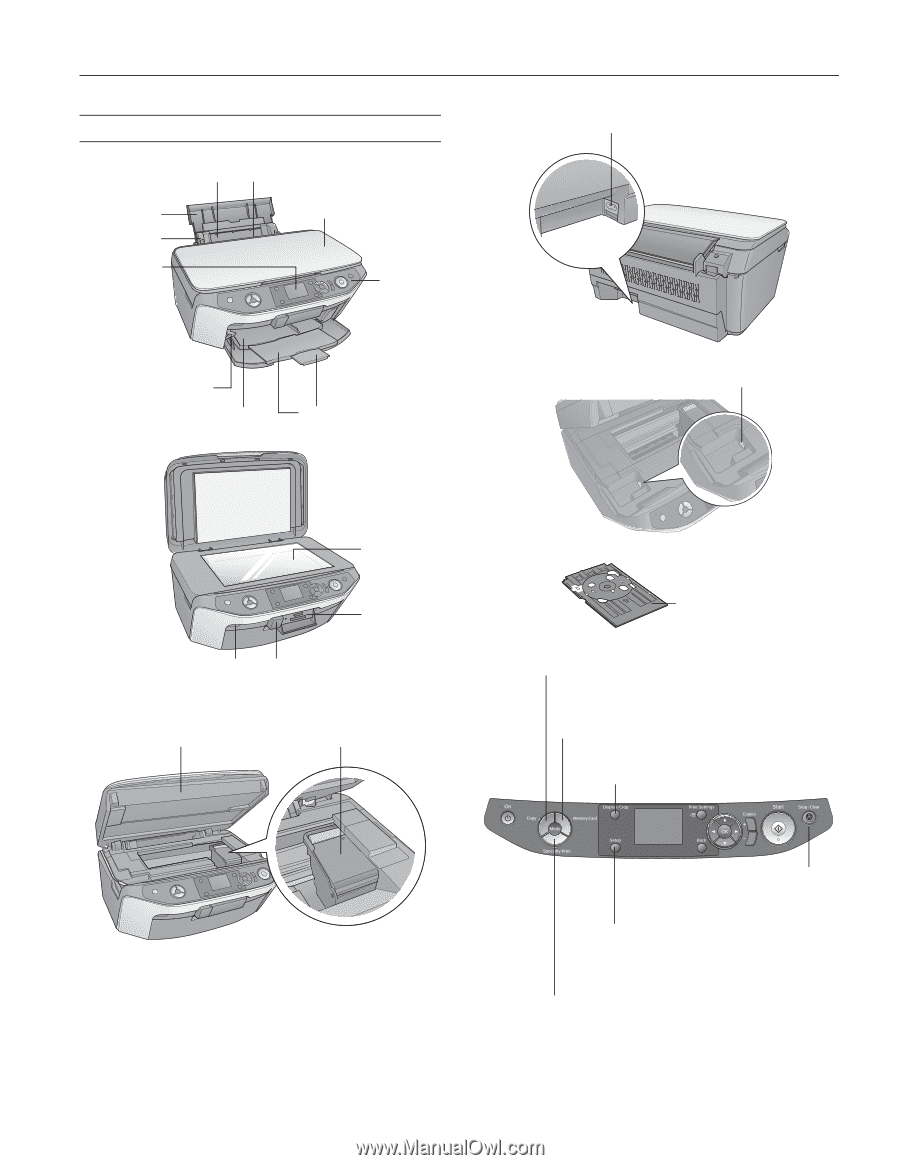
Product Parts
Sheet feeder
Edge guide
Paper
support
Document cover
Front tray
Front tray extensions
Tray lever
Feeder guard
Control
panel
LCD
screen
EXT. I/F USB port
(for PictBridge
®
or
USB storage devices)
Infrared port
Memory
card
slots
Document
table
Scanner unit
Cartridge cover
AC inlet
USB port
CD/DVD tray
Copy a photo or document
View and print photos on memory card; scan to card;
print an index sheet; print from an index sheet;
play a slide show of photos on card
Print on CD/DVDs;
reprint or restore photos;
print photo greeting cards
Check ink status; replace ink cartridges;
maintain the RX580; adjust CD/DVD print position;
backup photos; restore default settings;
make PictBridge or Bluetooth
®
settings
Display 1 or 9 photos;
crop or zoom a photo
Stop printing or
copying; cancel
settings