Epson RX580 Product Information Guide - Page 10
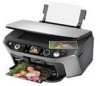
Printing Photos from Your Camera’s Memory Card, Inserting the Card, Printing Photos - stylus photo manual
 |
UPC - 010343859906
View all Epson RX580 manuals
Add to My Manuals
Save this manual to your list of manuals |
Page 10 highlights
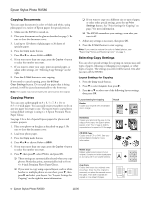
Epson Stylus Photo RX580 After you finish printing on a CD/DVD, remove the CD/DVD tray and set the front tray to the paper position by pushing up the tray lever. Printing Photos from Your Camera's Memory Card The RX580 lets you print color photos directly from your digital camera's memory card; just insert it into one of the memory card slots on the RX580 and you're ready to print. The color and lighting in your images are automatically corrected. You can also crop your photos, manually adjust the brightness and contrast, and correct red eyes-all without using your computer! See your printed Basics Guide for more information. You can use the cards and image file types shown in "Memory Cards" beginning on page 4. Inserting the Card 1. Make sure the RX580 is turned on. 2. Open the memory card slot cover. Caution: If your card requires an adapter, make sure you insert it into the adapter before you insert it in the slot. Otherwise, the card may get stuck in the slot. Do not insert more than one card at a time, and do not force the card into the slot. 3. Make sure the memory card access light is off and that no cards are in any of the slots, then insert your card into the correct slot. See page 4 for details. The memory card access light flashes and then stays on. 4. Close the memory card slot cover. When you want to remove the card, make sure the memory card access light is not flashing, then pull the card straight out of its slot. Caution: Do not remove the card or turn off the RX580 while the memory card access light is flashing; you may lose photos on the card. If your RX580 is connected to a computer running Windows 2000 or XP, never turn off the RX580 or disconnect the USB cable when a memory card is inserted; you may lose photos on the card. On a Macintosh, always drag the memory card icon on the desktop into the trash to eject the card before you turn off the RX580 or unplug the USB cable. Otherwise, you may lose photos on the card. Printing Photos The View and Print option lets you preview and choose individual photos to print. 1. Insert your memory card as described on the left. 2. Press the Memory Card mode button. 3. Press l or r to select View and Print, then press OK. 4. Press l or r to choose the photo you want to print. 5. When you see a photo you want to print, press the Copies + button. If you want more than one copy, press the Copies + button again. 6. Repeat steps 4 and 5 for each additional photo you want to print. 7. Press the x Print Settings button. 8. Press r to choose Paper Type. 9. Press u or d to select the setting that matches the type of paper you loaded, then press OK. Note: See "Selecting the Paper Type Setting When You Print or Copy Without a Computer" on page 8 for a list of Epson papers and the corresponding Paper Types. 10. Press d to highlight Paper Size, then press r to display a list of sizes. Press u or d to choose your paper size, then press OK. 11. Press d to highlight Layout, then press r to display a list of layouts. Press u or d to choose your layout option, then press OK. See your printed Basics Guide for more information. 12. Press d or u to highlight other settings in the Print Settings list, then press r to display the list of options. See your printed Basics Guide for more information. 13. Press OK to confirm your print settings and selections. 14. Make sure you have paper loaded, then press the x Start button to print your photos. Note: If you need to cancel printing, press the y Stop/ Clear Settings button. 10 - Epson Stylus Photo RX580 11/06
-
 1
1 -
2
-
3
-
4
-
 5
5 -
 6
6 -
 7
7 -
 8
8 -
 9
9 -
 10
10 -
 11
11 -
 12
12 -
 13
13 -
 14
14 -
 15
15 -
16
 |
 |
