Epson Stylus COLOR 777i Product Information Guide - Page 5
Testing the Printer, Printing on Special Media - stylus color 777 i printer
 |
View all Epson Stylus COLOR 777i manuals
Add to My Manuals
Save this manual to your list of manuals |
Page 5 highlights
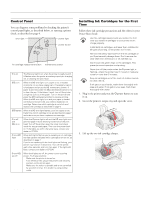
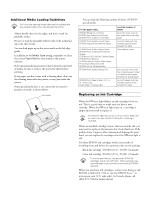
EPSON Stylus Color 777/777i 4. Unwrap the ink cartridges, then remove only the yellow part of the tape seal on top. Don't pull off the blue part. black cartridge color cartridge 5. Tilt each cartridge forward slightly as you lower it into its holder. Hang the tabs on the back of the ink cartridges on the hoods on the holder clamps. Don't place the cartridges under the holder clamp hooks; you may damage the clamp when you close it. Testing the Printer You can run a printer check to determine whether a problem comes from the printer itself or some other source. 1. Make sure both the printer and computer are turned off. 2. Disconnect the interface cable from the printer. 3. Make sure letter-size or larger paper is loaded in the printer. 4. Hold down the b maintenance button, then press and release the P power button. Continue holding down the b maintenance button until the Ppower light starts to flash, then release it. The printer prints one page showing its ROM version number, ink counter, and a nozzle check pattern. (If the pattern has gaps in its dots, you need to clean the print head; see page 8.) 5. To end the check, turn off the printer after it prints the check page. Then reconnect the interface cable and turn on your printer and computer. If the check page prints, the problem probably lies in your software settings, the interface cable, or your computer. If the check page doesn't print, you may have a problem with your printer. Try the suggestions in the Printer Basics book. If nothing seems to work, contact your dealer or EPSON. 6. Close the ink cartridge clamps. 7. Press the e ink cartridge replacement button to begin charging the ink delivery system, then close the printer cover. 8. Charging takes about two minutes. the P power light flashes and the printer makes various sounds until it's finished. Don't turn off the printer or interrupt charging or it will start over, using more ink than necessary. Charging is finished when the P power light stops flashing and stays on. Printing on Special Media Whether you print on plain paper or special media, you need to select the Media Type setting according to the guidelines in the table below. For this paper name... Plain paper and envelopes EPSON 360 dpi Ink Jet Paper EPSON Iron-On Cool Peel Transfer Paper EPSON High Quality Ink Jet Paper EPSON Photo Quality Ink Jet Paper EPSON Photo Quality Ink Jet Cards EPSON Photo Quality Self Adhesive Sheets EPSON Photo Quality Glossy Paper EPSON Photo Paper EPSON Glossy Photo Greeting Cards EPSON Premium Glossy Photo Paper EPSON Photo Quality Glossy Film EPSON Photo Stickers EPSON Ink Jet Transparencies Matte Paper - Heavyweight Select this Media Type setting Plain paper 360 dpi Ink Jet Paper Photo Quality Ink Jet Paper Photo Paper Premium Glossy Photo Paper Photo Quality Glossy Film Ink Jet Transparencies Matte Paper - Heavyweight 8/00 EPSON Stylus Color 777/777i - 5
-
 1
1 -
 2
2 -
 3
3 -
 4
4 -
 5
5 -
 6
6 -
 7
7 -
 8
8 -
 9
9 -
 10
10
 |
 |
