Epson Stylus COLOR 777i Product Information Guide - Page 7
Ink Cartridge Precautions, Determining Which Cartridge to Replace - stylus color 777 windows 7
 |
View all Epson Stylus COLOR 777i manuals
Add to My Manuals
Save this manual to your list of manuals |
Page 7 highlights
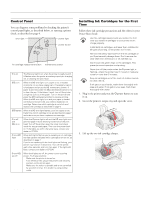
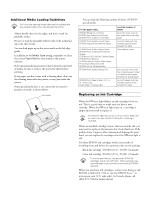
EPSON Stylus Color 777/777i Before you replace a cartridge, be sure to read these sections below: t "Ink Cartridge Precautions" below t "Determining Which Cartridge to Replace" Ink Cartridge Precautions Follow these precautions and those listed in the Printer Basics book before handling ink cartridges: Keep ink cartridges out of the reach of children and do not drink the ink. If ink gets on your hands, wash them thoroughly with soap and water. If ink gets in your eyes, flush them thoroughly with water. To avoid damaging the printer, never move the print head by hand. You cannot print if either ink cartridge is empty. Leave the empty cartridge installed in the printer until you have obtained a replacement. Otherwise the ink remaining in the print head nozzles may dry out. You must remove the yellow tape from the top of the cartridge or you will permanently damage it. Don't try to remove the clear seal underneath the cartridge. Don't touch the green circuit board on the back of the cartridge; you may inhibit normal operation and printing. Determining Which Cartridge to Replace To find out which ink cartridge is low or empty, do one of the following: t Check the information in the EPSON Status Monitor 3 (Windows) or EPSON StatusMonitor (Macintosh) window that automatically appears on your screen when you print. t Press the e ink cartridge replacement button and check the flash pattern of the control panel lights: t b error and P power lights flash at the same speed = replace black cartridge t b error light flashes twice as fast as the P power light = replace color cartridge Removing and Installing Ink Cartridges Be sure you have a new ink cartridge before you begin. Once you start the ink cartridge replacement procedure, you must complete all the steps in one session. Follow these steps to replace ink cartridges: 1. Make sure the printer is turned on and not printing (the Ppower light should be on, but not flashing), then open the printer cover. 2. Press the e ink cartridge replacement button. The print head moves to the center and the Ppower light flashes and the b error light flashes or remains on. (If you need to determine which cartridge to replace, check the status monitor window or the control panel light pattern now, as described above.) 3. The color cartridge is on the right and the black is on the left. Pull up the ink cartridge clamp. The cartridge rises up from its holder. 4. Lift the cartridge out of the printer and dispose of it carefully. 5. Unwrap the new ink cartridge. Then remove only the yellow tape seal on top. 8/00 black cartridge color cartridge EPSON Stylus Color 777/777i - 7
-
 1
1 -
 2
2 -
 3
3 -
 4
4 -
 5
5 -
 6
6 -
 7
7 -
 8
8 -
 9
9 -
 10
10
 |
 |
