Epson Stylus Pro WT7900 Quick Reference Guide
Epson Stylus Pro WT7900 Manual
 |
View all Epson Stylus Pro WT7900 manuals
Add to My Manuals
Save this manual to your list of manuals |
Epson Stylus Pro WT7900 manual content summary:
- Epson Stylus Pro WT7900 | Quick Reference Guide - Page 1
Epson Stylus® Pro WT7900 QUICK REFERENCE GUIDE - Epson Stylus Pro WT7900 | Quick Reference Guide - Page 2
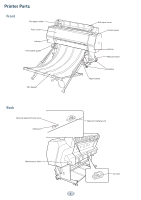
Printer Parts Front Roll paper holder Front cover Ink bay Film basket guide Film basket Back Optional SpectroProofer port USB port Roll paper cover Control panel Ink bay Manual holder Casters Paper basket Network interface port Maintenance tank 1 AC inlet - Epson Stylus Pro WT7900 | Quick Reference Guide - Page 3
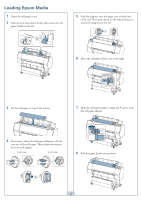
Loading Epson Media 1 Open the roll paper cover. 2 Push the lock lever down firmly, then move roll. 6 Move the roll paper all the way to the right. 3 Set the roll paper on top of the printer. 7 Slide the roll paper holder to align the arrow with the roll paper adapter. 4 If necessary, adjust the - Epson Stylus Pro WT7900 | Quick Reference Guide - Page 4
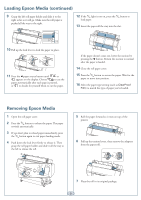
(such as ClearProof Film) to match the type of paper you've loaded. Removing Epson Media 1 Open the roll paper cover. 2 Press the button to release the paper. Roll the paper forward so it rests on top of the printer. 6 Pull up the tension levers, then remove the adapters from the paper roll. - Epson Stylus Pro WT7900 | Quick Reference Guide - Page 5
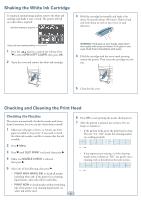
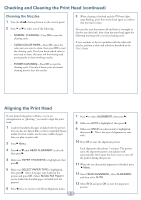
check them yourself. 1 Make sure roll paper or letter- or A4-size cut sheet paper is loaded in the printer. If you need to check the white ink nozzles, use film to ensure that the ink is visible. 2 Press Menu. 3 Press until TEST PRINT is selected, then press . 4 Make sure NOZZLE CHECK is selected - Epson Stylus Pro WT7900 | Quick Reference Guide - Page 6
ink refresh as described in the User's Guide. Aligning the Print Head If your prints look grainy or blurry, or you see misregistration or "ghosting," you need to align the print head. 1 Load the bundled roll paper included with the printer. You can also use Epson film or other compatible Epson - Epson Stylus Pro WT7900 | Quick Reference Guide - Page 7
is low, and make sure you have the correct replacement cartridge. Epson UltraChrome® HDR ink cartridges Ink Slot Cartridge bay no. 150 ml 350 ml 700 ml Left 1 Remove the expended ink cartridge from the printer. Warning: Do not shake the expended cartridge, or ink may leak. If ink gets on your - Epson Stylus Pro WT7900 | Quick Reference Guide - Page 8
seconds for the white ink cartridge, or 5 ink cover. 6 Hold the cartridge with the arrow mark pointing toward the printer. Then insert the cartridge into the slot. Don't force it. Replacing Printer the Menu button on the printer, then press until MAINTENANCE the printer. 5 To remove the cutter - Epson Stylus Pro WT7900 | Quick Reference Guide - Page 9
TANK FULL on the LCD, the icon has an X, and the printer won't print. 1 Turn off the printer. 2 Pull out the maintenance tank as shown. Caution: Do not tip the tank or ink may spill out. 9 Tighten the screw. 3 Place the used tank in the plastic bag included with the new tank and dispose - Epson Stylus Pro WT7900 | Quick Reference Guide - Page 10
User's Guide for details. Menu PRINTER SETUP Item Printer settings, total prints, and maintenance tank capacity remaining Network settings Date and Time and Ink and paper used firmware version Percentage of ink remaining in each cartridge Percentage of capacity remaining in the maintance tank Ink - Epson Stylus Pro WT7900 | Quick Reference Guide - Page 11
ft From 4 to 50 ft Media type loaded in the printer Paper No 1 to 10 Media type loaded in the printer STANDARD, NARROW, WIDE, WIDER PRINT -0.70% to 0.70 STANDARD, -1, -2, -3, -4 STANDARD, HIGH, HIGHER ON, OFF Media type loaded in the printer. 8 mil (0.2 mm), 4 mil to 60 mil (0.1 to 1.5 mm) UNI-D, BI - Epson Stylus Pro WT7900 | Quick Reference Guide - Page 12
to epson.com/support to download drivers and firmware, access product documentation and troubleshooting, and get technical advice through e-mail. Support for non-Epson RIP Contact the RIP manufacturer. Web-based printer information management system myEpsonPrinter.com Epson and Epson Stylus are - Epson Stylus Pro WT7900 | Quick Reference Guide - Page 13
Lights and Buttons Paper light Power light and button Pause/reset light and button Ink light Head cleaning button Paper feed button (up) Paper release (ePlaten™) light and button Menu button Paper cut button Ink cover open button OK button Paper feed button (down) Paper source button Printed
-
 1
1 -
 2
2 -
 3
3 -
 4
4 -
 5
5 -
 6
6 -
 7
7 -
8
-
9
-
10
-
11
-
12
-
13
 |
 |
Epson Stylus
®
Pro WT7900
QUICK REFERENCE GUIDE