Epson Stylus Pro WT7900 Quick Reference Guide - Page 4
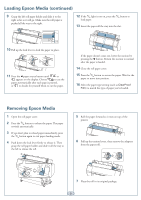
Removing Epson Media, Pull up the lock lever to lock the paper in place.
 |
View all Epson Stylus Pro WT7900 manuals
Add to My Manuals
Save this manual to your list of manuals |
Page 4 highlights
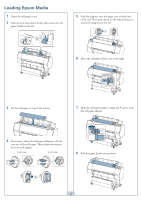
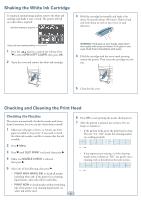
Loading Epson Media (continued) 9 Grasp the left roll paper holder and slide it to the right as far as it will go. Make sure the roll paper is pushed all the way to the right. 12 If the light is not on, press the button to load paper. 13 Insert the paper all the way into the slot. 10 Pull up the lock lever to lock the paper in place. 11 Press the paper source button until or appears on the display. Choose to cut the paper automatically after each page is printed, or to decide for yourself when to cut the paper. If the paper doesn't come out, lower the suction by pressing the button. Return the suction to normal after the paper is loaded. 14 Close the roll paper cover. 15 Press the button to secure the paper. Wait for the paper to move into position. 16 Select the paper type setting (such as ClearProof Film) to match the type of paper you've loaded. Removing Epson Media 1 Open the roll paper cover. 2 Press the button to release the paper. The paper rewinds automatically. 3 If you don't plan to reload paper immediately, press the button again to exit paper loading mode. 4 Push down the lock lever firmly to release it. Then grasp the roll paper holder and slide it all the way to the left to release the roll. 5 Roll the paper forward so it rests on top of the printer. 6 Pull up the tension levers, then remove the adapters from the paper roll. 7 Place the roll in its original package. 3
-
 1
1 -
 2
2 -
 3
3 -
 4
4 -
 5
5 -
 6
6 -
 7
7 -
 8
8 -
 9
9 -
 10
10 -
11
-
12
-
13
 |
 |
