Epson Stylus Pro WT7900 Quick Reference Guide - Page 9
Replacing Printer Parts continued, Replacing the Maintenance Tank
 |
View all Epson Stylus Pro WT7900 manuals
Add to My Manuals
Save this manual to your list of manuals |
Page 9 highlights
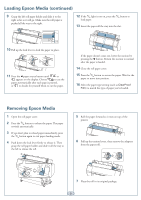
Replacing Printer Parts (continued) 7 Carefully remove the cutter. 8 Insert the new cutter. Make sure the cutter pin goes into the hole. Replacing the Maintenance Tank You need to replace the maintenance tank (part # C12C890191) when you see MAINTENANCE TANK FULL on the LCD, the icon has an X, and the printer won't print. 1 Turn off the printer. 2 Pull out the maintenance tank as shown. Caution: Do not tip the tank or ink may spill out. 9 Tighten the screw. 3 Place the used tank in the plastic bag included with the new tank and dispose of it carefully. 10 Insert the cutter cover, then press it in until it snaps into place. 4 Insert the new tank. 11 Turn the printer back on. 12 Run the cutter adjustment from the Maintenance menu using the control panel. 8
-
 1
1 -
2
-
3
-
 4
4 -
 5
5 -
 6
6 -
 7
7 -
 8
8 -
 9
9 -
 10
10 -
 11
11 -
 12
12 -
 13
13
 |
 |
