Fisher and Paykel RF201ADUSX5 User Guide
Fisher and Paykel RF201ADUSX5 Manual
 |
View all Fisher and Paykel RF201ADUSX5 manuals
Add to My Manuals
Save this manual to your list of manuals |
Fisher and Paykel RF201ADUSX5 manual content summary:
- Fisher and Paykel RF201ADUSX5 | User Guide - Page 1
ActiveSmart™ refrigerator Ice & Water and Non-Ice & Water RF135B, E522B, RF170W, RF170A, RF201A models Réfrigérateur ActiveSmart™ Ice & Water et autres Modèles RF135B, E522B, RF170W, RF170A, RF201A Installation instructions and User guide Instructions d'installation et Guide d'utilisation US CA - Fisher and Paykel RF201ADUSX5 | User Guide - Page 2
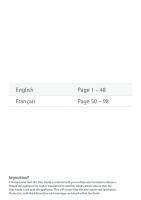
çais Page 1 - 48 Page 50 - 98 Important! It is important that this User Guide is retained with your refrigerator for future reference. Should the appliance be sold or transferred to another owner, please ensure that the User Guide is left with the appliance. This will ensure that the new owner can - Fisher and Paykel RF201ADUSX5 | User Guide - Page 3
time. For current details about model and specification availability in your country, please visit our website listed on the back cover or contact your local Fisher & Paykel dealer. Note that the word "refrigerator", throughout this User Guide, refers to combination refrigerator/freezer products. - Fisher and Paykel RF201ADUSX5 | User Guide - Page 4
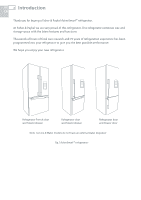
US 2 Introduction CA Thank you for buying a Fisher & Paykel ActiveSmart™ refrigerator. At Fisher & Paykel we are very proud of this refrigerator. This refrigerator combines size and storage space with the latest features and functions. Thousands of hours of food care research and 75 years of - Fisher and Paykel RF201ADUSX5 | User Guide - Page 5
as described in this User Guide. Important safety precautions Warning When have been given supervision or instruction concerning use of the appliance by Fisher & Paykel Authorized Service Agent will be able to give advice on environmentally friendly methods of disposing of your old refrigerator - Fisher and Paykel RF201ADUSX5 | User Guide - Page 6
can only be removed by Fisher & Paykel Authorized Service Agents. Important! Your refrigerator is designed to operate for many years without the need for service checks. However, if your refrigerator is malfunctioning, have it attended to by your Fisher & Paykel Authorized Service Agent as soon as - Fisher and Paykel RF201ADUSX5 | User Guide - Page 7
Ice & Water (Ice & Water models only) ■■ Your Ice & Water refrigerator must be installed by an authorized plumber or Fisher & Paykel Authorized Service Agent as incorrect plumbing can lead to water leaks. ■■ Fisher & Paykel Appliances does not accept responsibility for damage (including water damage - Fisher and Paykel RF201ADUSX5 | User Guide - Page 8
cabinetry dimensions below. ■■ If integrating your refrigerator, please follow installation instructions provided with the integration kits. PLAN VIEW FLUSH WITH REFRIGERATOR CHASSIS - FULL DOOR ROTATION E P M M F Q Q R S Flush with refrigerator chassis - full door rotation PLAN VIEW - Fisher and Paykel RF201ADUSX5 | User Guide - Page 9
Installation instructions 7 US CA RF135B Product dimensions inches mm A overall height of H inside depth flush to curved door - - I inside depth flush to flat door 27 3/8 695 Flush with refrigerator door - 90° door rotation (for full drawer/shelf access, the doors need to be open past 90°) - Fisher and Paykel RF201ADUSX5 | User Guide - Page 10
US 8 Installation instructions CA 5. Ventilation and installation - Freezer drawer models (RF170W, RF170A, RF201A) (Ice & WPater aMnd Enon IcMe & Water) RF170W F Q Q RF170A/RF201A F S Q Q R R DA B P H/I C P G M DA N T B P K/L J M O H/I C P Flush with refrigerator chassis - - Fisher and Paykel RF201ADUSX5 | User Guide - Page 11
Installation instructions 9 US CA To ensure adequate ventilation for your refrigerator see recommended cabinetry - - - - I inside depth flush to flat door 27 3/8 695 27 3/8 695 Flush with refrigerator door - 90° door rotation (for full drawer/shelf access, the doors need to be open past 90 - Fisher and Paykel RF201ADUSX5 | User Guide - Page 12
may not function in some circumstances. ■■ The water connection to your Ice & Water refrigerator must be installed by an authorized plumber or Fisher & Paykel Authorized Service Agent. ■■ The water connection instructions below are intended only for the professional installer. ■■ The new tubings - Fisher and Paykel RF201ADUSX5 | User Guide - Page 13
11 US CA Installation instructions: 1 Ensure the refrigerator is NOT plugged into a power supply. 2 Locate a cold water We suggest that this location is beside the water filter supply faucet in a cupboard beside the refrigerator. ■■ A minimum clearance of 2 ½" (64 mm) from the bottom of the filter - Fisher and Paykel RF201ADUSX5 | User Guide - Page 14
US 12 Installation instructions CA 11 Attach double sided foam to the back of the water (6 mm) tubing to the back of the refrigerator ensuring there is enough tubing to pull the refrigerator out for service. 13 Using the measurement guide located on the rear compartment cover as shown6 in - Fisher and Paykel RF201ADUSX5 | User Guide - Page 15
Installation instructions 13 US CA Important! ■■ All connections must be checked for leaks. ■■ Ensure white ¼" (6 mm) tubing is routed away from sharp objects, sharp corners (beware of kinking the tube as this will stop water flow), clear of the refrigerator rear compartment and not in a - Fisher and Paykel RF201ADUSX5 | User Guide - Page 16
US 14 Installation instructions CA Before you start using your Ice & Water refrigerator ■■ Check your refrigerator is switched on. ■■ Press and hold the , and buttons together for 4 seconds and then close the refrigerator compartment door to force an ice maker cycle. The ice tray will flip twice - Fisher and Paykel RF201ADUSX5 | User Guide - Page 17
Installation instructions 15 US CA 7. Installation (all models) Your Fisher & Paykel ActiveSmart™ refrigerator is fitted with front and rear rollers, designed for moving the product in the forwards and backwards direction. Avoid moving the product in a sideways direction - Fisher and Paykel RF201ADUSX5 | User Guide - Page 18
US 16 Installation instructions CA 9. What to do if your product is unstable A Gently push the refrigerator back until the rear rollers contact off the floor when pushing gently on the top front of the refrigerator C Roll the refrigerator back into position and adjust front feet as per step 7C. ( - Fisher and Paykel RF201ADUSX5 | User Guide - Page 19
have cooled sufficiently. Energy efficiency For the most energy efficient use of your appliance: ■■ Ensure your refrigerator has adequate ventilation as recommended in the installation instructions. ■■ Do not cover your appliance with any material that will prevent air from flowing around the - Fisher and Paykel RF201ADUSX5 | User Guide - Page 20
as far as they will turn (refer to page 15). ■■ Ease the refrigerator out of its position. Tuck the power cord away, tape the shelves in as long as you can (a few hours) before turning on. Storing your refrigerator ■■ When storing your cleaned appliance, leave the doors open. This allows air - Fisher and Paykel RF201ADUSX5 | User Guide - Page 21
conversion kit for that model refrigerator. The kit is available from your Fisher & Paykel Authorized Service Agent or Dealer. Full instructions are included in the conversion it is not serviceable by the user. If a problem occurs, please contact your Fisher & Paykel Authorized Service Agent. - Fisher and Paykel RF201ADUSX5 | User Guide - Page 22
US 20 ActiveSmart™ operating instructions CA Models: 25" (635 mm) wide 31 1/8" (790 mm) wide 35 3/8" (900 mm) wide RF135B E522B, RF170W, RF170A RF201A The control panel enables you to view and modify all the features and options on your refrigerator. Temperature control (all models) ■■ When the - Fisher and Paykel RF201ADUSX5 | User Guide - Page 23
instructions be open longer than normal eg when cleaning the interior of your refrigerator press the ALARM MUTE button to silence the door alarm for 20 the door alarms will return to normal. ■■ To deactivate ALARM MUTE manually, press the button again. When ALARM MUTE is deactivated the light - Fisher and Paykel RF201ADUSX5 | User Guide - Page 24
operating instructions CA will still operate. ■■ KEY MUTE will not automatically deactivate. To manually deactivate, press and hold the button for 4 seconds. ■■ The affect the compressor or fans. ■■ If the power to the refrigerator is turned off whilst in this mode, the product will continue in - Fisher and Paykel RF201ADUSX5 | User Guide - Page 25
ActiveSmart™ operating instructions 23 US CA Special Functions Bottle Chill (Designer, Elegance and Ice & Water models only) This function allows you to chill your beverages more rapidly in - Fisher and Paykel RF201ADUSX5 | User Guide - Page 26
US 24 All about the external display (Ice & Water models only) CA This screen enables you to lock the water dispenser, indicates to you when BOTTLE CHILL is activated and when your water filter requires changing. Fig.19 Electronic external display Keys 32 1 1. Dispenser lock button and light - Fisher and Paykel RF201ADUSX5 | User Guide - Page 27
Using your water dispenser (Ice & Water models only) 25 US CA Dispensing ■■ Your water dispenser has been designed for one-handed operation. ■■ To dispense water push the dispensing pad gently, using a glass or container. This pad requires only a gentle press to activate. ■■ To stop the flow of - Fisher and Paykel RF201ADUSX5 | User Guide - Page 28
. ■■ Replacement filter cartridges are available from your Fisher & Paykel Authorized Service Agent. The details of the replacement filter cartridge and to also check for leaks, disconnect the tubing from the back of the refrigerator, aim the end of the tubing into a bucket, turn isolating tap on - Fisher and Paykel RF201ADUSX5 | User Guide - Page 29
Water filter (Ice & Water models only) 27 US CA To reset the filter indicator Important! We recommend the water filter to be used from the time of installation. Do not reset indicator before filter is changed or filter monitoring will be inaccurate. ■■ Press and hold and for 4 seconds to reset the - Fisher and Paykel RF201ADUSX5 | User Guide - Page 30
when there is no bin in place to catch the ice and it will not dispense any ice. First use ■■ When you first turn your refrigerator on after installation, the ice maker will be off. The light above the ICE ON/OFF icon will be off. ■■ To turn your ice maker - Fisher and Paykel RF201ADUSX5 | User Guide - Page 31
automatic ice making mechanism while the refrigerator is in operation. ■■ Do not use ice cubes that may have become discolored, usually with a green-blue color. If such discoloration is noted, discard the ice cubes and contact your Fisher & Paykel Authorized Service Agent. ■■ Ensure the ice maker is - Fisher and Paykel RF201ADUSX5 | User Guide - Page 32
US 30 ActiveSmart™ special features (all models) CA Fruit and vegetable bins and humidity control lid The fruit and vegetable bins feature a unique lid which provides two functions: ■■ The humidity lid seals the bins and provides a humid microclimate to extend storage times of fruit and vegetables. - Fisher and Paykel RF201ADUSX5 | User Guide - Page 33
another so they do not take up unnecessary shelf space. ■■ Bottles are best stored with the neck of the beverage facing the front of the refrigerator. Glass shelves ■■ Glass shelves can be repositioned in the cabinet as desired. ■■ Remove shelves by lifting up the back of the shelf and then pulling - Fisher and Paykel RF201ADUSX5 | User Guide - Page 34
US 32 ActiveSmart™ special features (all models) CA Manual ice system - RF170W and RF170A (non Ice & Water storage bin, ice tray, lid and scoop in correct position Fig.29 Accessing your ice Information about your manual ice system ■■ To make ice, take the ice tray and lid from the top of the ice - Fisher and Paykel RF201ADUSX5 | User Guide - Page 35
cleaning may be necessary for dusty homes or those with pets shedding hair. ■■ To do this wind up the feet and carefully ease the refrigerator out Fig.30 Cleaning the rear of its position. Switch off and unplug. compartment cover ■■ Vacuum the flooring behind your appliance and the rear - Fisher and Paykel RF201ADUSX5 | User Guide - Page 36
to crack. It is important to use only warm water and a small amount of liquid dishwashing detergent on any components inside and outside your refrigerator. Avoid using anti-bacterial cleaning products on either the interior or exterior of the cabinet as they may cause rusting of metal components and - Fisher and Paykel RF201ADUSX5 | User Guide - Page 37
Cleaning and caring for your refrigerator 35 US CA Humidity Control System Important! When control lid (plastic lid) and humidity slides become separated from the glass shelf, follow these instructions to reassemble. Retainer Humidity Slides 1 Turn shelf upside down 2 To attach humidity slides - Fisher and Paykel RF201ADUSX5 | User Guide - Page 38
ice maker to OFF on the internal control panel (refer to page 28). ■■ Shut off the water supply to the refrigerator. ■■ On your return, turn on the water supply to the refrigerator. ■■ Dispense 10 qt (10 liters) of water and discard to ensure the water tank is refilled with fresh water. ■■ Turn - Fisher and Paykel RF201ADUSX5 | User Guide - Page 39
smelling foods are wrapped or covered and stored away from foods such as butter, milk and cream which can be easily tainted by strong odors. ■■ Refrigerate fresh, perishable foods as soon as possible after purchase. If left at room temperature for any length of time the rate of deterioration will be - Fisher and Paykel RF201ADUSX5 | User Guide - Page 40
stuffing from poultry and store separately. Fish and seafood ■■ Whole fish and fillets should be used on the day of purchase. Until required, refrigerate on a plate loosely covered with plastic wrap, waxed paper or foil. ■■ If storing overnight or longer, take particular care to select very fresh - Fisher and Paykel RF201ADUSX5 | User Guide - Page 41
The use of temperatures of -0.4°F (-18°C) or colder to store food means that the food can be kept for longer periods than when refrigeration temperatures are used. This is because the growth of bacteria, moulds and yeasts are stopped, and chemical and physical reactions are severely restricted at - Fisher and Paykel RF201ADUSX5 | User Guide - Page 42
US 40 Storing food in your freezer CA Meat, poultry and game ■■ Do not try to freeze more than 2.2 pound (1 kg) meat per 6.6 gal (25 L) or 0.88 cubic feet of freezer storage volume at any one time. Meat must be frozen quickly in order to maintain its texture. ■■ Do not stuff poultry before freezing. - Fisher and Paykel RF201ADUSX5 | User Guide - Page 43
may be heard for the following reasons: - Cabinet not level - Floor uneven or weak - Bottles or jars rattling on shelves ■■ If this is your first refrigerator with an ice maker, you will hear occasional sounds that may be unfamiliar. They are normal ice making sounds and are not cause for concern - Fisher and Paykel RF201ADUSX5 | User Guide - Page 44
US 42 Troubleshooting CA If there is a problem with your appliance, please check the following points before contacting your local Fisher & Paykel Authorized Service Agent or the Customer Care Center. All models Problem Possible causes What to do Appliance does not operate. No electricity at - Fisher and Paykel RF201ADUSX5 | User Guide - Page 45
Troubleshooting 43 US CA All models Problem Water in the vegetable bins. Exterior of cabinet is warm. Warm area on central door seal (French door models only). Condensation on outside of refrigerator tightly. Wipe dry. See Installation instructions - Stability instructions (pages 15 - 16). Check - Fisher and Paykel RF201ADUSX5 | User Guide - Page 46
US 44 Troubleshooting CA Ice & Water models only Problem Possible causes What to do Automatic is perfectly normal and is part of on the central seal between the the normal refrigerator operation. two refrigerator doors. Wet ice/ ice clumping. Low water pressure. Filter blocked. Check water - Fisher and Paykel RF201ADUSX5 | User Guide - Page 47
Troubleshooting 45 US CA Ice & Water models only Problem Possible causes Water has poor taste/odor. Refrigerator not used for an extended or seems too loud. Normal ice maker operation. Refer to refrigerator sounds (refer to page 41). Ice boost function Ambient temperature very warm. - Fisher and Paykel RF201ADUSX5 | User Guide - Page 48
mainland United States, Hawaii, Washington D.C. and Canada. In Alaska the Limited Warranty for the sealed refrigeration system is the same except that you must pay to ship the product to the service shop or the service technician's travel to your home. Fisher & Paykel undertakes to: Repair or at its - Fisher and Paykel RF201ADUSX5 | User Guide - Page 49
service call will be charged if the problem is not found to be a defect of the product. For example: 1. Correcting faulty installation of the product. 2. Instructing drain/fan sounds, refrigeration noises or user warning in accordance with the product's User Guide. C Defects to the product caused by - Fisher and Paykel RF201ADUSX5 | User Guide - Page 50
read your User Guide. If you then have any questions about operating the product, need the name of your local Fisher & Paykel Authorized Service Agent, or believe the product is defective and wish service under this limited warranty, please contact your dealer or call us at: USA and Canada TOLL FREE - Fisher and Paykel RF201ADUSX5 | User Guide - Page 51
- Fisher and Paykel RF201ADUSX5 | User Guide - Page 52
avec votre réfrigérateur pour toute référence ultérieure. Si votre appareil est vendu ou cédé à un autre propriétaire, veillez à lui laisser le guide de l'utilisateur avec le réfrigérateur. Ainsi, le nouveau propriétaire pourra consulter les informations et les mises en garde contenues dans le - Fisher and Paykel RF201ADUSX5 | User Guide - Page 53
83 87 89 91 92 96 99 Important! CONSERVEZ CES INSTRUCTIONS Les modèles illustrés dans ce guide de l'utilisateur peuvent ne pas être disponibles dans tous ou contacter votre détaillant Fisher & Paykel local. Veuillez noter que le terme « réfrigérateur » utilisé dans ce guide de l'utilisateur sert à - Fisher and Paykel RF201ADUSX5 | User Guide - Page 54
US 52 Introduction CA (FR) Nous vous remercions d'avoir acheté un réfrigérateur ActiveSmart™ de Fisher & Paykel. Chez Fisher & Paykel, nous sommes très fiers de ce réfrigérateur. Ce réfrigérateur combine un format et un espace de rangement pratiques avec les caractéristiques et - Fisher and Paykel RF201ADUSX5 | User Guide - Page 55
guide de l'utilisateur avant d'utiliser cet appareil. Le défaut de se conformer à ces instructions peut pas avec l'appareil. ■■ Utilisez le support stabilisateur en vous reportant au dépliant Communiquez immédiatement avec un agent de service autorisé de Fisher & Paykel pour prévoir une réparation. - Fisher and Paykel RF201ADUSX5 | User Guide - Page 56
ème électrique ■■ Cet appareil doit être installé conformément aux instructions d'installation avant d'être utilisé. ■■ Ne débranchez jamais votre réfrigé endommagé, il doit être remplacé par un agent de service autorisé de Fisher & Paykel qui dispose des outils spéciaux nécessaires. ■■ Lorsque vous - Fisher and Paykel RF201ADUSX5 | User Guide - Page 57
Instructions d'installation 55 US CA (FR) Veuillez suivre les étapes de la proc un plombier qualifié ou un agent de service autorisé de Fisher & Paykel car un raccordement de plomberie incorrect pourrait entraîner des fuites d'eau. ■■ Fisher & Paykel Appliances n'assume aucune responsabilité pour les - Fisher and Paykel RF201ADUSX5 | User Guide - Page 58
recommandées. ■■ Si vous souhaitez encastrer votre réfrigérateur, veuillez suivre les instructions d'installation fournies avec les ensembles d'encastrement. PLAN VIEW FLUSH WITH REFRIGERATOR CHASSIS - FULL DOOR ROTATION E P M M F Q Q R S Châssis du réfrigérateur au même niveau - Fisher and Paykel RF201ADUSX5 | User Guide - Page 59
Instructions d'installation 57 US CA (FR) RF135B E522B Dimensions du produit po mm po mm A hauteur hors tout du produit avec porte plate 67 17/32 1 - Fisher and Paykel RF201ADUSX5 | User Guide - Page 60
US 58 Instructions d'installation CA (FR) 5. Ventilation et installation - Modèles avec congélateur-tiroir (RF170W, RF170A, RF201A) (modèlePsP Ice &M MWEaEter eMt Mautres) RF170W FF QQ QQ - Fisher and Paykel RF201ADUSX5 | User Guide - Page 61
Instructions d'installation 59 US CA (FR) Pour assurer la ventilation adéquate de votre réfrigérateur, consultez le tableau ci-dessous pour connaître les dimensions d' - Fisher and Paykel RF201ADUSX5 | User Guide - Page 62
la conduite d'eau à votre réfrigérateur Ice & Water doit être effectué par un plombier qualifié ou un agent de service autorisé de Fisher & Paykel. ■■ Les instructions de raccordement de la conduite d'eau présentées ci-dessous sont destinées uniquement à un installateur professionnel. ■■ Les tuyaux - Fisher and Paykel RF201ADUSX5 | User Guide - Page 63
Instructions d'installation : Instructions d'installation 61 US CA (FR) 1 Assurez-vous que le réfrigérateur n'est PAS raccordé à une prise d'alimentation. 2 Trouvez une conduite d'alimentation en eau froide permettant d' - Fisher and Paykel RF201ADUSX5 | User Guide - Page 64
US 62 Instructions d'installation CA (FR) 11 Fixez la mousse double face à la partie tuyau suffisante pour pouvoir avancer le réfrigérateur lors des travaux d'entretien. PART: 838587 13 Utilisez le guide de mesure situé sur le6 couvercle 7 de compartiment arrière, comme le montre le schéma 6. - Fisher and Paykel RF201ADUSX5 | User Guide - Page 65
Instructions d'installation 63 US CA (FR) Important! ■■ Tous les raccordements doivent être vérifiés pour éviter les fuites. ■■ Assurez-vous que le tuyau blanc de ¼ po (6 mm) - Fisher and Paykel RF201ADUSX5 | User Guide - Page 66
US 64 Instructions d'installation CA (FR) Avant d'utiliser votre réfrigérateur Ice & Water ■■ Assurez-vous que le réfrigérateur est en marche. ■■ Assurez-vous que le robinet d'isolement a été - Fisher and Paykel RF201ADUSX5 | User Guide - Page 67
(tous les modèles) Instructions d'installation 65 US CA (FR) Votre réfrigérateur ActiveSmart™ de Fisher & Paykel est muni de roulettes avant le pied du côté de la poignée jusqu'à ce qu'il repose au sol et supporte une petite partie du poids. ■■ Une fois le réfrigérateur en place et aligné - Fisher and Paykel RF201ADUSX5 | User Guide - Page 68
US 66 Instructions d'installation CA (FR) 9. Que faire si votre appareil est instable A Poussez légèrement le réfrigérateur vers l'arrière jusqu'à ce que les roulettes arrière - Fisher and Paykel RF201ADUSX5 | User Guide - Page 69
de votre appareil : ■■ Veillez à ce que votre réfrigérateur bénéficie d'une ventilation suffisante en suivant les recommandations indiquées dans les instructions d'installation. ■■ Ne couvrez pas le réfrigérateur de matériaux qui pourraient empêcher l'air de circuler autour de l'appareil. ■■ Assurez - Fisher and Paykel RF201ADUSX5 | User Guide - Page 70
US 68 Déplacement ou entreposage de votre appareil CA (FR) Si votre réfrigérateur devait s'éteindre pour une raison quelconque, attendez 10 minutes avant de le remettre en marche. Cela permet d'équilibrer les pressions du système de réfrigération avant la remise en marche. Déplacement de votre ré - Fisher and Paykel RF201ADUSX5 | User Guide - Page 71
de conversion conçu pour votre modèle de réfrigérateur. L'ensemble est disponible auprès de votre détaillant ou agent de service autorisé de Fisher & Paykel. Des instructions complètes sont fournies avec l'ensemble de conversion. Si vous souhaitez fixer la porte sur le côté opposé, nous vous - Fisher and Paykel RF201ADUSX5 | User Guide - Page 72
US 70 Instructions d'utilisation ActiveSmart™ CA (FR) Modèles : 25 po (635 mm) de largeur 31 1/8 po (790 mm) de largeur 35 3/8 po (900 mm) de largeur RF135B - Fisher and Paykel RF201ADUSX5 | User Guide - Page 73
Instructions d'utilisation ActiveSmart™ Compartiment réfrigérateur (tous les modèles) 71 US CA (FR) ■■ Le témoin du compartiment réfrigérateur s'allumera automatiquement. La température de - Fisher and Paykel RF201ADUSX5 | User Guide - Page 74
US 72 Instructions d'utilisation ActiveSmart™ CA (FR) Touches silencieuses (tous les modèles) Le mode KEY MUTE (touches silencieuses) permet de désactiver les sons émis par toutes les - Fisher and Paykel RF201ADUSX5 | User Guide - Page 75
Instructions d'utilisation ActiveSmart™ 73 US CA (FR) Fonctions spéciales Refroidissement de bouteille (modèles Designer, Elegance et Ice & Water uniquement) Cette fonction permet de refroidir - Fisher and Paykel RF201ADUSX5 | User Guide - Page 76
US 74 Informations sur l'afficheur externe CA (FR) (modèles Ice & Water uniquement) Cet écran permet de verrouiller le distributeur d'eau, indique si la fonction BOTTLE CHILL est activée et vous prévient lorsque le filtre à eau doit être remplacé. Fig.19 Afficheur externe électronique Touches - Fisher and Paykel RF201ADUSX5 | User Guide - Page 77
Distribution Utilisation de votre distributeur d'eau 75 US (modèles Ice & Water uniquement) CA (FR) ■■ Le distributeur d'eau a été conçu pour être actionné d'une seule main. ■■ Pour distribuer de l'eau, poussez légèrement un verre ou un contenant contre la plaque du distributeur. Appuyez - Fisher and Paykel RF201ADUSX5 | User Guide - Page 78
la distribution d'eau pour vous le rappeler. ■■ Il est possible d'obtenir des cartouches de filtre de rechange auprès d'un agent de service autorisé de Fisher & Paykel. Les renseignements sur le filtre de rechange sont inscrits sur la cartouche. Remplacement de la cartouche de filtre à eau Il n'est - Fisher and Paykel RF201ADUSX5 | User Guide - Page 79
Filtre à eau (modèles Ice & Water uniquement) Pour réinitialiser l'icône de remplacement de filtre 77 US CA (FR) Important! Nous vous recommandons d'utiliser le filtre à eau dès l'installation. Pour éviter de fausser les données de remplacement du filtre, ne réinitialisez pas l'icône avant d'avoir - Fisher and Paykel RF201ADUSX5 | User Guide - Page 80
US 78 Utilisation de votre appareil à glaçons CA (FR) (modèles Ice & Water uniquement) Activation/désactivation des glaçons Votre appareil à glaçons est conçu pour produire automatiquement des glaçons jusqu'à ce que le bac soit plein. Ainsi, plus vous utilisez de glaçons, plus l'appareil en - Fisher and Paykel RF201ADUSX5 | User Guide - Page 81
temps peuvent rétrécir, se coller ensemble et avoir un aspect trouble et un goût fétide. Videz le bac à glaçons pé glaçons et communiquez avec un agent de service autorisé de Fisher & Paykel. ■■ Assurez-vous que l'appareil à gla : Instructions d'installation). Pour fabriquer des glaçons manuellement, consultez - Fisher and Paykel RF201ADUSX5 | User Guide - Page 82
US 80 Fonctions spéciales ActiveSmart™ (tous les modèles) CA (FR) Bacs à fruits et légumes avec couvercle de contrôle de l'humidité Les bacs à fruits et légumes sont munis d'un couvercle ingénieux proposant deux fonctions : ■■ Le couvercle de contrôle de l'humidité scelle les bacs et procure un - Fisher and Paykel RF201ADUSX5 | User Guide - Page 83
Fonctions spéciales ActiveSmart™ (tous les modèles) Tiroir de rangement mince (sur certains modèles) 81 US CA (FR) Les bacs minces dans le bas du compartiment réfrigérateur procurent un espace de rangement pour les aliments que vous souhaitez conserver dans un espace distinct. Ces bacs minces - Fisher and Paykel RF201ADUSX5 | User Guide - Page 84
système à glaçons est utilisé occasionnellement, les glaçons produits depuis un certain temps peuvent rétrécir, se coller ensemble et avoir un aspect trouble et un goût fétide. Videz le bac à glaçons périodiquement et nettoyez-le dans de l'eau tiède. Séchez-le complètement, puis réinstallez-le - Fisher and Paykel RF201ADUSX5 | User Guide - Page 85
Nettoyage et entretien de votre réfrigérateur 83 US CA (FR) Extérieur (tous les modèles) Portes en acier inoxydable ■■ Nettoyez l'extérieur des portes en utilisant un chiffon doux et un détergent à vaisselle liquide dissout dans de l'eau tiède. ■■ Séchez les portes avec un chiffon non pelucheux. ■■ - Fisher and Paykel RF201ADUSX5 | User Guide - Page 86
US 84 Nettoyage et entretien de votre réfrigérateur CA (FR) Intérieur (tous les modèles) ■■ Il est important que l'intérieur du réfrigérateur et du congélateur soit propre pour éviter la contamination des aliments. ■■ La quantité et le type d'aliments conservés déterminent la fréquence de nettoyage - Fisher and Paykel RF201ADUSX5 | User Guide - Page 87
ôle de l'humidité (en plastique) et les curseurs de contrôle de l'humidité devaient se séparer de la tablette en verre, suivez ces instructions pour les remettre en place. Dispositif de retenue Curseurs de contrôle d'humidité 1 Tournez la tablette à l'envers. 2 Pour fixer les curseurs de contr - Fisher and Paykel RF201ADUSX5 | User Guide - Page 88
US 86 Nettoyage et entretien de votre réfrigérateur CA (FR) Pour retirer les plateaux ou les bacs fixes : ■■ Pour faciliter le retrait, videz d'abord le contenu des plateaux et des bacs. ■■ Saisissez la poignée centrale à l'avant du plateau ou du bac. ■■ Soulevez la poignée vers le haut pour dé - Fisher and Paykel RF201ADUSX5 | User Guide - Page 89
Conservation des aliments dans votre réfrigérateur 87 US CA (FR) Votre réfrigérateur aide à prolonger la durée de conservation des aliments périssables. La température froide permet de limiter les principales causes de détérioration des aliments, soit la prolifération des bactéries, la formation de - Fisher and Paykel RF201ADUSX5 | User Guide - Page 90
US 88 Conservation des aliments dans votre réfrigérateur CA (FR) Viandes rouges ■■ Déposez la viande rouge et fraîche dans une assiette, puis recouvrez-la d'un papier ciré, d'une pellicule plastique ou d'une feuille d'aluminium. ■■ Conservez la viande cuite et la viande crue dans des assiettes - Fisher and Paykel RF201ADUSX5 | User Guide - Page 91
Conservation des aliments dans votre congélateur 89 US CA (FR) L'utilisation d'une température de -0,4 °F (-18 °C) ou moins permet de conserver les aliments plus longtemps que dans le réfrigérateur. En effet, la prolifération des bactéries, la formation de moisissure et la fermentation sont - Fisher and Paykel RF201ADUSX5 | User Guide - Page 92
US 90 Conservation des aliments dans votre congélateur CA (FR) Viande, volaille et gibier ■■ Ne tentez pas de congeler plus de 2,2 lb (1 kg) de viande par 6,6 gal (25 L) ou 0,88 pi³ d'espace de congélateur à la fois. La viande doit être congelée rapidement afin qu'elle conserve sa texture. ■■ Ne - Fisher and Paykel RF201ADUSX5 | User Guide - Page 93
noter le nombre et la séquence des témoins de température affichés sur le panneau de commande interne, puis communiquez avec notre centre de service à la clientèle. ■■ Pour arrêter l'alarme de défaillance, appuyez sur n'importe quelle touche du panneau de commande interne. L'icône demeurera allum - Fisher and Paykel RF201ADUSX5 | User Guide - Page 94
. Vérifiez le boîtier de fusibles. L'éclairage DEL ne peut pas être réparé par l'utilisateur. Contactez votre détaillant Fisher & Paykel ou un agent de service autorisé de Fisher & Paykel. Assurez-vous que le réfrigérateur est branché à une prise de courant. Maintenez enfoncées les touches , et - Fisher and Paykel RF201ADUSX5 | User Guide - Page 95
le joint repose à plat et qu'il est parfaitement étanche. Essuyez la condensation. Consultez la section Instructions d'installation - Stabilisation du réfrigérateur (pages 65 - 66). Assurez-vous qu'aucun aliment ou ère (page 83). Si le problème persiste, veuillez contacter le service à la clientèle. - Fisher and Paykel RF201ADUSX5 | User Guide - Page 96
US 94 Dépannage CA (FR) Modèles Ice & Water uniquement Problème Causes possibles L'appareil à glaçons L'appareil à glaçons n'est pas activé. automatique ne fonctionne pas. Le bac n'est pas inséré dans le bon sens, ou il n'est pas inséré. Les glaçons ont une odeur ou un goût inhabituel. L' - Fisher and Paykel RF201ADUSX5 | User Guide - Page 97
le système. faire couler 3 litres d'eau. Le filtre peut être bloqué et doit être remplacé. Remplacez le filtre (voir l'arrière de ce guide pour connaître les coordonnées de l'assistance à la clientèle). Le verrouillage du distributeur (DISPENSER LOCK) est activé. Maintenez enfoncée la touche - Fisher and Paykel RF201ADUSX5 | User Guide - Page 98
™ de Fisher & Paykel destiné à un usage personnel ou celui d'un consommateur, vous bénéficiez automatiquement d'une garantie limitée d'un an s'appliquant aux pièces et à la main-d'œuvre pour le service dans les 48 États continentaux des États-Unis, à Hawaï, à Washington DC et au Canada. Les - Fisher and Paykel RF201ADUSX5 | User Guide - Page 99
Cette garantie limitée ne couvre pas : Garantie limitée 97 US CA (FR) A Les déplacements d'un technicien de maintenance jusqu'à votre domicile pour tout problème non lié à un défaut dans le produit. Les frais du déplacement vous seront facturés si le problème s'avère ne pas être un défaut du - Fisher and Paykel RF201ADUSX5 | User Guide - Page 100
votre représentant Fisher & Paykel agréé local ou si vous pensez que le produit est défectueux et que vous souhaitez contacter le service clientèle dans tats-Unis et Canada SANS FRAIS 1.888.9.FNP.USA (1.888.936.7872) ou utilisez le lien sur cette page : www.fisherpaykel.com/locator/servicer/ Il est - Fisher and Paykel RF201ADUSX5 | User Guide - Page 101
99 - Fisher and Paykel RF201ADUSX5 | User Guide - Page 102
100 - Fisher and Paykel RF201ADUSX5 | User Guide - Page 103
- Fisher and Paykel RF201ADUSX5 | User Guide - Page 104
at any time. You should therefore check with your Dealer to ensure this booklet correctly describes the product currently available. Droits réservés © Fisher & Paykel 2014. Les spécifications du produit contenues dans ce manuel s'appliquent aux modèles et produits spécifiques comme décrits à la date
-
 1
1 -
 2
2 -
 3
3 -
 4
4 -
 5
5 -
 6
6 -
 7
7 -
8
-
9
-
10
-
11
-
12
-
13
-
14
-
15
-
16
-
17
-
18
-
19
-
20
-
21
-
22
-
23
-
24
-
25
-
26
-
27
-
28
-
29
-
30
-
31
-
32
-
33
-
34
-
35
-
36
-
37
-
38
-
39
-
40
-
41
-
42
-
43
-
44
-
45
-
46
-
47
-
48
-
49
-
50
-
51
-
52
-
53
-
54
-
55
-
56
-
57
-
58
-
59
-
60
-
61
-
62
-
63
-
64
-
65
-
66
-
67
-
68
-
69
-
70
-
71
-
72
-
73
-
74
-
75
-
76
-
77
-
78
-
79
-
80
-
81
-
82
-
83
-
84
-
85
-
86
-
87
-
88
-
89
-
90
-
91
-
92
-
93
-
94
-
95
-
96
-
97
-
98
-
99
-
100
-
101
-
102
-
103
-
104
 |
 |

US CA
ActiveSmart™ refrigerator
Ice & Water and Non-Ice & Water
RF135B, E522B, RF170W,
RF170A, RF201A models
Réfrigérateur ActiveSmart™
Ice & Water et autres
Modèles RF135B, E522B, RF170W,
RF170A, RF201A
Installation instructions
and
User guide
Instructions d’installation
et
Guide d’utilisation