Fisher and Paykel WA37T26G User Guide - Page 7
Caution - parts
 |
View all Fisher and Paykel WA37T26G manuals
Add to My Manuals
Save this manual to your list of manuals |
Page 7 highlights
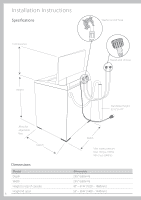
Installation Instructions US Step 1 Remove Bottom Packer 1 Remove outer packaging. 2 Tilt the machine backwards and walk the machine off the bottom packer. The plastic bottom packer can now be removed. CAUTION! Operating the machine when the bottom packer is in place can result in damage to the machine. Step 2 Removing Tub Packer and Accessories 1 Lift the lid and remove cardboard tub packer from the top of the washer tub. 2 Keep the bottom packer and tub packer in case they are required for future transit. 3 Remove hoses, accessories and installation pack. The Installation Pack Contains the Following: 4 rubber inserts for the leveling feet 1 drain hose guide Step 3 Drain Hose 1 Carefully pull the drain hose out from the back of the washer by pulling the exposed part of the hose downwards and then out. 2 The hose guide is used to guide the drain hose over the tub or standpipe. It MUST be fitted to the drain hose. To prevent siphoning the drain hose should not extend more than ¾" (20mm) from the end of the guide. If necessary, the drain hose can be trimmed to length. 3 Place the drain hose in the laundry tub or standpipe. Tub packer Pull hose through guide ¾" (20mm) Note: In multi-storey apartments or any upper floor installation, the machine should be installed on a drained floor. Check that the tub or standpipe is free from lint or other obstructions before operating the washer. In basement installation do not exceed a standpipe height of (78"). 7
-
 1
1 -
 2
2 -
 3
3 -
 4
4 -
 5
5 -
 6
6 -
 7
7 -
 8
8 -
 9
9 -
 10
10 -
 11
11 -
 12
12 -
13
-
14
-
15
-
16
-
17
-
18
-
19
-
20
-
21
-
22
-
23
-
24
-
25
-
26
-
27
-
28
-
29
-
30
-
31
-
32
-
33
-
34
-
35
-
36
-
37
-
38
-
39
-
40
-
41
-
42
-
43
-
44
-
45
-
46
-
47
-
48
-
49
-
50
-
51
-
52
-
53
-
54
-
55
-
56
-
57
-
58
-
59
-
60
-
61
-
62
-
63
-
64
-
65
-
66
-
67
-
68
 |
 |
