Fisher and Paykel WA37T26G User Guide - Page 8
Step 4, Step 5 - diagram
 |
View all Fisher and Paykel WA37T26G manuals
Add to My Manuals
Save this manual to your list of manuals |
Page 8 highlights
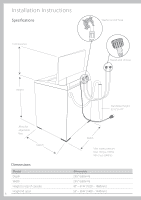
Installation Instructions Step 4 Inlet Hoses 1 Install hoses with the straight end (with filters) fitted to the faucets. 2 Install elbow ends onto washing machine (inlet valves are marked on the back of the machine H=hot, C=cold). Ensure the hot is connected to the hot, and the cold is connected to the cold. 1 Faucet end of hose 2 Washer end of hose Note: If there is a cold water supply only, an inlet valve cap (available from Fisher & Paykel) MUST be connected to the hot valve. The cap prevents water leaking from the hot valve. However, we recommend this product is connected to both hot and cold water. Step 5 Leveling the Washer 1 Unscrew the feet so the machine is NOT sitting on the corner cabinets, then fit the rubber leveling inserts (refer to diagram 1). Corner cabinets Adjustable feet Rubber insert Diagram 1 1" (25mm) 1" (25mm) 2 Move the washer into its final position. We suggest a minimum clearance of 1" (25mm) on each side for ease of installation. (See diagram 2). 3 Turn on water and check hose connections for leaks. Check that there are no kinks in the hoses. 4 It is IMPORTANT to level the washer to ensure proper performance during spin. Adjust the feet by unscrewing/screwing to make sure the washer is level and cannot rock. Diagram 2 5 Use the walls and adjacent counter tops as a sight guide to check to see if washer appears level. Readjust the feet if necessary. 6 Open the lid and check the washer tub to see that it sits slightly forward of centre. (See diagram 3). 8 Incorrect adjustment Correct adjustment Diagram 3
-
 1
1 -
2
-
 3
3 -
 4
4 -
 5
5 -
 6
6 -
 7
7 -
 8
8 -
 9
9 -
 10
10 -
 11
11 -
 12
12 -
 13
13 -
14
-
15
-
16
-
17
-
18
-
19
-
20
-
21
-
22
-
23
-
24
-
25
-
26
-
27
-
28
-
29
-
30
-
31
-
32
-
33
-
34
-
35
-
36
-
37
-
38
-
39
-
40
-
41
-
42
-
43
-
44
-
45
-
46
-
47
-
48
-
49
-
50
-
51
-
52
-
53
-
54
-
55
-
56
-
57
-
58
-
59
-
60
-
61
-
62
-
63
-
64
-
65
-
66
-
67
-
68
 |
 |
