Foscam FR305 _USER GUIDE
Foscam FR305 Manual
 |
View all Foscam FR305 manuals
Add to My Manuals
Save this manual to your list of manuals |
Foscam FR305 manual content summary:
- Foscam FR305 | _USER GUIDE - Page 1
- Foscam FR305 | _USER GUIDE - Page 2
Wireless N300 High power Router is the registered trademark of Foscam mentioned in this manual are for references only. Upgrades of software and hardware may occur; Foscam reserves the right foscam.us. Technical Support Website: http://www.foscam..us Email: [email protected] Toll Free:1-800-930-0949 - Foscam FR305 | _USER GUIDE - Page 3
Contents Wireless N300 High power Router COPYRIGHT STATEMENT...2 CONTENTS ...3 CHAPTER 1 PRODUCT OVERVIEW ...1 1 PACKAGE CONTENTS ...1 2 GETTING TO KNOW YOUR ROUTER ...1 3 POSITION YOUR ROUTER...2 CHAPTER 2 INSTALLATION AND QUICK SETUP GUIDE ...3 1 PHYSICAL INSTALLATION...3 1.1 Preparation ...3 - Foscam FR305 | _USER GUIDE - Page 4
Wireless N300 High power Router 6.5 Remote Web Management ...46 6.6 Time Settings ...46 6.7 Change Password ...47 6.8 Upgrade ...47 APPENDIX 1 CONFIGURE PC ...48 APPENDIX 2 FAQS ...51 APPENDIX 3 SAFETY AND EMISSION STATEMENT ...52 - Foscam FR305 | _USER GUIDE - Page 5
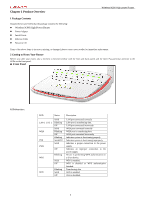
1 Package Contents Unpack the box and verify that the package contains the following: Wireless N300 High Power Router Power Adapter Install Guide Ethernet Cable Resource CD If any of the above items is incorrect, missing, or damaged, please contact your reseller for immediate replacement - Foscam FR305 | _USER GUIDE - Page 6
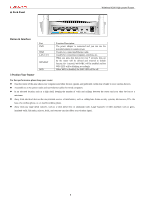
◈ Back Panel Wireless N300 High power Router Button & Interface: Port PWR WAN LAN 1/2/3 WPS/RST WiFi Function Description The power adapter is connected and you can use the provided adapter to supply - Foscam FR305 | _USER GUIDE - Page 7
Setup Guide Wireless N300 High power Router 1 Physical Installation 1.1 Preparation Before connecting Ethernet cables, please verify the following items: Item Description Wireless N300 High Power Router select L2TP; PPPoE Dual Access (only supported in special Area e.g. Russia.). 1.2 - Foscam FR305 | _USER GUIDE - Page 8
Ethernet cable. Wireless N300 High power Router 3. Connect your router's WAN port to the existing modem's RJ45 port (usually blue) with an Ethernet cable. 4. Log in to Web manager to set up Internet connection. 2 Internet Connection Setup - Foscam FR305 | _USER GUIDE - Page 9
3. Enter admin in the password field on the appearing login window and then click OK. Wireless N300 High power Router 4. Now you may access the device's home page for quickly setting up Internet connection and wireless security. 5. If you fail to log in to it, please refer to Appendix 2 FAQs. 2 - Foscam FR305 | _USER GUIDE - Page 10
Wireless N300 High power Router 2.3 Internet Connection Setup Common Internet connection types are available on about your PPPoE username and password, contact your Internet service provider (ISP) for help. For other Internet connection types, please go to section 1.2: Internet Connection Setup. 3 . - Foscam FR305 | _USER GUIDE - Page 11
Wireless N300 High power Router 3 Verify Internet Connection Settings System automatically skips to the status page when you finish all needed settings on the home page. Here you can see - Foscam FR305 | _USER GUIDE - Page 12
Wireless N300 High power Router 3. If "Connecting" is displayed and no WAN IP address is seen, try refreshing the page five times. And if it still displays "Connecting" try steps - Foscam FR305 | _USER GUIDE - Page 13
Wireless N300 High power Router 4 Connect to Device Wirelessly Having finished above settings, you can search the device's wireless network (SSID) from your wireless devices (notebook, iPad, iPhone, etc) and enter a security key to connect to it wirelessly. Windows 7 1. If you are using Windows 7 OS - Foscam FR305 | _USER GUIDE - Page 14
3) Click Network and Sharing Center. Wireless N300 High power Router 4) Click Change adapter settings. 5) Select a desired wireless connection and click Connect/Disconnect. 7 . - Foscam FR305 | _USER GUIDE - Page 15
6) Select the wireless network you wish to connect and click Connect. Wireless N300 High power Router 7) Enter the security key and click OK. 8) You can access the Internet via the device when "Connected" appears next to the wireless network name you have selected. 8 . - Foscam FR305 | _USER GUIDE - Page 16
Windows XP 2. If you are using Windows XP OS, do as follows: 1) Click Start and select Control Panel. Wireless N300 High power Router 2) Click Network Connections. 3) Right click Wireless Network Connection and then select View Available Wireless Networks. 9 . - Foscam FR305 | _USER GUIDE - Page 17
4) Select the desired wireless network, click Connect, enter the security key and then click OK. Wireless N300 High power Router 5) You can access the Internet via the device when "Connected" appears next to the wireless network name you selected. 1. 0 - Foscam FR305 | _USER GUIDE - Page 18
Chapter 3 Advanced Settings Wireless N300 High power Router 1 Advanced 1.1 Status Here you can see at a glance the operating status of the device. If WAN port displays Disconnected, please refer to 3 Verify Internet Connection Settings. 1. 1 - Foscam FR305 | _USER GUIDE - Page 19
Wireless N300 High power Router 1.2 Internet Connection Setup PPPoE Select PPPoE (Point to Point Protocol over Ethernet) if you used to connect to the Internet using a broadband connection that requires a username and a password and enter the user name and password provided by your ISP. 1. 2 - Foscam FR305 | _USER GUIDE - Page 20
Wireless N300 High power Router Static IP Select Static IP if your ISP provides all the . MTU: Maximum Transmission Unit. DO NOT change it from the factory default of 1500 unless instructed by your ISP. You may need to change it for optimal performance with some specific websites or application - Foscam FR305 | _USER GUIDE - Page 21
Wireless N300 High power Router PPTP Select PPTP (Point-to-Point-Tunneling Protocol) if your ISP uses a PPTP connection. The PPTP allows you to connect a router Unit. DO NOT change it from the factory default of 1492 unless instructed by your ISP. You may need to change it for optimal performance - Foscam FR305 | _USER GUIDE - Page 22
Wireless N300 High power Router L2TP Select L2TP (Layer 2 Tunneling Protocol) if your ISP uses an L2TP connection. The L2TP connects your router to Transmission Unit. DO NOT change it from the factory default of 1492 unless instructed by your ISP. You may need to change it for optimal performance - Foscam FR305 | _USER GUIDE - Page 23
Dual Access PPPoE dual access only supported in special Area e.g. Russia. Wireless N300 High power Router Internet connection Type: Displays the NOT change it from the factory default value unless necessary. Service Name: Description of PPPoE connection. Leave blank unless otherwise required. - Foscam FR305 | _USER GUIDE - Page 24
Wireless N300 High power Router 1.3 MAC Clone Some Internet service providers (ISPs) require end-user's MAC address to access their network. This feature copies the MAC address of your network device to the router. MAC Address: Configure device's WAN MAC address. Clone MAC Address: Click to copy - Foscam FR305 | _USER GUIDE - Page 25
Advanced > LAN Settings to enter the screen below: Wireless N300 High power Router LAN MAC Address: Displays device's LAN MAC 1.6 DNS Settings DNS is short for Domain Name System or Domain Name Service. Enable Manual DNS Assignment: Check to activate DNS settings. Primary DNS Server:Enter - Foscam FR305 | _USER GUIDE - Page 26
Wireless N300 High power Router 1.7 DHCP Server The Dynamic Host Configuration Protocol (DHCP) is . If you would like some devices on your network to always get the same IP addresses, you can manually add a static DHCP reservation entry for each such device. IP Address: Enter the IP address for - Foscam FR305 | _USER GUIDE - Page 27
Wireless Settings Wireless N300 High power Router 2.1 Wireless Basic Settings If you want to create a WLAN for sharing Internet connection, simply click Wireless-> Wireless your settings. 2.2 Wireless Security Wireless Security Setup This section allows you to secure your wireless network and block - Foscam FR305 | _USER GUIDE - Page 28
Wireless N300 High power Router Note: You can also select other security modes as you need. WPS Wi-Fi Protected Setup makes it easy for home users who know little of wireless security to establish a home network, as well as to add new devices to an existing network without entering long passphrases - Foscam FR305 | _USER GUIDE - Page 29
WPS connection. Namely security settings and SSID on the router will still be the same. If you want to generate a random wireless key via WPS, click Reset OOB and then follow WPS setup instructions above. Note: To use the WPS security, the wireless client must be also WPS-capable. Before you - Foscam FR305 | _USER GUIDE - Page 30
Wireless N300 High power Router 2.3 Access Control The Access Control feature allows you to specify a list of devices to Permit or Forbid a connection to your wireless network via the devices' MAC addresses. All other devices not listed as Permitted will be Forbidden and vice versa. 1. Select the - Foscam FR305 | _USER GUIDE - Page 31
Wireless N300 High power Router 2. Select the AP you wish to connect, such as Foscam-000248, click OK, and click Close Scan; 3. Enter the wireless security key of the selected SSID , and click OK. 2. 4 - Foscam FR305 | _USER GUIDE - Page 32
4. Save the settings and the router will reboot automatically. Wireless N300 High power Router 5. Internet Connection Setup: Click Advanced>Internet Connection Setup, select Internet Connection Setup, such as DHCP, and click OK. 6. Click Advanced>Status and the connection status displays Connected - Foscam FR305 | _USER GUIDE - Page 33
Wireless N300 High power Router Note: When the settings finished, remember to enter Internet Connection Setup to set up Internet connection. Verify that the SSID, channel, and security mode on the page match those of the added wireless network. If not, manually correct them. For the normal - Foscam FR305 | _USER GUIDE - Page 34
7. Enter the wireless security key of the selected SSID ,and click OK. Wireless N300 High power Router 8. Save the settings and the router will restart automatically. 2. 7 - Foscam FR305 | _USER GUIDE - Page 35
Wireless N300 High power Router WDS Bridge Mode Wireless distribution system (WDS) is a system enabling the wireless interconnection of access points in an IEEE 802.11 network. It allows a wireless network to be expanded using multiple access points without the traditional requirement for a wired - Foscam FR305 | _USER GUIDE - Page 36
Wireless N300 High power Router 3. Click Wireless>Wireless Security to check router one's wireless security settings. 2. 9 - Foscam FR305 | _USER GUIDE - Page 37
DHCP server is enabled on Router 1: Click Advanced>DHCP Server. Wireless N300 High power Router 5. Set the LAN IP address of Router 2 to a different address yet on the same net segment as Router 1. As shown below: Router 1: LAN IP: 192.168.0.1; Subnet Mask: 255.255.255.0; Router 2: LAN IP:192.168 - Foscam FR305 | _USER GUIDE - Page 38
3) Select the wireless network to connect click OK, and click Close Scan; Wireless N300 High power Router 4) Enter the wireless security key of the selected SSID ,and click OK. 3. 1 - Foscam FR305 | _USER GUIDE - Page 39
6) Click OK on the prompt window; Wireless N300 High power Router 3. 2 - Foscam FR305 | _USER GUIDE - Page 40
Wireless N300 High power Router 7) Go to DHCP Server to disable the DHCP on Router 2. Now you have finished all settings on Router 2 required for WDS. 2. Configure Router 1: 1. Go to wireless section on Router 1 and specify WDS (or WDS Bridge) as its wireless working mode. 2. Manually enter Router - Foscam FR305 | _USER GUIDE - Page 41
Wireless N300 High power Router 3.1 Bandwidth Control Use this section to manage bandwidth allocation to devices on your LAN. If there are multiple PCs behind your router get up to 2M bandwidth. To do so, follow instructions below: 1. Check Enable. 2. Input "192.168.0.100" in both IP - Foscam FR305 | _USER GUIDE - Page 42
Enable. 6. Click Add To List 7. Click OK. Wireless N300 High power Router 3.2 Traffic Statistics Traffic Statistics allows you to see at the Internet to your router's WAN port will be forwarded to the specified LAN IP address. As seen in the figure above, to let PC3 access service ports on PC1, - Foscam FR305 | _USER GUIDE - Page 43
Wireless N300 High power Router Start/End Port: Specify a range of ports between 1~65535 (for a single port, enter the port number in both Start and End fields, say, 21 for FTP). Contact corresponding service provider if you don't know the port number of the service to use. LAN IP: Specify the - Foscam FR305 | _USER GUIDE - Page 44
Wireless N300 High power Router Note: If you include port 80 on this section, you must set DMZ Host The DMZ (De-Militarized Zone) function disables the firewall on the router for one device for a special purpose service such as Internet gaming or video conferencing. Enabling DMZ host may expose your - Foscam FR305 | _USER GUIDE - Page 45
Wireless N300 High power Router Note: Once enabled, the DMZ host loses protection from device's firewall and provided by your DDNS service provider on the DDNS screen. If your domain name is foscam.dyndns.org, others can access your web server by simply entering http://foscam.dyndns.org in their - Foscam FR305 | _USER GUIDE - Page 46
Wireless N300 High power Router Enable UPnP: Check/uncheck to enable/disable the UPnP feature. OK: Click to complete your settings. 4.5 Static Routing When there are several routers in the network, you may want to set up static routing. Static routing determines the path of the data in your - Foscam FR305 | _USER GUIDE - Page 47
Wireless N300 High power Router 4.6 Routing Table This page displays the device core routing table which lists destination IP, subnet mask, gateway, hop count and interface. The principal task for a router is to look for an optimal transfer path for each data packet passing through it, and transfer - Foscam FR305 | _USER GUIDE - Page 48
Wireless N300 High power Router Time: Specify a time period for a current rule to take effect. If the field is set to 0:00-0:00, the rule will be applied 24hrs/day. - Foscam FR305 | _USER GUIDE - Page 49
8) OK: Click to save your settings. Wireless N300 High power Router 5.3 Client Filter Settings This section allows you to set the times specific clients can or cannot access the Internet via the devices' assigned IP addresses and service port. Forbid Only: Only PCs listed as Forbidden will be - Foscam FR305 | _USER GUIDE - Page 50
Wireless N300 High power Router 1) Filter Mode: Select Forbid Only. 2) Access Policy: Select an access policy the Restore To Factory Default button to reset your device to factory default settings. You need to reconfigure parameters on the device (such as wireless settings) for Internet access, and - Foscam FR305 | _USER GUIDE - Page 51
Wireless N300 High power Router The factory default settings are listed below: IP Address: 192. your device in case that the device is restored to factory default settings. To do so, follow instructions below: 1. Click the Backup button and specify a directory to save settings on your local hardware. - Foscam FR305 | _USER GUIDE - Page 52
Wireless N300 High power Router Click the Restore button to reset your device to previous settings. 6.4 Syslog Here you can view the record of the device's operations. After 150 records, the earliest log(s) will be cleared automatically. 4. 5 - Foscam FR305 | _USER GUIDE - Page 53
Wireless N300 High power Router Enable: Check/uncheck to enable/disable the DMZ host feature. Port: This is the management port to be open to external access. The default setting is 8080. Do NOT change it unless instructed This page is used to set the router's system time. You can get the - Foscam FR305 | _USER GUIDE - Page 54
Wireless N300 High power Router time and date info shall be set correctly, either manually or automatically. 6.7 Change Password This section allows you features. If you run into a problem about a specific feature of the device, log on to our website (www.foscam.us) to download the latest firmware - Foscam FR305 | _USER GUIDE - Page 55
IP settings. Windows 7 Step 1: Click the icon on the bottom right corner of your desktop. Step 2: Click Open Network and Sharing Center. Wireless N300 High power Router Tip: If you cannot find the icon on the bottom right corner of your desktop, follow steps below: Click Start -> Control Panel - Foscam FR305 | _USER GUIDE - Page 56
Wireless N300 High power Router Step 5: Select Obtain an IP address automatically and Obtain DNS server address automatically and click OK. Step 6: Click OK on the Local Area Connection Properties - Foscam FR305 | _USER GUIDE - Page 57
Wireless N300 High power Router Step 4: Select Obtain an IP address automatically and Obtain DNS server address automatically and click OK. Step 5: Click OK on the Local Area Connection Properties window (see Step 3 for the screenshot). 5. 0 - Foscam FR305 | _USER GUIDE - Page 58
Wireless N300 High power Router This section provides solutions to problems that may occur during installation and operation of the device. If your problem is not covered here, please feel free to go to www.foscam.us to find a solution or email your problems to: support@foscam Setup" service - Foscam FR305 | _USER GUIDE - Page 59
Appendix 3 Safety and Emission Statement Wireless N300 High power Router CE Mark Warning This is a Class B product. In a radio frequency energy and, if not installed and used in accordance with the instructions, may cause harmful interference to radio communications. However, there is no guarantee
-
 1
1 -
 2
2 -
 3
3 -
 4
4 -
 5
5 -
 6
6 -
 7
7 -
8
-
9
-
10
-
11
-
12
-
13
-
14
-
15
-
16
-
17
-
18
-
19
-
20
-
21
-
22
-
23
-
24
-
25
-
26
-
27
-
28
-
29
-
30
-
31
-
32
-
33
-
34
-
35
-
36
-
37
-
38
-
39
-
40
-
41
-
42
-
43
-
44
-
45
-
46
-
47
-
48
-
49
-
50
-
51
-
52
-
53
-
54
-
55
-
56
-
57
-
58
-
59
 |
 |