Foxconn B75M User manual - Page 100
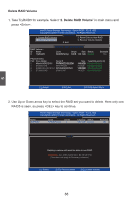
hard disk for rebuilding. Here, we select ST 74.5GB. Press <Enter> to select it.
 |
View all Foxconn B75M manuals
Add to My Manuals
Save this manual to your list of manuals |
Page 100 highlights
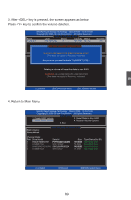
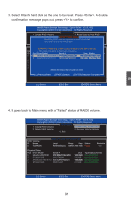
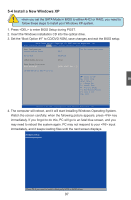
4. A "DEGRADED VOLUME DETECTED" screen pops out asking you to select a new hard disk for rebuilding. Here, we select ST 74.5GB. Press to select it. Intel(RIn) tMela(Rtr)ixRSatpoirdagSetoMraagneaTgeecrhonpotilongyR-OOMptvio5n.0R.0O.1M01-11I0C.0H.90R.10w3R2AID5 CCooppyyrriigghhtt((CC)) 22000033--1004 IInntteell CCoorrppoorraattiioonn.AlAl lRl RigihgthstsRReseesrevrevde.d. [ MAIN MENU ] 1. Create RAID Vo[luDmEeG RA DED VOLUME DET4E. RCeTcEoDve]r Volume Options 2."DelgertaedReAd"IDvoVluomluemaen d d isk available for reb5u.ilAdicncgeldeerateticotnedO. pSteiolencsting 3. ReasdeitskDisnkitsiatoesNaonre-RbuAiIlDd. r ebuild completes6in. Ethxeit operating system. S elect th e port of the d estina tion dis k for rebuilding (ESC to exit): Port Drive Mode[l DIS K/VOLUME ISNeFrOiaRl #M AT ION ] Size RA ID Volu2me : SAMSUNG HD161HJ S0V3J 9APA30524 140.9GB ID Nam3�e� �S� T�38�0�81�5�AS� L�e� ve�l 5�RS�Wtr�i1p�Ce�A3�7� S�i�ze��S�ta�t7u7�4s4.�.55G�GB�B Bootable �0����T�ry�R�A�I�D�5 R��A�ID�5�(�P�a�rit�y�) ��6�4�K�B��1�4�9�.1�G�B� Normal Yes Physical Disks: Port Drive Model Serial # Size Type/Status(Vol ID) 01 ���HS�Tit�a38c�h0[�↑8i �↓H1]�1-DPA�SrS�e7�v2i�o1�u6s1�/��N��e�x�P5t�P�V�SF��19��T0�A4[EZ�GN2�W1�TG�E�2R�J]Z�-SM�e�le�c�t �17�449.�5.�0G[G�EB�BSC]MM-Eeexmmit bbeerr Disk(0) Disk(0) 2 SAMSUNG HD161HJ �S�0�V�3J�9�A�P�A�3�0�5�2�4 1��4�9��.�0�G���B Non-RAID Disk 3 ST380815AS 5RW1CA37 74.5GB Non-RAID Disk 5 [↑↓]-Select [ESC]-Exit [ENTER]-Select Menu 5. It goes back to Main menu with a "Rebuild" status of RAID5 volume. Eventually, a replacement hard disk has to join in and it always keeps three hard disks in the RAID5 system. 6. Operating System will perform the rebuilding later. Intel(RIn) tMela(Rtr)ixRSatpoirdagSetoMraagneaTgeecrhonpotilongyR-OOMptvio5n.0R.0O.1M01-11I0C.0H.90R.10w3R2AID5 CCooppyyrriigghhtt((CC)) 22000033--1004 IInntteell CCoorrppoorraattiioonn.AlAl lRl RigihgthstsRReseesrevrevde.d. [ MAIN MENU ] 1. Create RAID Volume 3. Reset Disks to Non-RAID 2. Delete RAID Volume 4. Recover Volume Options 5. Exit [ DISK/VOLUME INFORMATION ] RAID Volume : ID Name Level Stripe Size �0����T�ry�R�A�I�D�5 R��A�ID�5�(�P�a�rit�y�) ��6�4�K�B��1�4�9�.1�G�B� Status Rebuild� Bootable Yes Physical Disks: Port Drive Model Serial # Size 0 ���H�it�ac�h�i �H�D�S�7�2�1�61 P��V�F��9��0�4Z�2�1�G��2�JZ�M 1�49�.�0G��B 1 ST380811AS 5PS1TAGW 74.5GB 2 SAMSUNG HD161HJ �S�0�V�3J�9�A�P�A�3�0�5�2�4 1��4�9��.�0�G���B 3 ST380815AS 5RW1CA37 74.5GB Type/Status(Vol ID) Member Disk(0) Member Disk(0) Non-RAID Disk Member Disk(0) Volume with "Rebulid" status will be rebuilt within the operating system. [↑↓]-Select [ESC]-Exit [ENTER]-Select Menu 93
-
 1
1 -
2
-
3
-
4
-
5
-
6
-
7
-
8
-
9
-
10
-
11
-
12
-
13
-
14
-
15
-
16
-
17
-
18
-
19
-
20
-
21
-
22
-
23
-
24
-
25
-
26
-
27
-
28
-
29
-
30
-
31
-
32
-
33
-
34
-
35
-
36
-
37
-
38
-
39
-
40
-
41
-
42
-
43
-
44
-
45
-
46
-
47
-
48
-
49
-
50
-
51
-
52
-
53
-
54
-
55
-
56
-
57
-
58
-
59
-
60
-
61
-
62
-
63
-
64
-
65
-
66
-
67
-
68
-
69
-
70
-
71
-
72
-
73
-
74
-
75
-
76
-
77
-
78
-
79
-
80
-
81
-
82
-
83
-
84
-
85
-
86
-
87
-
88
-
89
-
90
-
91
-
92
-
93
-
94
-
 95
95 -
 96
96 -
 97
97 -
 98
98 -
 99
99 -
 100
100 -
 101
101 -
 102
102 -
 103
103 -
 104
104 -
 105
105 -
106
-
107
 |
 |
