Frigidaire FFHI1832TS Complete Owner s Guide - Page 7
Door Removal/reversal Instructions
 |
View all Frigidaire FFHI1832TS manuals
Add to My Manuals
Save this manual to your list of manuals |
Page 7 highlights
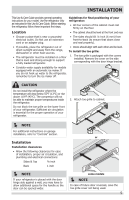
DOOR REMOVAL/REVERSAL INSTRUCTIONS Tools Necessary: PhillipsTM Head or 3/8" (10mm) Fixed Wrench Socket Wrench Set or Adjustable Wrench Top Hinge Cover Front Screw Top Hinge Cover Rear Screw Top Hinge Screw Bottom Hinge Screw NOTE The direction in which your refrigerator doors open (door swing) can be reversed, from left to right or right to left, by moving the door hinges from one side to the other. Reversing the door swing should be performed by a qualified person. IMPORTANT Before you begin, turn the refrigerator temperature control to "0" and remove the electrical power cord from the wall outlet. Remove any food from door shelves. Door removal and reversal instructions: 1. Remove toe grille. 2. Remove top hinge cover. Trace around the hinge with a soft lead pencil. This makes reinstallation easier. Remove top hinge and lift door off center hinge pin. Set door aside. 3. Unscrew center hinge pin using adjustable wrench and save for reassembly. Ensure plastic washer stays on hinge pin. Top Hinge Cover Top Hinge 7
-
 1
1 -
 2
2 -
 3
3 -
 4
4 -
 5
5 -
 6
6 -
 7
7 -
 8
8 -
 9
9 -
 10
10 -
 11
11 -
 12
12 -
13
-
14
-
15
-
16
-
17
-
18
-
19
-
20
-
21
-
22
-
23
 |
 |
