Fujitsu FI-6770A Getting Started Guide - Page 12
Installing the Scanner - flatbed
 |
UPC - 097564307485
View all Fujitsu FI-6770A manuals
Add to My Manuals
Save this manual to your list of manuals |
Page 12 highlights
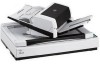
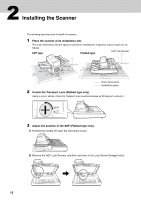
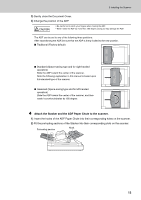
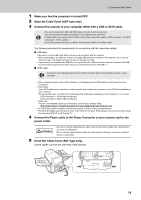
2 Installing the Scanner The following describes how to install the scanner. 1 Place the scanner at its installation site. The outer dimensions and the spaces required for installing the respective scanner types are as follows: ADF type Flatbed type (Unit: mm/inches) 432 (17.0) 686 (27.0) 390 (15.3) 300 (11.8) 700 500 (27.5) (19.6) 329 (13.0) 1179 (46.4) 640 (25.1) 342 (13.4) 690 (27.1) 1030 (40.5) Outer dimensions Installation space 2 Unlock the Transport Lock (Flatbed type only). Using a coin or similar, rotate the Transport Lock counterclockwise by 90 degree to unlock it. 3 Adjust the position of the ADF (Flatbed type only). 1) Holding the handle, lift open the Document Cover. 2) Remove the ADF Lock Screws, and then set them to the Lock Screw Storage Holes. 12
-
 1
1 -
2
-
3
-
4
-
5
-
6
-
 7
7 -
 8
8 -
 9
9 -
 10
10 -
 11
11 -
 12
12 -
 13
13 -
 14
14 -
 15
15 -
 16
16 -
 17
17 -
18
-
19
-
20
-
21
-
22
-
23
-
24
-
25
-
26
 |
 |
