Fujitsu ST4121 User Guide - Page 34
Charging the Battery, Removing and Installing the Battery, Battery Charge, Level Reached, Approximate - manual
 |
View all Fujitsu ST4121 manuals
Add to My Manuals
Save this manual to your list of manuals |
Page 34 highlights
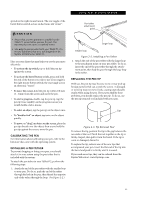
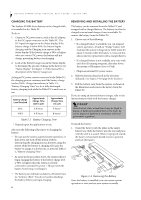
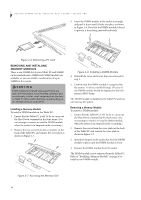
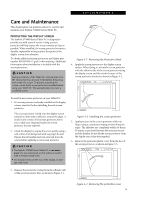
Stylistic ST4000 Series Tablet PC User's Guide - Section Two CHARGING THE BATTERY The Stylistic ST4000 Series battery can be charged while it is installed in the Tablet PC. To do so: 1. Connect a DC power source, such as the AC adapter, to the DC input connector on the Tablet PC. The DC Input icon appears in the Status display. If the battery charge is below 90%, the battery begins charging and the Charging icon appears in the Status display. If the battery charge is 90% or higher when you connect DC power, the battery will not charge, preventing battery overcharging. 2. Look at the Battery Gauge icon in the Status display to determine the percent of charge in the battery. See "Status Display" in Chapter 1 of this manual for a description of the Battery Gauge icon. As long as DC power remains connected to the Tablet PC, the charging process continues until the battery charge reaches 100%. Charge times shown in Table 2-2, "Battery Charging Time" are for a fully discharged battery charging both while the Tablet PC is and is not in use. Battery Charge Level Reached 90% 100% Approximate Charge Time (not in use) 3.5 hours 4.5 hours Approximate Charge Time (in use) 7 hours* 8 hours* Table 2-2 Battery Charging Time * Depends upon the applications in use. Also note the following with respect to charging the battery: • You can use the system, suspend system operation, or shut down and turn off the system without interrupting the charging process; however, using the system while the battery is charging will cause the battery to charge at a slower rate, as noted in Table 22, "Battery Charging Time". • As noted in the procedure above, the system will not begin charging the battery if the battery charge level is 90% or higher when the system is initially connected to external DC power. (This prevents the battery from being overcharged.) • The battery uses Lithium ion battery cells which have no "memory effect." You do not need to discharge the battery before you begin charging. 24 REMOVING AND INSTALLING THE BATTERY The battery can be removed from the Tablet PC and swapped with a charged battery. The battery can then be charged in an external charger if one is available. To remove the battery from the Tablet PC: 1. Choose one of the following: • If a charged battery is available, you can suspend system operation. A built-in "bridge" battery will maintain the system in Suspend-to-RAM mode for about 5 minutes while the battery is removed; this allows time for replacement with a charged battery. • If a charged battery is not available, save your work and close all running programs, then shut down the system or Hibernate (Save-to-Disk). • Plug in an external DC power source. 2. Slide the battery release latch in the direction indicated. (See Figure 2-4 on page 24 for location). 3. Pull the battery away from the system, as shown in the illustration and remove the battery from the Tablet PC. If you are using an external battery charger, refer to the instructions provided with the battery charger. POINT Under Federal, state, or local law, it may be illegal to dispose of batteries by putting them in the trash. Be sure to dispose of batteries in accordance with local government regulations. To install the battery: 1. Orient the battery with the slides in the empty battery tray. Slide the battery into the tray and press it firmly until it is seated. When it is properly seated, the battery release latch should return to position and lock the battery. Figure 2-4. Removing the Battery Once the battery is installed, you can resume system operation or start and use your system normally.
-
 1
1 -
2
-
3
-
4
-
5
-
6
-
7
-
8
-
9
-
10
-
11
-
12
-
13
-
14
-
15
-
16
-
17
-
18
-
19
-
20
-
21
-
22
-
23
-
24
-
25
-
26
-
27
-
28
-
 29
29 -
 30
30 -
 31
31 -
 32
32 -
 33
33 -
 34
34 -
 35
35 -
 36
36 -
 37
37 -
 38
38 -
 39
39 -
40
-
41
-
42
-
43
-
44
-
45
-
46
-
47
-
48
-
49
-
50
-
51
-
52
-
53
-
54
-
55
-
56
-
57
-
58
-
59
-
60
-
61
-
62
-
63
-
64
-
65
-
66
-
67
-
68
-
69
-
70
-
71
-
72
-
73
-
74
 |
 |
