Garmin Cortex VHF and AIS Cortex Handset Installation Guide - Page 2
Register Your Cortex, Questions and FAQ's, Introduction, Index
 |
View all Garmin Cortex VHF and AIS manuals
Add to My Manuals
Save this manual to your list of manuals |
Page 2 highlights
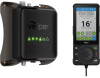
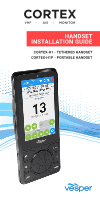
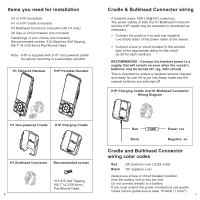
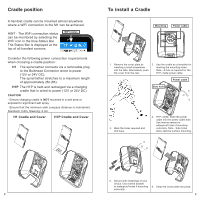
Index Introduction 3 DSC Emergency Calls 4 VHF Emergency Calls 5 Items you need for installation 6 Cradle & Bulkhead Connector wiring 7 Cradle position 8 To install a Cradle 9 H1 Bulkhead Connector 10 To install a Bulkhead Connector 11 To connect power to a handset 12 To place and remove a handset 12 Turning a handset ON 13 To connect a handset to an M1 14 Handset connection FAQs 15 To connect mobile devices to an M1 15 To program your MMSI number 16 To program your VHF (ATIS and Region) 17 Handset care 18 Handset use 18 Dimensions and Specifications 19 Warnings 20 Compliance 21 Warranty 22 2 Introduction Your Vesper Marine Cortex H1 (tethered) and H1P (portable) VHF Handset and AIS display. Cortex handsets connect with the Cortex M1 hub and together they work as an AIS Class B SO-TDMA Transponder and Class D VHF Radio with DSC. The handset is the voice and calling interface used for VHF and DSC calls. The handset's touchscreen display is the primary interface together with dedicated buttons and the Click-Wheel for swift navigation, ease of operation and single-handed use. The touchscreen is purpose-built for the harsh marine environment and is designed and manufactured for use in wet conditions and with gloves. The handset provides a screen to set up and manage the Cortex M1 hub, view AIS target data and vessel instrumentation, manage and monitor alarms and configure the remote vessel monitoring. The H1 version has a spiral tether connected to the vessel's 12V or 24V power (DC) via a bulkhead plug and socket. The H1P includes a robust surface mount cradle to secure the handset in a fixed location and identify it as a VHF radio. The H1P is designed for freedom of movement on board. The H1P has a battery inside and is held and recharged via the H1P charging cradle that is wired to 12V or 24V power (DC). Questions and FAQ's Visit www.vespermarine.com/faqs for answers to frequently asked questions, technical support, downloads, local dealer contacts and more. Register Your Cortex Vesper Marine releases product updates from time to time. These updates often add new features. To be notified when an update is available please register your Cortex at www.vespermarine.com/register. 3
-
 1
1 -
 2
2 -
 3
3 -
 4
4 -
 5
5 -
 6
6 -
 7
7 -
 8
8 -
9
-
10
-
11
-
12
-
13
 |
 |
