Garmin Cortex VHF and AIS Cortex Handset Installation Guide - Page 4
Cradle & Bulkhead Connector wiring, Cradle and Bulkhead Connector, wiring color codes, Items
 |
View all Garmin Cortex VHF and AIS manuals
Add to My Manuals
Save this manual to your list of manuals |
Page 4 highlights
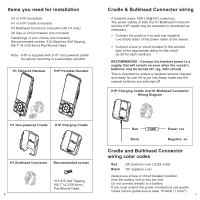
Items you need for installation H1 or H1P (included) H1 or H1P cradle (included) H1 Bulkhead Connector (included with H1 only) 2A fuse or circuit breaker (not included) Fastenings of your choice (not included) Recommended screws: 316 Stainless Self Tapping 8G/1" (4.2/25.4mm) Pan/Round Head. Note - H1P is supplied with a H1 non-powered cradle for secure mounting in a secondary position. H1 Tethered Handset H1P Portable Handset 1. BASE, SOCKET & NUT ASSEMBLY FRONT ON ANGLE AS CRADLE ABOVE Cradle & Bulkhead Connector wiring A handset draws 12W (1A@12V) maximum. The power cables of both the H1 Bulkhead Connector and the H1P cradle may be extended or shortened as necessary. > Connect the positive (+ve red) and negative (-ve black) leads of the power cable to the vessel. > Connect a fuse or circuit breaker to the positive lead of the appropriate rating for the circuit. (ie 2A for each handset) RECOMMENDED - Connect the handset power to a supply that will remain on even when the vessel's batteries may be turned off. (eg, 24hr circuit) This is important to ensure a handset remains charged and ready for use if it is put into Sleep mode and the vessels batteries are switched off. H1P Charging Cradle and H1 Bulkhead Connector Wiring Diagram H1 Non-powered Cradle H1P Charging Cradle H1 Bulkhead Connector Recommended screws 316 S/S Self Tapping 8G/1" (4.2/25.4mm) Pan/Round Head. 6 Red Black FUSE Power +ve Negative -ve Cradle and Bulkhead Connector wiring color codes Red Black DC positive (+ve) (12/24 volts). DC negative (-ve) Always use a fuse or circuit breaker installed near the battery end or bus bar end. Do not connect directly to a battery. If you must extend the power connections use quality tinned marine grade wire at least 16 AWG (1.5mm²). 7
-
 1
1 -
 2
2 -
 3
3 -
 4
4 -
 5
5 -
 6
6 -
 7
7 -
 8
8 -
 9
9 -
 10
10 -
11
-
12
-
13
 |
 |
