Garmin GMR xHD3 Radar Installation Instructions - Page 4
Installation Procedures, Preparing the Surface and the Radar for Mounting
 |
View all Garmin GMR xHD3 Radar manuals
Add to My Manuals
Save this manual to your list of manuals |
Page 4 highlights
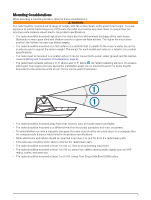
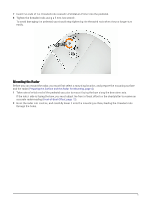
Installation Procedures Preparing the Surface and the Radar for Mounting Before you can mount the radar, you must choose a suitable mounting location (Mounting Considerations, page 3). 1 Secure the included mounting template to the surface at the mounting location, along the bow-stern axis, as indicated on the template. 2 Drill the mounting holes using a 15 mm (19/32 in.) drill bit. 3 If you need to run the power and network cables through the mounting surface, select a location under the power and network connectors indicated on the template, drill a pass-through hole for the cables using a 32 mm (11/4 in.) drill bit, and route the cables through the surface (optional) (Wiring and Connection Considerations, page 8). 4 Remove the mounting template from the surface. 5 Remove the hatch on the front of the pedestal by loosening the screw and lifting the hatch off of the hinges. 6 Apply the included Petrolatum Primer to one half of the threads of the four threaded rods. 4
-
 1
1 -
 2
2 -
 3
3 -
 4
4 -
 5
5 -
 6
6 -
 7
7 -
 8
8 -
 9
9 -
 10
10 -
11
-
12
-
13
-
14
-
15
-
16
-
17
-
18
-
19
-
20
 |
 |
