Garmin GMR xHD3 Radar Installation Instructions - Page 5
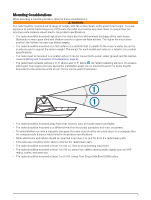
Mounting the Radar, Preparing the Surface and the Radar for Mounting, Front-of-Boat Offset
 |
View all Garmin GMR xHD3 Radar manuals
Add to My Manuals
Save this manual to your list of manuals |
Page 5 highlights
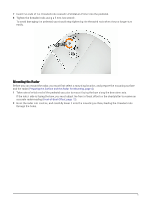
7 Insert the ends of the threaded rods coated in Petrolatum Primer into the pedestal. 8 Tighten the threaded rods using a 5 mm hex wrench. To avoid damaging the pedestal, you should stop tightening the threaded rods when they no longer turn easily. Mounting the Radar Before you can mount the radar, you must first select a mounting location, and prepare the mounting surface and the radar (Preparing the Surface and the Radar for Mounting, page 4). 1 Take note of which end of the pedestal you plan to mount facing the bow along the bow-stern axis. If the hatch side is facing the bow, you must adjust the front-of-boat offset on the chartplotter to receive an accurate radar reading (Front-of-Boat Offset, page 13). 2 Hoist the radar into position, and carefully lower it onto the mounting surface, feeding the threaded rods through the holes. 5
-
 1
1 -
 2
2 -
 3
3 -
 4
4 -
 5
5 -
 6
6 -
 7
7 -
 8
8 -
 9
9 -
 10
10 -
 11
11 -
12
-
13
-
14
-
15
-
16
-
17
-
18
-
19
-
20
 |
 |
