Garmin GTN 650 XM Satellite Radio Activation Instructions - Page 14
Verify the Radios are Ready to be Activated - operation
 |
View all Garmin GTN 650 manuals
Add to My Manuals
Save this manual to your list of manuals |
Page 14 highlights
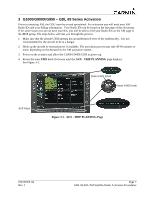
5. Rotate the inner FMS knob clockwise until the AUX-XM INFORMATION page is displayed. Press the INFO smart key to view your Audio Radio ID and Data Radio ID. See Figure 3-2 for these locations. 6. A list of Weather Products will also be shown on the bottom half of the screen. Boxes filled in green will correspond with the type of subscription you have access. For example, if the weather subscription you have purchased allows NEXRAD, the box next to NEXRAD will be green. Page Mode - Default INFO mode Figure 3-2. AUX-XM Information Page 3.1 Verify the Radios are Ready to be Activated The AUX - XM INFORMATION page has two modes, Radio Information and Radio Operation. The page should default to INFO mode (if the radio is not activated). You will need to be on this page when you call for activation. You can change modes with the RADIO/INFO soft keys. The INFO page should look like Figure 3-2. Pressing the RADIO smart key will display the AUX - XM RADIO page and will look similar to Figure 3-3. If the radio is inactivated and working properly the G1000/G900X/G950 will display the free-to-air channels, which are channel 0 (Radio ID) and channel 1 (XM Preview). If you can see the freeto-air channels and can hear channel 1, you are ready to activate your radios. Press the soft key under INFO and the page will return to the INFO page. Figure 3-3. AUX - XM Radio Page Page 8 GDL 69/69A XM Satellite Radio Activation Procedures 190-00355-04 Rev. J
-
 1
1 -
2
-
3
-
4
-
5
-
6
-
7
-
8
-
 9
9 -
 10
10 -
 11
11 -
 12
12 -
 13
13 -
 14
14 -
 15
15 -
 16
16 -
 17
17 -
 18
18 -
 19
19 -
20
-
21
-
22
-
23
-
24
-
25
-
26
-
27
-
28
-
29
-
30
-
31
-
32
-
33
-
34
-
35
-
36
-
37
-
38
-
39
-
40
-
41
-
42
-
43
-
44
-
45
-
46
 |
 |
